Introduction 00:00
Materials are used to put a color on each visible pixel of the geometries.
The algorithms that decide on the color of each pixel are written in programs called shaders. Writing shaders is one of the most challenging parts of WebGL and Three.js, but don't worry; Three.js has many built-in materials with pre-made shaders.
We will discover how to create our own shaders in a future lesson. For now, let's use Three.js materials.
Setup 01:25
The starter doesn't contain any object and you should get a black render. This is an excellent occasion to revise the basics of creating Meshes.
Prepare our scene 01:45
To test the materials, we should prepare a lovely scene and load some textures.
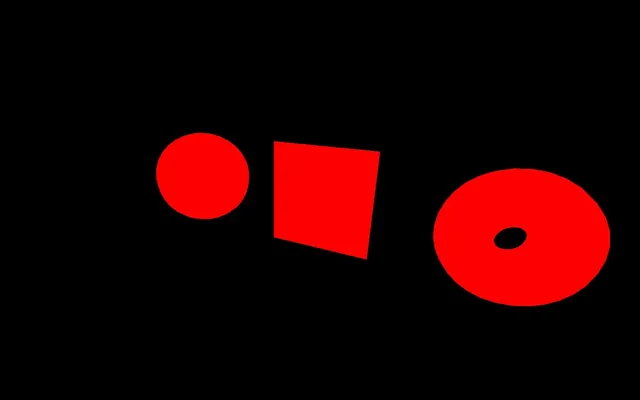
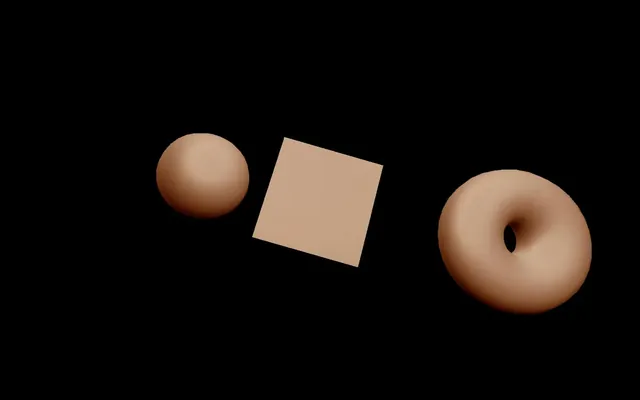
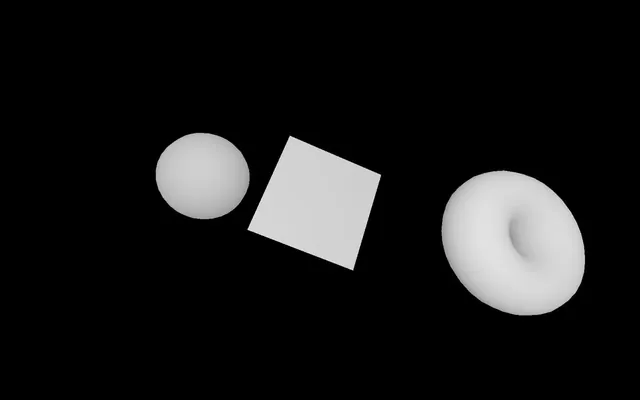
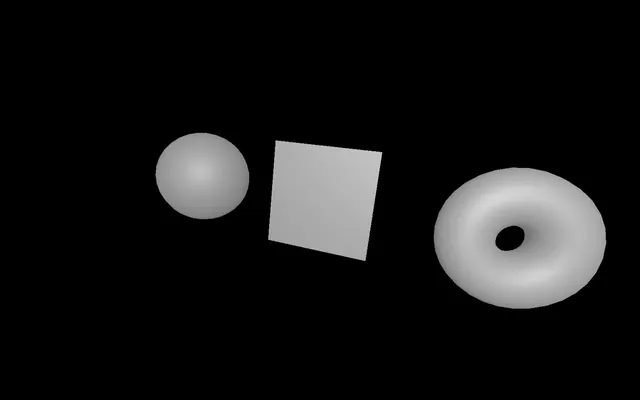
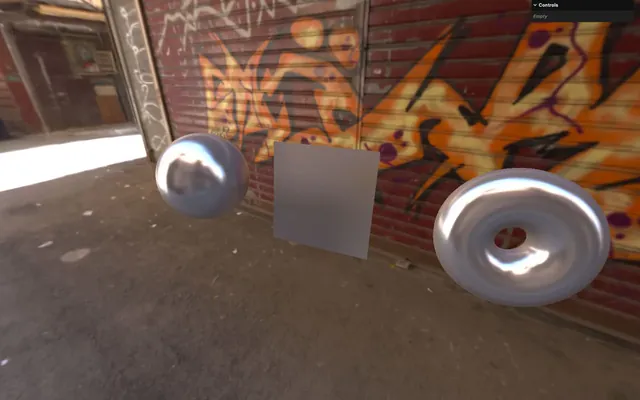
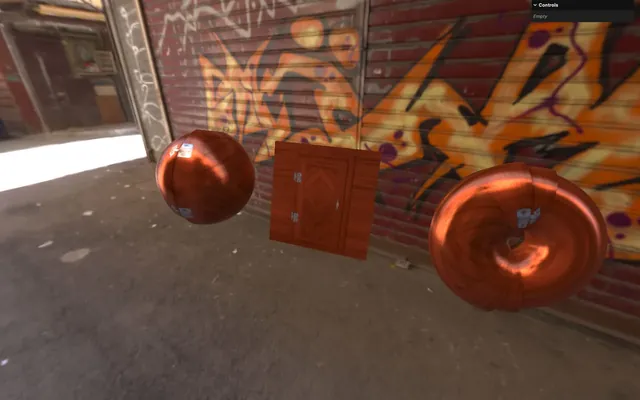
Create 3 Meshes composed of 3 different geometries (a sphere, a plane, and a torus) and use the same MeshBasicMaterial on all of the 3. Yes, you can use one material on multiple meshes. Move the sphere on the left and the torus on the right to separate them.
The add(...) method supports adding multiple objects at once:
/**
 * Objects
 */
// MeshBasicMaterial
const material = new THREE.MeshBasicMaterial()

const sphere = new THREE.Mesh(
    new THREE.SphereGeometry(0.5, 16, 16),
    material
)
sphere.position.x = - 1.5

const plane = new THREE.Mesh(
    new THREE.PlaneGeometry(1, 1),
    material
)

const torus = new THREE.Mesh(
    new THREE.TorusGeometry(0.3, 0.2, 16, 32),
    material
)
torus.position.x = 1.5

scene.add(sphere, plane, torus)

We can now rotate our objects on our tick function, as we did in the Animation lesson:
/**
 * Animate
 */
const clock = new THREE.Clock()

const tick = () =>
{
    const elapsedTime = clock.getElapsedTime()

    // Update objects
    sphere.rotation.y = 0.1 * elapsedTime
    plane.rotation.y = 0.1 * elapsedTime
    torus.rotation.y = 0.1 * elapsedTime

    sphere.rotation.x = 0.15 * elapsedTime
    plane.rotation.x = 0.15 * elapsedTime
    torus.rotation.x = 0.15 * elapsedTime

    // ...
}

tick()
You should see your 3 objects spinning slowly.
Let’s use - 0.15 * elapsedTime for the rotation.x to ensure that they rotate the other way and we appreciate the plane for longer before it disappears:
sphere.rotation.x = - 0.15 * elapsedTime
plane.rotation.x = - 0.15 * elapsedTime
torus.rotation.x = - 0.15 * elapsedTime
The materials we are going to discover are using textures in many different ways. Let's load some textures using the TextureLoader as we did in the Textures lesson.
All the texture images are located in the static/textures/ folder. For now, we will load all the door textures located in the static/textures/door/ folder, the first matcap texture located in the static/textures/matcaps/ folder, and the first gradient texture located in the static/textures/gradients/ folder.
Make sure to do that before instantiating the material:
/**
 * Textures
 */
const textureLoader = new THREE.TextureLoader()

const doorColorTexture = textureLoader.load('./textures/door/color.jpg')
const doorAlphaTexture = textureLoader.load('./textures/door/alpha.jpg')
const doorAmbientOcclusionTexture = textureLoader.load('./textures/door/ambientOcclusion.jpg')
const doorHeightTexture = textureLoader.load('./textures/door/height.jpg')
const doorNormalTexture = textureLoader.load('./textures/door/normal.jpg')
const doorMetalnessTexture = textureLoader.load('./textures/door/metalness.jpg')
const doorRoughnessTexture = textureLoader.load('./textures/door/roughness.jpg')
const matcapTexture = textureLoader.load('./textures/matcaps/1.png')
const gradientTexture = textureLoader.load('./textures/gradients/3.jpg')
As we’ve seen previously, textures used as map and matcap are supposed to be encoded in sRGB and we need to inform Three.js of this by setting their colorSpace to THREE.SRGBColorSpace:
doorColorTexture.colorSpace = THREE.SRGBColorSpace
matcapTexture.colorSpace = THREE.SRGBColorSpace
To ensure that all the textures are well loaded, you can use them on your material with the map property, as we saw in the Textures lesson.
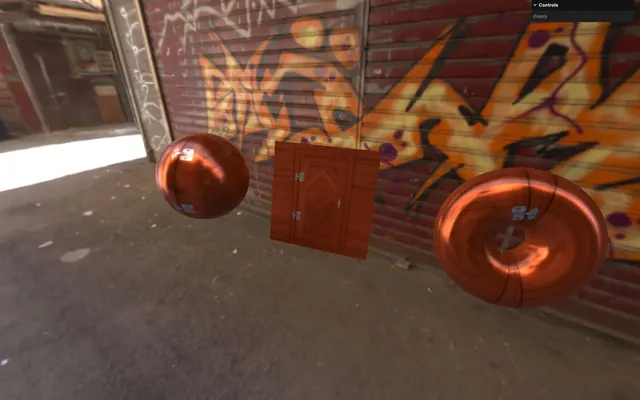
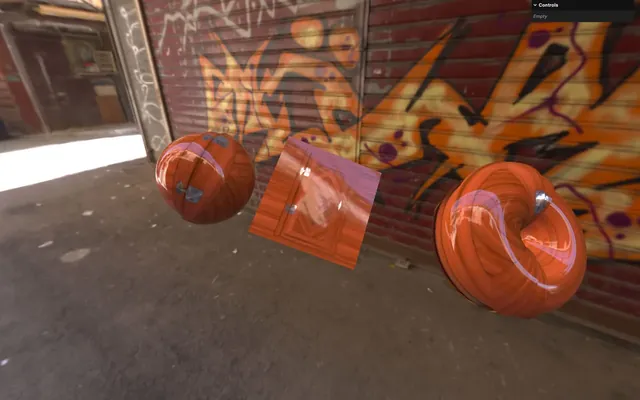
const material = new THREE.MeshBasicMaterial({ map: doorColorTexture })

Until now, we only used the MeshBasicMaterial, which applies a uniform color or texture to our geometry.
If you search for "material" on the Three.js documentation, you'll see that there are many classes we can use. Let's try them.
MeshBasicMaterial 13:59
MeshBasicMaterial is probably the most "basic" material... But there are multiple properties that we haven't covered yet.
You can set most of those properties while instancing the material in the object we send as a parameter, but you can also change those properties in the instance directly:
const material = new THREE.MeshBasicMaterial({
    map: doorColorTexture
})

// Equivalent
const material = new THREE.MeshBasicMaterial()
material.map = doorColorTexture
We will use the second method for the rest of the lesson, but feel free to do whatever you like.
Map
The map property will apply a texture on the surface of the geometry:
material.map = doorColorTextureColor
The color property will apply a uniform color on the surface of the geometry. When you are changing the color property directly, you must instantiate a Color class. You can use many different formats.
Try commenting on the map first and test those color formats:
// material.map = doorColorTexture
material.color = new THREE.Color('#ff0000')
material.color = new THREE.Color('#f00')
material.color = new THREE.Color('red')
material.color = new THREE.Color('rgb(255, 0, 0)')
material.color = new THREE.Color(0xff0000)
Combining color and map will tint the texture with the color:
material.map = doorColorTexture
material.color = new THREE.Color('#ff0000')
Wireframe
The wireframe property will show the triangles that compose your geometry with a thin line of 1px regardless of the distance of the camera:
// material.map = doorColorTexture
// material.color = new THREE.Color('#ff0000')
material.wireframe = true
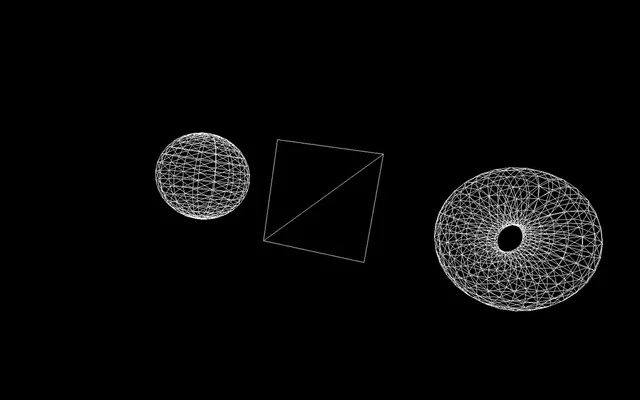
As you can see, the plane is composed of only two triangles, which will become a problem later in the lesson.
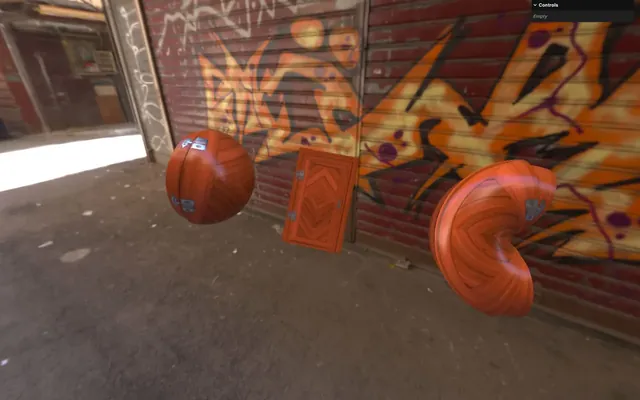
Opacity
The opacity property controls the transparency but, to work, you need to set the transparent property to true in order to inform Three.js that this material now supports transparency.
// material.map = doorColorTexture
// material.color = new THREE.Color('#ff0000')
// material.wireframe = true
material.transparent = true
material.opacity = 0.5

Although it looks gray, it’s not because we can just see the black background through the white material.
AlphaMap
Now that the transparency is working, we can use the alphaMap property to control the transparency with a texture:
// material.map = doorColorTexture
// material.color = new THREE.Color('#ff0000')
// material.wireframe = true
material.transparent = true
// material.opacity = 0.5
material.alphaMap = doorAlphaTexture
Side
The side property lets you decide which side of the faces is visible. By default, the front side is visible (THREE.FrontSide), but you can show the backside instead (THREE.BackSide) or both (THREE.DoubleSide):
// material.map = doorColorTexture
// material.color = new THREE.Color('#ff0000')
// material.wireframe = true
// material.transparent = true
// material.opacity = 0.5
// material.alphaMap = doorAlphaTexture
material.side = THREE.DoubleSide
You should see both the front and the back of the plane.
Try to avoid using THREE.DoubleSide whenever possible because it actually requires more resources when rendering, even though the side isn’t visible.
Some of these properties like wireframe or opacity can be used with most following materials. We won't repeat those every time.
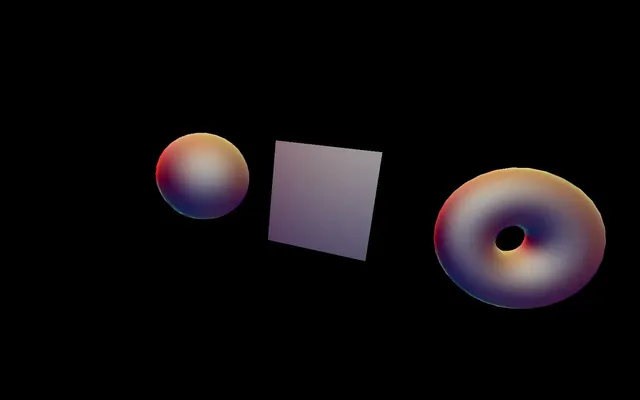
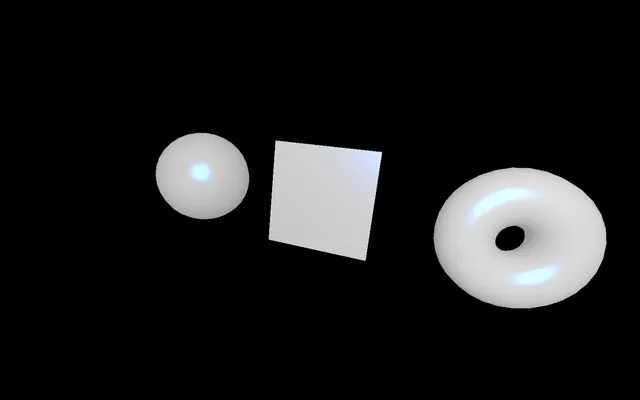
MeshNormalMaterial 22:04
The MeshNormalMaterial displays a nice purple, blueish color that looks like the normal texture we saw in the Textures lessons. That is no coincidence because both are related to what we call “normals”.
We are going to call it material as well to make sure that it replaces the material on all objects and comment the MeshBasicMaterial in case you want to get back to it at some point:
// // MeshBasicMaterial
// const material = new THREE.MeshBasicMaterial()
// material.map = doorColorTexture
// material.color = new THREE.Color('#ff0000')
// material.wireframe = true
// material.transparent = true
// material.opacity = 0.5
// material.alphaMap = doorAlphaTexture
// material.side = THREE.DoubleSide

// MeshNormalMaterial
const material = new THREE.MeshNormalMaterial()
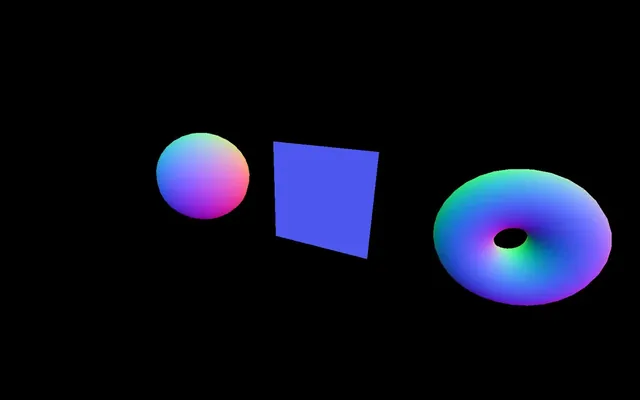
Normals are information encoded in each vertex that contains the direction of the outside of the face. If you displayed those normals as arrows, you would get straight lines coming out of each vertex that compose your geometry.
You can use Normals for many things like calculating how to illuminate the face or how the environment should reflect or refract on the geometries' surface.
When using the MeshNormalMaterial, the color will just display the normal orientation relative to the camera. If you rotate around the sphere, you'll see that the color is always the same, regardless of which part of the sphere you're looking at.
While you can use some of the properties we discovered with the MeshBasicMaterial like wireframe, transparent, opacity, and side, there is also a new property that you can use, which is called flatShading:
material.flatShading = true

flatShading will flatten the faces, meaning that the normals won't be interpolated between the vertices.
MeshNormalMaterial can be useful to debug the normals, but it also looks great, and you can use it just the way it is, similar to what ilithya did on her portfolio https://www.ilithya.rocks.
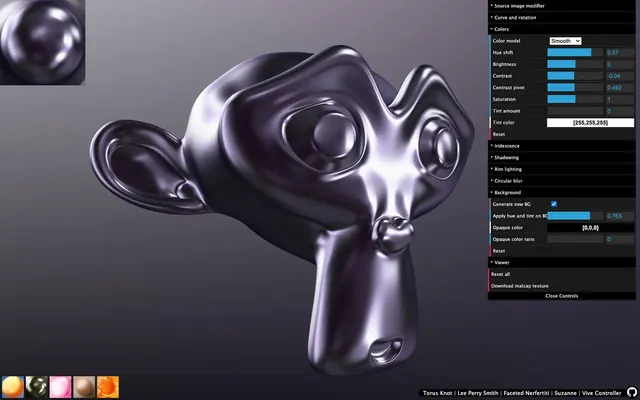
MeshMatcapMaterial 26:24
MeshMatcapMaterial is a fantastic material because of how great it can look while remaining very performant.
For it to work, the MeshMatcapMaterial needs a reference texture that looks like a sphere.
The material will then pick colors from the texture according to the normal orientation relative to the camera.
Comment the previous material, instantiate a MeshMatcapMaterial, and set its matcap property to matcapTexture:
// // MeshNormalMaterial
// const material = new THREE.MeshNormalMaterial()
// material.flatShading = true

// MeshMatcapMaterial
const material = new THREE.MeshMatcapMaterial()
material.matcap = matcapTexture
The meshes will appear illuminated, but it's an illusion created by the texture. There is no light in the scene.
The only problem is that the result is the same regardless of the camera orientation. Also, you cannot update the lights because there are none.
Try different textures available on the /static/textures/matcaps/ folder (just one of the lines below):
const matcapTexture = textureLoader.load('/textures/matcaps/2.png')
const matcapTexture = textureLoader.load('/textures/matcaps/3.png')
const matcapTexture = textureLoader.load('/textures/matcaps/4.png')
const matcapTexture = textureLoader.load('/textures/matcaps/5.png')
const matcapTexture = textureLoader.load('/textures/matcaps/6.png')
const matcapTexture = textureLoader.load('/textures/matcaps/7.png')
const matcapTexture = textureLoader.load('/textures/matcaps/8.png')
If you want to know where to find matcaps textures, then check out the following vast list of matcaps: https://github.com/nidorx/matcaps
Note that licenses aren’t all verified and you might not be allowed to use them other than for personal projects.
You can also create your own matcaps using 3D software by rendering a sphere in front of the camera in a square image. You can even try to create a matcap in 2D software like Photoshop. And finally, you can use online tools just like the one Kevin Chapelier built: https://www.kchapelier.com/matcap-studio/:
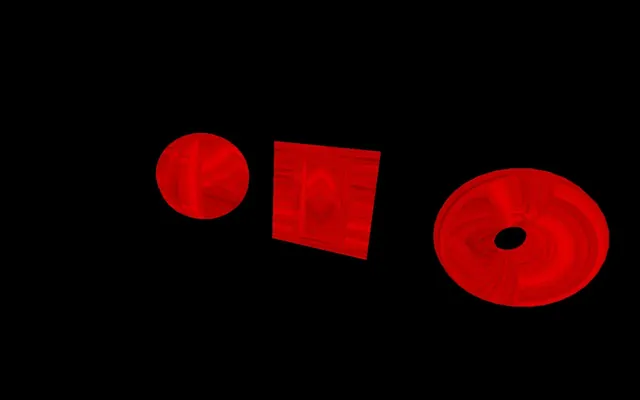
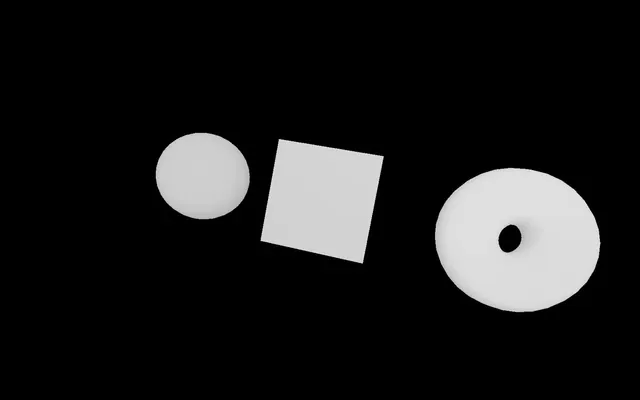
MeshDepthMaterial 32:37
The MeshDepthMaterial will simply color the geometry in white if it's close to the camera's near value and in black if it's close to the far value of the camera:
// // MeshMatcapMaterial
// const material = new THREE.MeshMatcapMaterial()
// material.matcap = matcapTexture

// MeshDepthMaterial
const material = new THREE.MeshDepthMaterial()
It’s actually a little more complex than that and this material is actually used to save the depth in a texture, which can be used for later complex computations like handling shadows.
We will learn more about it in a future lesson.
MeshLambertMaterial 33:45
The next material is the MeshLambertMaterial:
// // MeshDepthMaterial
// const material = new THREE.MeshDepthMaterial()

// MeshLambertMaterial
const material = new THREE.MeshLambertMaterial()

What just happened? The screen is now entirely black although there is no error in the console.
Here’s the thing: The MeshLambertMaterial is the first material in the list that requires lights to be seen.
Well, let’s add some lights.
Adding a few lights
We are going to add two simple lights to our scene but we are not going to dive too deep into the topic because there is a whole lesson dedicated to lights.
Create an AmbientLight and add it to the scene:
/**
 * Lights
 */
const ambientLight = new THREE.AmbientLight(0xffffff, 1)
scene.add(ambientLight)
Create a PointLight and add it to the scene:
// ...

const pointLight = new THREE.PointLight(0xffffff, 30)
pointLight.position.x = 2
pointLight.position.y = 3
pointLight.position.z = 4
scene.add(pointLight)
Things are getting realistic, as you can see. While the illumination isn't very convincing, it's a good start.
MeshLambertMaterial supports the same properties as the MeshBasicMaterial but also some properties related to lights. We will cover those properties later in the lesson with more adequate materials.
The MeshLambertMaterial is the most performant material that uses lights. Unfortunately, the parameters aren't convenient, and you can see strange patterns in the geometry if you look closely at rounded geometries like the sphere.
MeshPhongMaterial 38:02
The MeshPhongMaterial is very similar to the MeshLambertMaterial, but the strange patterns are less visible, and you can also see the light reflection on the surface of the geometry:
// // MeshLambertMaterial
// const material = new THREE.MeshLambertMaterial()

// MeshPhongMaterial
const material = new THREE.MeshPhongMaterial()
MeshPhongMaterial is less performant than MeshLambertMaterial. However, it doesn't really matter at this level.
You can control the light reflection with the shininess property. The higher the value, the shinier the surface. You can also change the color of the reflection by using the specular property:
material.shininess = 100
material.specular = new THREE.Color(0x1188ff)
MeshToonMaterial 40:02
The MeshToonMaterial is similar to the MeshLambertMaterial in terms of properties but with a cartoonish style:
// // MeshPhongMaterial
// const material = new THREE.MeshPhongMaterial()
// material.shininess = 100
// material.specular = new THREE.Color(0x1188ff)

// MeshToonMaterial
const material = new THREE.MeshToonMaterial()
By default, you only get a two-part coloration (one for the shadow and one for the light). To add more steps to the coloration, you can use the gradientTexture we loaded at the start of the lesson on the gradientMap property:
material.gradientMap = gradientTexture
The cartoon effect doesn't work anymore. It’s because the gradient texture is actually a very very small texture of 3 by 1 pixels. When extracting the pixels from this texture, the GPU will blend them.
Instead of this:

We get this:

Fortunately, we can control how the GPU handles such texture thanks to the minFilter, magFilter, similar to what we saw in the Textures lesson when talking about mipmapping.
Change the minFilter and magFilter to THREE.NearestFilter.
// MeshToonMaterial
const material = new THREE.MeshToonMaterial()
gradientTexture.minFilter = THREE.NearestFilter
gradientTexture.magFilter = THREE.NearestFilter
material.gradientMap = gradientTexture
You should now see the cartoon effect with an intermediate step.
And because the THREE.NearestFilter isn’t actually using any mipmap versions of the texture, we can deactivate the generation of the mipmaps in order to free some memory by setting gradientTexture.generateMipmaps to false:
gradientTexture.minFilter = THREE.NearestFilter
gradientTexture.magFilter = THREE.NearestFilter
gradientTexture.generateMipmaps = false
You can try out even more steps by using the image located in static/textures/gradients.5.jpg:
const gradientTexture = textureLoader.load('/textures/gradients/5.jpg')MeshStandardMaterial 44:42
The MeshStandardMaterial uses physically based rendering principles. Yes, we are talking about the PBR we saw in the Textures lesson. Like the MeshLambertMaterial and the MeshPhongMaterial, it supports lights but with a more realistic algorithm and better parameters like roughness and metalness.
It's called "standard" because the PBR has become the standard in many software, engines, and libraries. The idea is to have a realistic result with realistic parameters, and you should have a very similar result, regardless of the technology you are using:
// // MeshToonMaterial
// const material = new THREE.MeshToonMaterial()
// gradientTexture.minFilter = THREE.NearestFilter
// gradientTexture.magFilter = THREE.NearestFilter
// gradientTexture.generateMipmaps = false
// material.gradientMap = gradientTexture
// MeshStandardMaterial
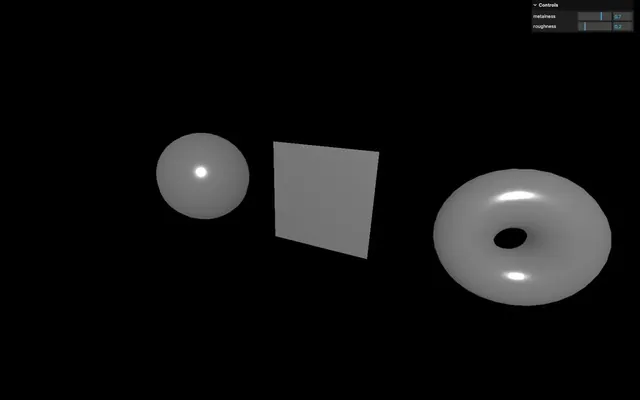
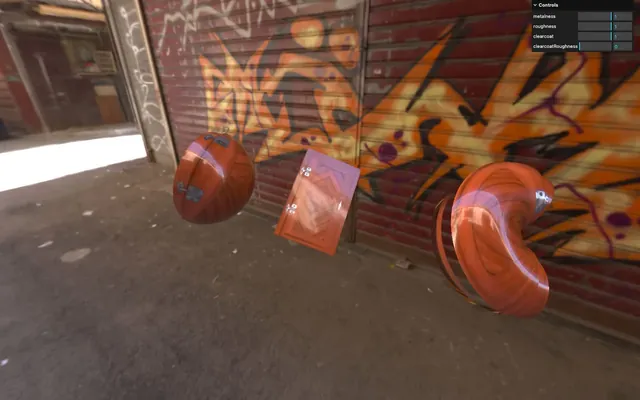
const material = new THREE.MeshStandardMaterial()

You can change the roughness and the metalness properties directly:
material.metalness = 0.45
material.roughness = 0.65
Add a debug UI
Now would be an excellent time to add a debug UI. This will be very useful to test the different properties.
First, we must add the lil-gui dependency to our project. In the terminal, in the project folder (where the server should be currently running), use the following command:
npm install lil-guiThen, on top of your code, import lil-gui (don't forget to re-launch the server with npm run dev if you stopped it):
import GUI from 'lil-gui'You can now create an instance of GUI:
/**
 * Debug
 */
const gui = new GUI()
Then, add the tweaks (after creating the material):
const material = new THREE.MeshStandardMaterial()
material.metalness = 0.45
material.roughness = 0.65

gui.add(material, 'metalness').min(0).max(1).step(0.0001)
gui.add(material, 'roughness').min(0).max(1).step(0.0001)
And that's it. You can now change the metalness and the roughness however you see fit.
Adding an environment map
We are not done with the MeshStandardMaterial, but before going any further, we are going to add an additional feature called environment map.
The environment map is like an image of what's surrounding the scene and you can find it in /static/textures/environmentMap/2k.hdr. You might be able to preview it if your OS supports it. If not, don’t worry, as it’s not important and Three.js will be able to handle it.
You can use it to add reflection, refraction but also lighting to your objects, in addition to the current DirectionalLight and AmbientLight.
Just like for the lights, we are not going to cover this in detail because there is a lesson dedicated to it in which you’ll also learn a bunch of ways to create your own environment maps.
Let's start by changing the metalness and the roughness of MeshStandardMaterial so that we can appreciate the upcoming environment map:
const material = new THREE.MeshStandardMaterial()
material.metalness = 0.7
material.roughness = 0.2
To load the previously mentioned environment map file, we need to use the RGBELoader. Import RGBELoader from three/examples/jsm/loaders/RGBELoader.js:
import { RGBELoader } from 'three/examples/jsm/loaders/RGBELoader.js'Next, we need to instantiate it as rgbeLoader and use its load() method to load the ./textures/environmentMap/2k.hdr file:
/**
 * Environment map
 */
const rgbeLoader = new RGBELoader()
rgbeLoader.load('./textures/environmentMap/2k.hdr', (environmentMap) =>
{
    console.log(environmentMap)
})
Unlike the textureLoader, we need to send a callback function as the second parameter. We can retrieve the loaded environment map as the parameter of that function.
To apply it to our scene, we need to change its mapping property to THREE.EquirectangularReflectionMapping and then assign it to the background and environment properties of the scene:
rgbeLoader.load('./textures/environmentMap/2k.hdr', (environmentMap) =>
{
    environmentMap.mapping = THREE.EquirectangularReflectionMapping

    scene.background = environmentMap
    scene.environment = environmentMap
})
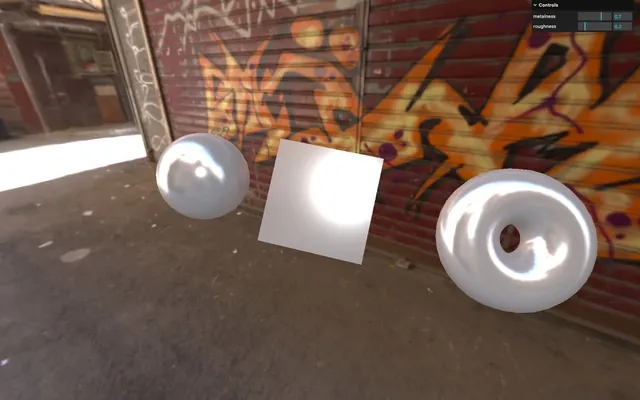
You should see the environment reflect on the surface of the geometry. Try to tweak the metalness and roughness for different results.
Although we’ve only added the environment map now, it is also compatible with MeshLambertMaterial and MeshPhongMaterial.
And since the environment map is enough on its own, we are going to remove or comment the AmbientLight and the PointLight:
// const ambientLight = new THREE.AmbientLight(0xffffff, 1)
// scene.add(ambientLight)

// const pointLight = new THREE.PointLight(0xffffff, 30)
// pointLight.position.x = 2
// pointLight.position.y = 3
// pointLight.position.z = 4
// scene.add(pointLight)
More properties
Let's continue with the other properties of the MeshStandardMaterial.
The map property allows you to apply a simple texture. You can use doorColorTexture:
material.map = doorColorTexture

The aoMap property (literally "ambient occlusion map") will add shadows where the texture is dark.
Then, add the aoMap using the doorAmbientOcclusionTexture texture and control the intensity using the aoMapIntensity property:
material.aoMap = doorAmbientOcclusionTexture
material.aoMapIntensity = 1
The crevices should look darker, which creates contrast and adds dimension.
Note that the aoMap only affects light created by AmbientLight, the environment map, and the HemisphereLight you’ll see in a later lesson.
The displacementMap property will move the vertices to create true relief:
material.displacementMap = doorHeightTexture
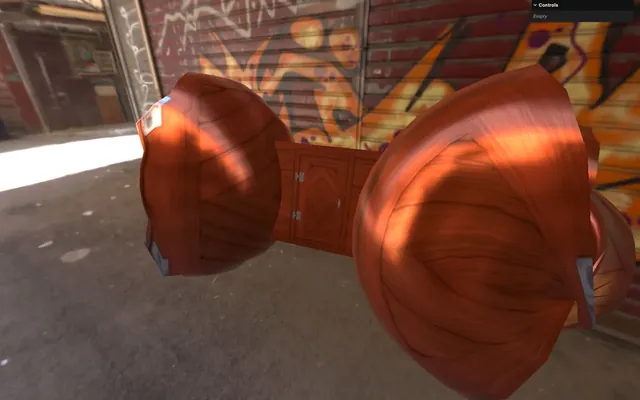
It should look terrible. That is due to the lack of vertices on our geometries and the displacement being way too strong.
Add more subdivisions to the geometries:
new THREE.SphereGeometry(0.5, 64, 64),

// ...

new THREE.PlaneGeometry(1, 1, 100, 100),

// ...

new THREE.TorusGeometry(0.3, 0.2, 64, 128),
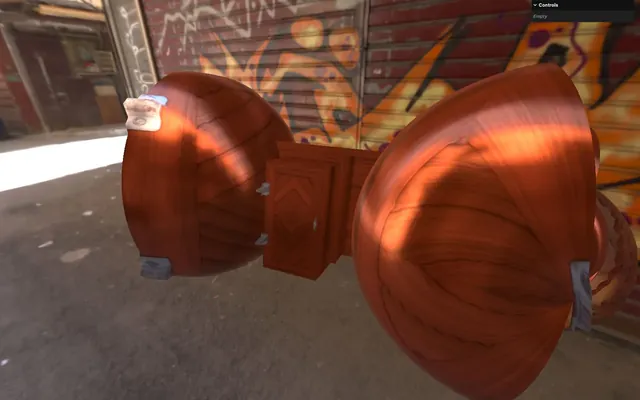
Elevations look more precise, but way too strong. We can control that with the displacementScale property:
material.displacementScale = 0.1
Instead of specifying uniform metalness and roughness for the whole geometry, we can use metalnessMap and roughnessMap:
material.metalnessMap = doorMetalnessTexture
material.roughnessMap = doorRoughnessTexture
The reflection looks weird because the metalness and roughness properties still affect the metalnessMap and roughnessMap. In order to work properly, we need to set both the metalness and roughness to 1:
material.metalness = 1
material.roughness = 1
We can now enjoy reflections on the metal parts of the door. Note that the texture is made to look like there is a varnish coating on the wood, which is why we can still perceive some reflections.
The normalMap will fake the normal orientation and add details to the surface regardless of the subdivision:
material.normalMap = doorNormalTextureYou can change the normal intensity with the normalScale property. Be careful, it's a Vector2:
material.normalScale.set(0.5, 0.5)And finally, you can control the alpha using the alphaMap property. Don't forget to set the transparent property to true:
material.transparent = true
material.alphaMap = doorAlphaTexture
MeshPhysicalMaterial 01:04:56
The MeshPhysicalMaterial is the same as the MeshStandardMaterial but with the support of additional effects such as clearcoat, sheen, iridescence, and transmission.
To implement this material, duplicate the whole MeshStandardMaterial, its properties, and its tweaks, then replace the class with MeshPhysicalMaterial. Don’t forget to comment the MeshStandardMaterial:
/**
 * MeshPhysicalMaterial
 */
// Base material
const material = new THREE.MeshPhysicalMaterial()
material.metalness = 1
material.roughness = 1
material.map = doorColorTexture
material.aoMap = doorAmbientOcclusionTexture
material.aoMapIntensity = 1
material.displacementMap = doorHeightTexture
material.displacementScale = 0.1
material.metalnessMap = doorMetalnessTexture
material.roughnessMap = doorRoughnessTexture
material.normalMap = doorNormalTexture
material.normalScale.set(0.5, 0.5)

gui.add(material, 'metalness').min(0).max(1).step(0.0001)
gui.add(material, 'roughness').min(0).max(1).step(0.0001)

All previous properties are supported because MeshPhysicalMaterial inherits from MeshStandardMaterial and now we can access those new features. We are going to try them separately while keeping this base material.
Clearcoat
The clearcoat will simulate a thin layer of varnish on top of the actual material. This layer has its own reflective properties while we can still see the default material behind it.
Here’s an example.
Add the clearcoat and clearcoatRoughness properties with their corresponding tweaks:
// Clearcoat
material.clearcoat = 1
material.clearcoatRoughness = 0

gui.add(material, 'clearcoat').min(0).max(1).step(0.0001)
gui.add(material, 'clearcoatRoughness').min(0).max(1).step(0.0001)
It feels like there is a glass on top of the same material.
Sheen
The sheen will highlight the material when seen from a narrow angle. We can usually see this effect on fluffy material like fabric.
Here’s an example.
Comment the clearcoat part.
Add the sheen, sheenRoughness, and sheenColor properties with their respective tweaks:
// Sheen
material.sheen = 1
material.sheenRoughness = 0.25
material.sheenColor.set(1, 1, 1)

gui.add(material, 'sheen').min(0).max(1).step(0.0001)
gui.add(material, 'sheenRoughness').min(0).max(1).step(0.0001)
gui.addColor(material, 'sheenColor')
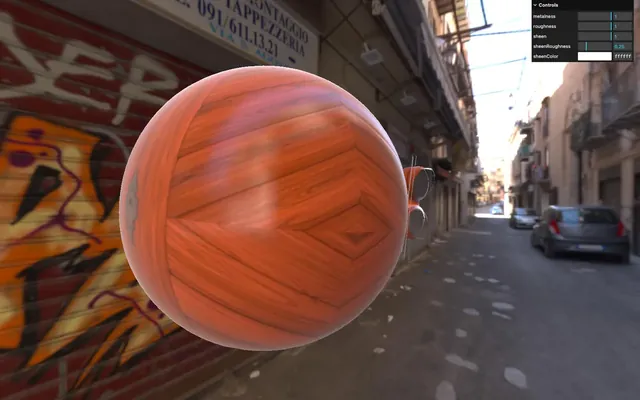
Again, this effect is applied to the material when seen at a narrow angle. Although it works best with fabric-like materials, it makes the material feel kind of soft.
Iridescence
The iridescence is an effect where we can see color artifacts like a fuel puddle, soap bubbles, or even LaserDiscs for those who are old enough to remember them.
Here’s an example.
Comment the sheen part.
Add the iridescence, iridescenceIOR, and iridescenceThicknessRange properties with their respective tweaks:
// Iridescence
material.iridescence = 1
material.iridescenceIOR = 1
material.iridescenceThicknessRange = [ 100, 800 ]

gui.add(material, 'iridescence').min(0).max(1).step(0.0001)
gui.add(material, 'iridescenceIOR').min(1).max(2.333).step(0.0001)
gui.add(material.iridescenceThicknessRange, '0').min(1).max(1000).step(1)
gui.add(material.iridescenceThicknessRange, '1').min(1).max(1000).step(1)
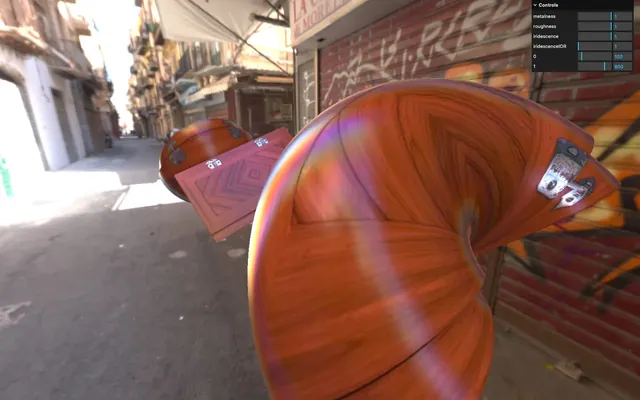
Just like the two previous effects, the iridescence is mostly visible on the material when seen at a narrow angle.
Transmission
The transmission will enable light to go through the material. It’s more than just transparency with opacity because the image behind the object gets deformed.
Here’s an example.
Comment the iridescence part.
Add the transmission, ior, and thickness properties with their respective tweaks:
// Transmission
material.transmission = 1
material.ior = 1.5
material.thickness = 0.5

gui.add(material, 'transmission').min(0).max(1).step(0.0001)
gui.add(material, 'ior').min(1).max(10).step(0.0001)
gui.add(material, 'thickness').min(0).max(1).step(0.0001)
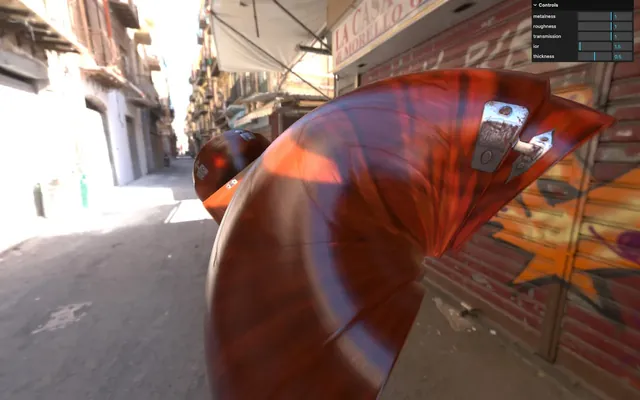
The objects feel translucent.
ior stands for Index Of Refraction and depends on the type of material you want to simulate.
A diamond has an ior of 2.417, water has an ior of 1.333 and air has an ior of 1.000293.
You can find the whole list on Wikipedia https://en.wikipedia.org/wiki/List_of_refractive_indices
The thickness is a fixed value and the actual thickness of the object isn’t taken into account.
Currently, we have a lot of maps messing up our material, but the transmission looks really good with a pure material too.
Remove or comment all the maps and set the metalness and roughness to 0:
const material = new THREE.MeshPhysicalMaterial()
material.metalness = 0
material.roughness = 0
// material.map = doorColorTexture
// material.aoMap = doorAmbientOcclusionTexture
// material.aoMapIntensity = 1
// material.displacementMap = doorHeightTexture
// material.displacementScale = 0.1
// material.metalnessMap = doorMetalnessTexture
// material.roughnessMap = doorRoughnessTexture
// material.normalMap = doorNormalTexture
// material.normalScale.set(0.5, 0.5)
// material.transparent = true
// material.alphaMap = doorAlphaTexture
The cool part is that we can still play with the roughness and get a glossy result:
That’s all for the MeshPhysicalMaterial. Note that we haven’t checked every possible property of it but the other properties aren’t as relevant.
Also, keep in mind that MeshPhysicalMaterial is the worst material in terms of performance. Don’t expect a good frame rate on every device, if you apply this material to many objects covering most of the screen.
Materials for later 01:19:31
And then there are the materials we won’t test in this lesson because they require a little more knowledge before tackling them, knowledge that we will acquire later in the course.
PointsMaterial
You can use PointsMaterial to handle particles, their size, their color, what’s drawn in them, etc.
ShaderMaterial and RawShaderMaterial
ShaderMaterial and RawShaderMaterial can both be used to create your own materials using a special language named GLSL. It’s such a complex topic that a whole chapter is dedicated to it.
Conclusion 01:20:08
That was a lot of materials with many properties. Do not worry, we are going to use them throughout the whole course in order to practice.
Feel free to tweak them and add them to the Debug UI.
We’ve also grasped topics such as lights and environment maps. While they probably feel a little fuzzy, as mentioned earlier, we are going to cover those topics in depth throughout dedicated lessons.
Finally, don’t forget that the materials you use can have a drastic impact on performance. Always keep an eye on the frame rate, especially on weak devices like mobiles.