Introduction 00:00
We’ve already talked about environment maps in a previous lesson.
It’s those images surrounding the scene that can be used as a background, but also directly on the objects as reflection and lighting. Yes, you’ve read it right, environment maps can be used to light up the whole scene in a very realistic manner.
In this lesson, we are going to discover the different formats of environment maps and the various techniques to implement them.
We are also going to discover how to find and generate those environment maps using resources such as Blender and Artificial Intelligence-powered image generators.
Setup 00:56
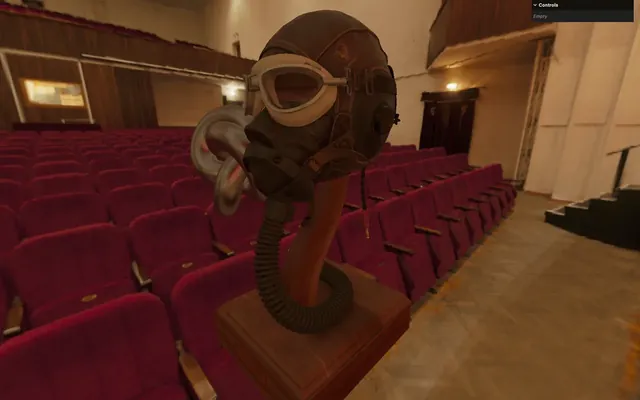
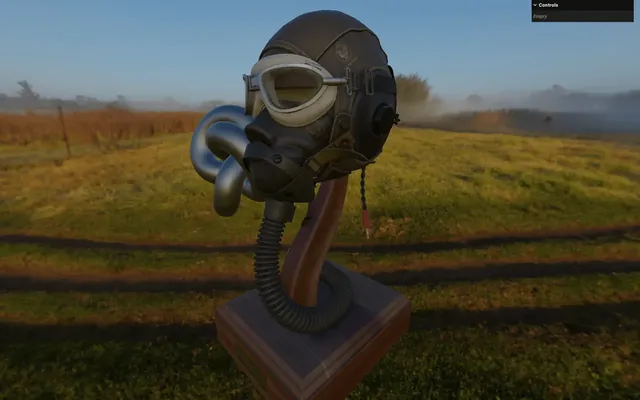
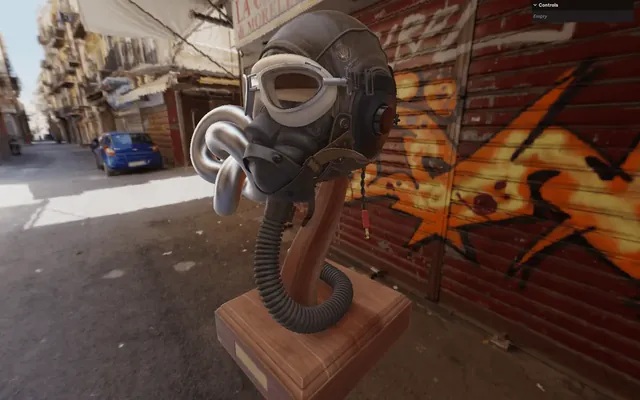
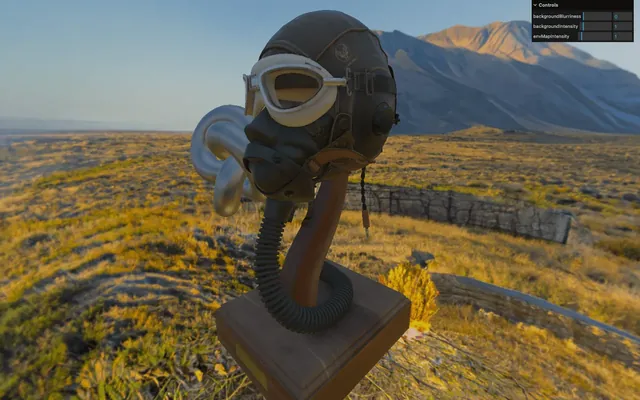
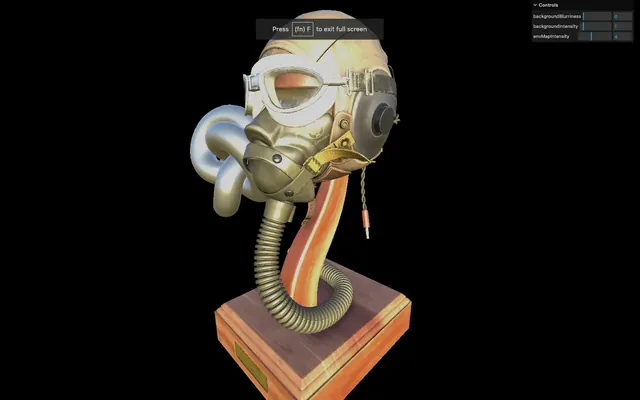
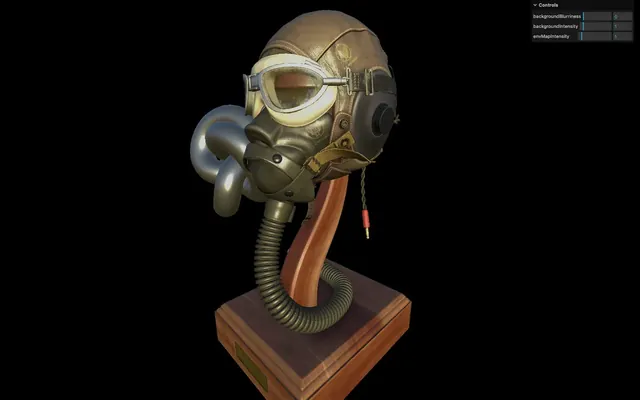
We are going to use a realistic model with many details and material variations in order to appreciate the different environment maps we are going to test. We will use the Flight Helmet from the GLTF Sample Models repository and you can find it in the /static/models/ folder.
For now, all we have in our scene is a white torus knot and an instance of lil-gui.
Model 02:01
Let's load our model.
First, instantiate the GLTFLoader. We will regroup the different loaders together right after the imports. The main reason for doing so is the ability to regroup things together:
import { GLTFLoader } from 'three/examples/jsm/loaders/GLTFLoader.js'

/**
 * Loaders
 */
const gltfLoader = new GLTFLoader()
We don't need the DRACOLoader because the model isn't compressed. But if you load a Draco compressed model, instantiate the DRACOLoader as we did in a previous lesson.
We can now load our model located in /static/models/FlightHelmet/glTF/FlightHelmet.gltf:
/**
 * Models
 */
gltfLoader.load(
    '/models/FlightHelmet/glTF/FlightHelmet.gltf',
    (gltf) =>
    {
        console.log('success')
        console.log(gltf)
    }
)

As always, go slow, make sure that the model is well loaded without any errors.
Because it's a complex model, we will simply add the gltf.scene group to our own scene:
gltfLoader.load(
'/models/FlightHelmet/glTF/FlightHelmet.gltf',
(gltf) =>
{
scene.add(gltf.scene)
}
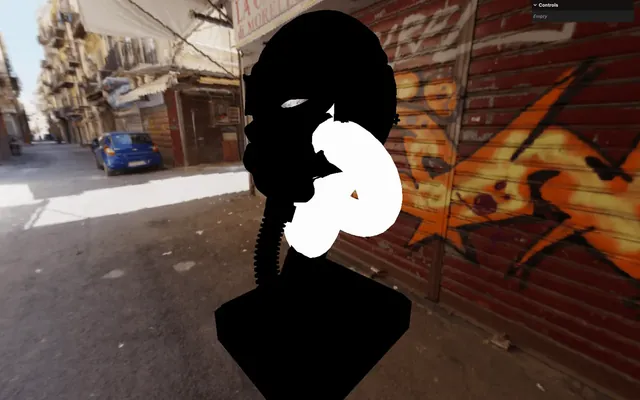
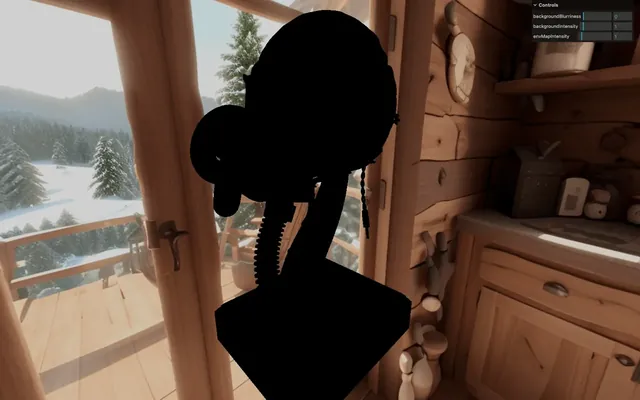
)Can’t see it? Move the camera underneath the white torus knot and you should see the helmet’s silhouette.

The model is too small, but also fully black because its materials are MeshStandardMaterial instances and those need light.
We are going to add lighting in a minute, but for now, let’s make the model bigger:
gltfLoader.load(
    '/models/FlightHelmet/glTF/FlightHelmet.gltf',
    (gltf) =>
    {
        gltf.scene.scale.set(10, 10, 10)
        scene.add(gltf.scene)
    }
)
Cube texture environment map 05:46
First, we are going to use the cube texture. We actually already did that in one of the previous lessons, but it’s always good to practice and it’ll be a good reminder.
Loading the textures
There are multiple environment map textures located in the /static/environmentMaps/ folder.
The 0/, 1/ and 2/ folders contain environment maps taken from the HDRI section of https://polyhaven.com and they have been converted to cube textures using https://matheowis.github.io/HDRI-to-CubeMap/.
We are going to use the first one in the 0/ folder.
Because these textures are composed of 6 images (like the faces of a cube), we have to use a CubeTextureLoader.
Add the CubeTextureLoader to our loaders:
/**
 * Loaders
 */
// ...
const cubeTextureLoader = new THREE.CubeTextureLoader()
Now we can load the textures. The order is positive x, negative x, positive y, negative y, positive z, and negative z.
Add these parameters after creating the scene:
/**
 * Environment map
 */
// LDR cube texture
const environmentMap = cubeTextureLoader.load([
    '/environmentMaps/0/px.png',
    '/environmentMaps/0/nx.png',
    '/environmentMaps/0/py.png',
    '/environmentMaps/0/ny.png',
    '/environmentMaps/0/pz.png',
    '/environmentMaps/0/nz.png'
])
Nothing should have changed because we are loading the environment map but we are not using it yet.
Check the logs for potential errors.
Using the environment map as the background
To add the environment map to our scene's background, we could create a massive cube around the scene, set its face to be visible on the inside, and apply the texture to it. It should work and look OK, but it would be very limited and only serve as a background.
Instead, let’s use Three.js features.
To apply an environment map to a scene, assign the environmentMap to the Scene's background property. Make sure to do this once you’ve created the environmentMap and the scene first:
scene.background = environmentMap
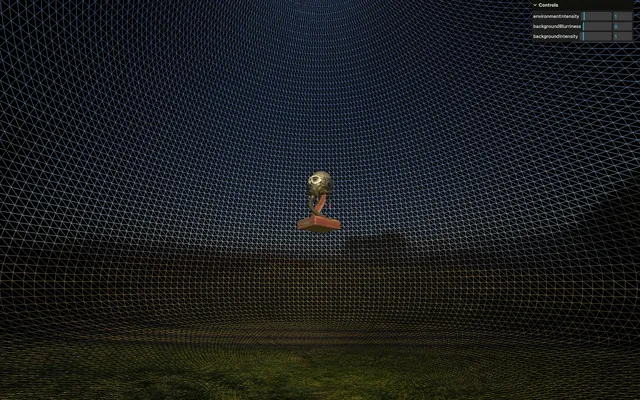
Now that we can distinguish the model, let’s move the torus knot to the side:
const torusKnot = new THREE.Mesh(
    new THREE.TorusKnotGeometry(1, 0.4, 100, 16),
    new THREE.MeshBasicMaterial()
)
torusKnot.position.x = - 4
torusKnot.position.y = 4
scene.add(torusKnot)
And change the knot’s material to a MeshStandardMaterial so that we can appreciate the environment map on a smooth surface. Use the following settings:
const torusKnot = new THREE.Mesh(
    new THREE.TorusKnotGeometry(1, 0.4, 100, 16),
    new THREE.MeshStandardMaterial({ roughness: 0.3, metalness: 1, color: 0xaaaaaa })
)
torusKnot.position.x = - 4
torusKnot.position.y = 4
scene.add(torusKnot)
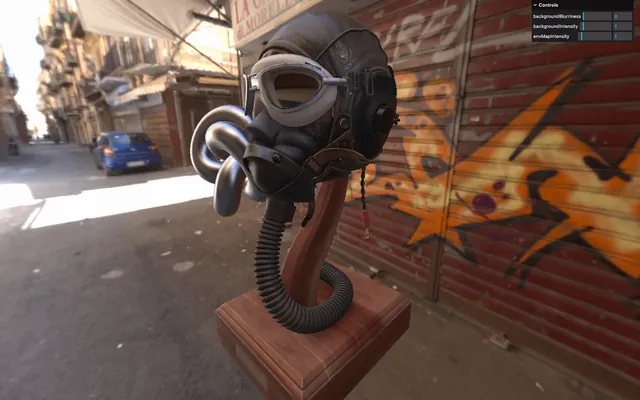
Using the environment map to light up the model
One essential feature to get a realistic render is to use our environment map to lighten our model.
In a previous lesson, we have already covered how to apply an environment map to a MeshStandardMaterial using the envMap property.
To apply the environment map as lighting to the whole scene, we can assign it to the environment property of the scene (same as the background):
scene.environment = environmentMap
scene.background = environmentMap
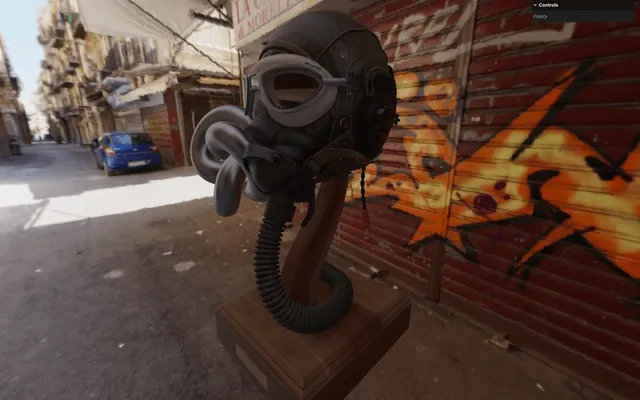
And that’s it. We can finally see our model. Check out the nice and realistic lighting we’ve achieved. The reflections, lighting, and shades match perfectly with what’s pictured in the environment map.
You can test with the two other environment maps and see how different the lighting is:
const environmentMap = cubeTextureLoader.load([
    '/environmentMaps/1/px.png',
    '/environmentMaps/1/nx.png',
    '/environmentMaps/1/py.png',
    '/environmentMaps/1/ny.png',
    '/environmentMaps/1/pz.png',
    '/environmentMaps/1/nz.png'
])
Or:
const environmentMap = cubeTextureLoader.load([
    '/environmentMaps/2/px.png',
    '/environmentMaps/2/nx.png',
    '/environmentMaps/2/py.png',
    '/environmentMaps/2/ny.png',
    '/environmentMaps/2/pz.png',
    '/environmentMaps/2/nz.png'
])
Let’s get back to the first environment map:
const environmentMap = cubeTextureLoader.load([
    '/environmentMaps/0/px.png',
    '/environmentMaps/0/nx.png',
    '/environmentMaps/0/py.png',
    '/environmentMaps/0/ny.png',
    '/environmentMaps/0/pz.png',
    '/environmentMaps/0/nz.png'
])
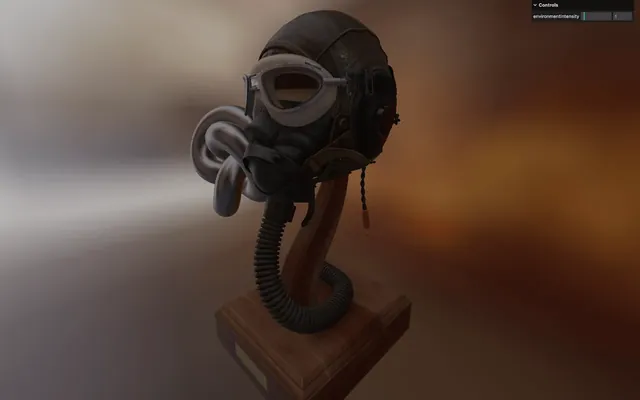
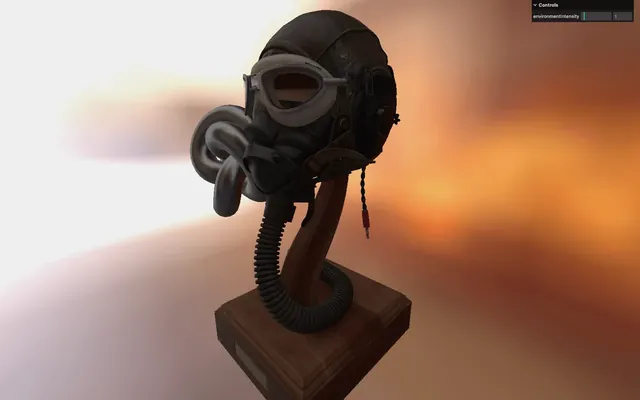
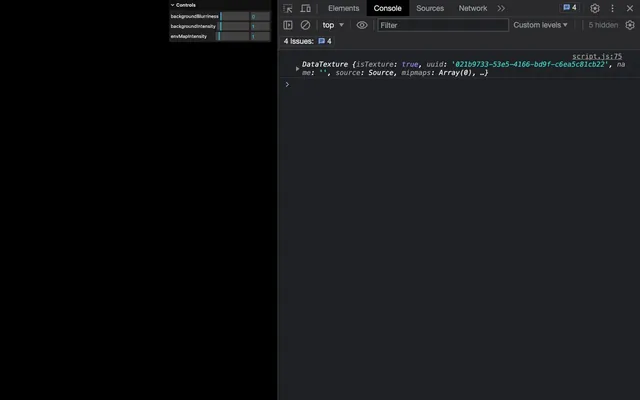
Environment properties and tweaks 00:00
Intensity
It’s working, but it looks kind of dark. We would like to cheat a little and control the environment map’s intensity.
We can do that directly on the Scene with the environmentIntensity property.
At the beginning of the Environment map section, set the scene.environmentIntensity to 4:
/**
 * Environment map
 */
scene.environmentIntensity = 4
Let’s have fun and add it to our lil-gui:
scene.environmentIntensity = 4

gui.add(scene, 'environmentIntensity').min(0).max(10).step(0.001)
For now, let’s put back 1. We will change it a bit later
scene.environmentIntensity = 1

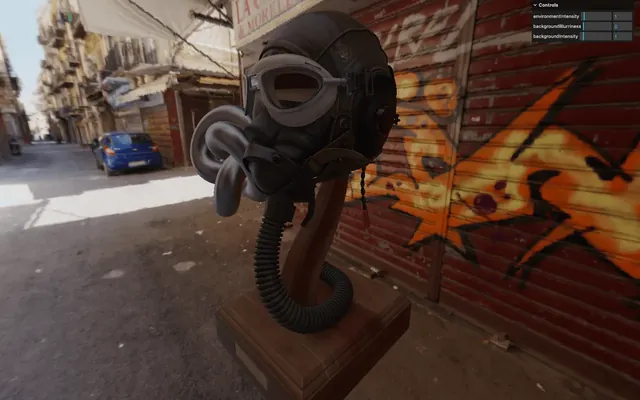
Background blurriness and background intensity
The environmentIntensity was a good start, but there’s more to the Scene.
backgroundBlurriness, will blur the background. We can put it before setting the actual environment map:
scene.environmentIntensity = 1
scene.backgroundBlurriness = 0.2
This technique is useful if the environment resolution is quite low or if you want the user to focus on the object in the foreground.
And then there is backgroundIntensity, which will control the background brightness:
scene.environmentIntensity = 1
scene.backgroundBlurriness = 0.2
scene.backgroundIntensity = 5
Be careful, as this property only controls the background, not the environment map intensity.
And as always, we can add these properties to our lil-gui:
scene.environmentIntensity = 1
scene.backgroundBlurriness = 0
scene.backgroundIntensity = 1

gui.add(scene, 'environmentIntensity').min(0).max(10).step(0.001)
gui.add(scene, 'backgroundBlurriness').min(0).max(1).step(0.001)
gui.add(scene, 'backgroundIntensity').min(0).max(10).step(0.001)
For now, let’s stick to the default values. I recommend setting the backgroundBlurriness to 0 and the backgroundIntensity to 1:
scene.environmentIntensity = 1
scene.backgroundBlurriness = 0
scene.backgroundIntensity = 1
Environment and background rotation
Finally, we can control the rotation of the environment and the background separately using the backgroundRotation and the environmentRotation properties.
scene.backgroundRotation.x = 1
scene.environmentRotation.x = 2

Those properties are Euler and can be rotated on all three axes. But in the case of a realistic environment, you usually want to keep the floor bellow, which is why we are going to avoid changing other axes than the y.
Remove or comment both rotations:
// scene.backgroundRotation.x = 1
// scene.environmentRotation.x = 2
That should not prevent us from having fun by adding tweaks for the y axis:
gui.add(scene, 'environmentIntensity').min(0).max(10).step(0.001)
gui.add(scene, 'backgroundBlurriness').min(0).max(1).step(0.001)
gui.add(scene, 'backgroundIntensity').min(0).max(10).step(0.001)
gui.add(scene.backgroundRotation, 'y').min(0).max(Math.PI * 2).step(0.001).name('backgroundRotationY')
gui.add(scene.environmentRotation, 'y').min(0).max(Math.PI * 2).step(0.001).name('environmentRotationY')
Note that we added names to those tweaks so that the default one isn’t y.
HDRI Equirectangular environment map 21:10
If you’ve checked in the /static/environmentMaps/ folder, you might have noticed those .hdr files.
Click on /static/environmentMaps/0/2k.hdr and, if your OS supports it, you will get a preview of that environment map (if you don’t get a preview, don’t worry, this doesn’t mean you can’t use it in Three.js).
This file has two specific features.
HDR
First, the file extension is .hdr. HDR stands for “High Dynamic Range” (we often say “HDRI” , where the “I” stands for “Image”). It means that the color values stored have a much higher range than a traditional image, which makes it ideal to store luminosity data.
As an example, if you look at a picture of a bright lamp, it’ll look white and if you look at a picture with the sun in the back, it’ll also look white. But their luminosity data should be different because the sun is actually much brighter than the lamp. HDR images will make the difference clear while traditional images (like a JPG or a PNG) won’t.
Equirectangular
Secondly, if you check the preview, you’ll notice that it’s only one picture containing kind of a 360° view of the surrounding.
The picture’s not just horizontal as we can also see the sky and the floor, although these sections are being stretched.
The proper name for such projection is “equirectangular”.
Note that an HDR environment map doesn’t have to be equirectangular, but it’s often the case and Three.js (like most 3D software packages, libraries and engines) supports this projection.
Loading and using the HDRI
Let’s start by commenting the old environment map (in the meantime, keep the backgroundBlurriness and backgroundIntensity tweaks):
// // LDR cube texture
// const environmentMap = cubeTextureLoader.load([
//     '/environmentMaps/0/px.jpg',
//     '/environmentMaps/0/nx.jpg',
//     '/environmentMaps/0/py.jpg',
//     '/environmentMaps/0/ny.jpg',
//     '/environmentMaps/0/pz.jpg',
//     '/environmentMaps/0/nz.jpg'
// ])

// scene.background = environmentMap
// scene.environment = environmentMap
We are going to comment on every version of environment map implementations so that you can go back to them by just uncommenting the section.
Next, we need to use the RGBELoader.
Import RGBELoader like we imported the GLTFLoader:
import { RGBELoader } from 'three/examples/jsm/loaders/RGBELoader.js'“RGBE” stands for “Red Green Blue Exponent” where the exponent stores the brightness. RGBE is what we would call the encoding for the “HDR” format which justifies the name of the loader instead of HDRLoader.
Instantiate it with the other loaders:
/**
 * Loaders
 */
// ...
const rgbeLoader = new RGBELoader()
Use it to load the /environmentMaps/0/2k.hdr file:
// HDR (RGBE) equirectangular
rgbeLoader.load('/environmentMaps/0/2k.hdr', (environmentMap) =>
{
    console.log(environmentMap)
})
In the callback function, set its mapping property to THREE.EquirectangularReflectionMapping (because it’s an equirectangular texture as mentioned earlier) and assign it to the background and environment properties of scene:
rgbeLoader.load('/environmentMaps/0/2k.hdr', (environmentMap) =>
{
    environmentMap.mapping = THREE.EquirectangularReflectionMapping

    scene.background = environmentMap
    scene.environment = environmentMap
})
The scene feels brighter and features more contrast, resulting in a more realistic render.
Downside
While those HDR textures sound attractive, they are usually much heavier to load and render, which is something to be aware of.
You can mitigate this by using a lower resolution and blur the background so that users don’t notice the low resolution.
Generate an environment map using Blender 29:02
As we’ve seen earlier, we can get a bunch of beautiful HDR environment maps from the HDRI section of https://polyhaven.com and there are other places where to get cool environment maps. But sometimes, we need to create a very specific environment map where everything is exactly where it should be.
Fortunately, we now know how to use Blender (at least the basics) and it’s the perfect tool for this job.
The following part has been recorded with Blender 3.5.1. You can use a more recent version, but expect some differences. You can download the same version I used, by clicking this link https://www.blender.org/download/previous-versions/
Note that, although I’ll remind you of the shortcuts, this lesson assumes that you’ve followed previous lessons where we learned Blender. And don’t forget that shortcuts are area sensitive, meaning that you’ll need to hover over the same area as I did when using the shortcut.
Project setup
We are going to start by setting up the project. First, launch Blender.
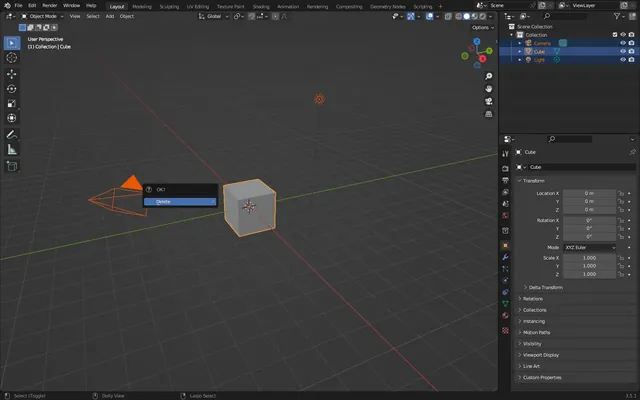
Clear
Delete everything in the scene.
Press A to select everything and press X to delete, then click on the prompt to confirm:
Render engine
In the Render Properties tab, switch the Render Engine to Cycles:
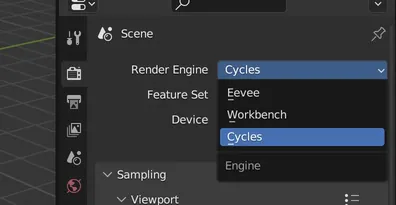
Eevee could have done the trick but let’s go for the most realistic render engine.
Sampling
Still in the Render Properties tab, in the Sampling section, set the Max Samples for both the Viewport and Render to 256:
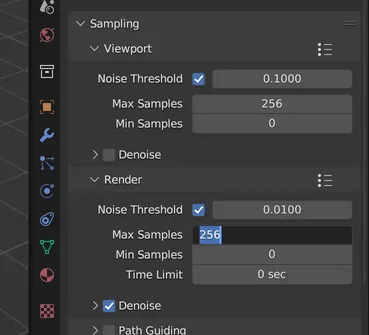
This will make renders much faster. Fill free to tweak this one depending on your computer and how long you are willing to wait for the render to finish.
Background
In the World Properties tab, in the Surface section, set the Color to a full black:
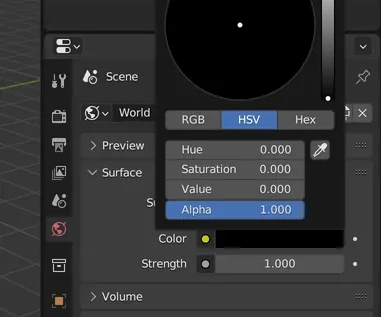
Setting a color here would apply a dim light everywhere, which can be interesting, but not in our case.
Resolution
In the Output Properties tab, in the Format section, set the resolution to 2048x1024:
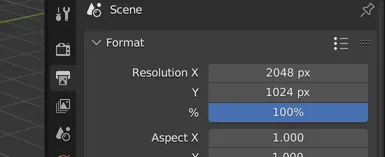
Although WebGL 2 (the actual version) supports non-power of two textures, it’s considered good practice. This way, we can use the environment map in other softwares.
Similar to the sampling values, you can tweak this value according to your needs. To save some time, you can change the % input and set it to 50%, 200%, or whatever suits you.
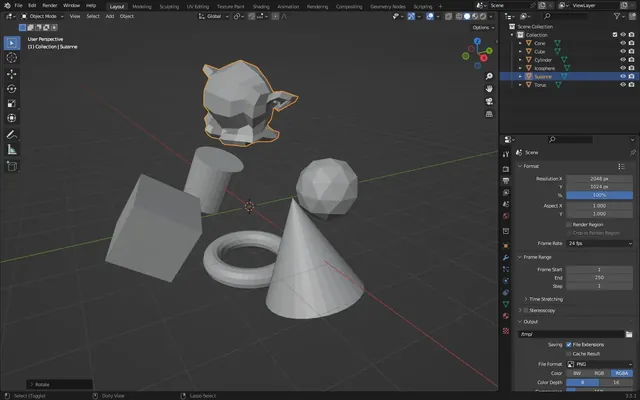
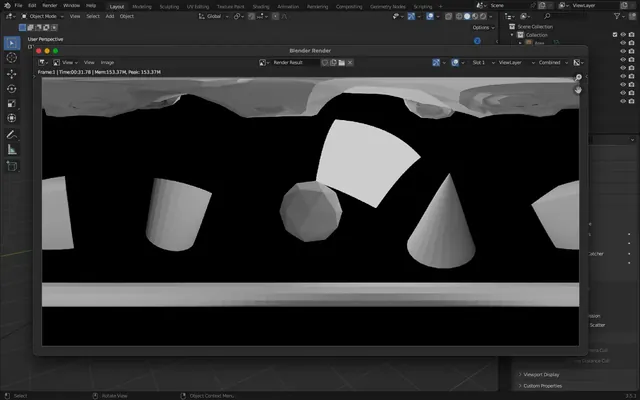
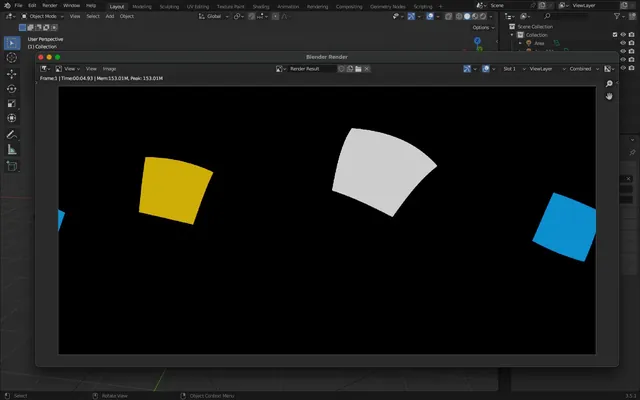
Basic objects
Next, create a few objects around the center of the scene. The goal here is to have a quick preview of what the camera sees. We will work on the scene later.
Press SHIFT + A and choose which object you want to create, G to move it, S to scale it and R to rotate it.
Put one different object on each side of the scene around the center:
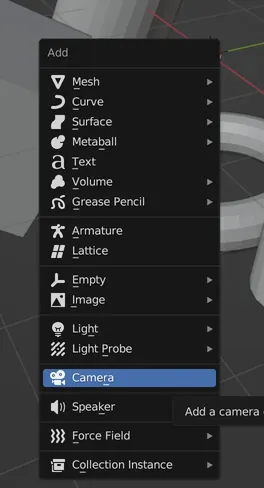
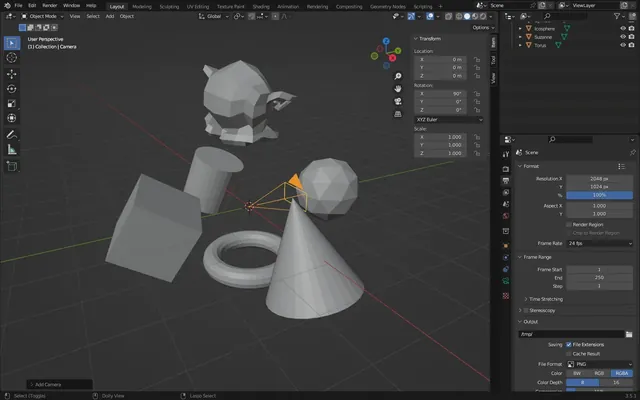
Camera
We can now add a new camera.
Press SHIFT + A and choose Camera:
Show the sidebar with N (if it’s not already visible):
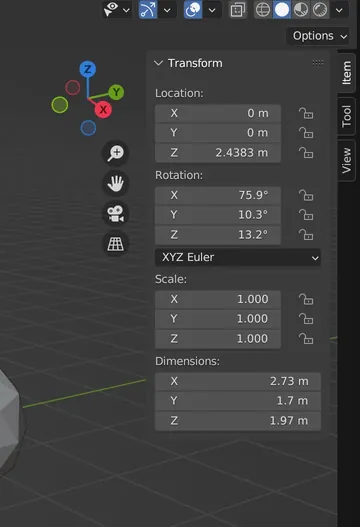
While the camera is selected, reset the Location and Rotation from the item tab.
Then set the rotation on the X axis to 90°:
In the Object Data Properties tab, in the Lens section, set the Type to Panoramic and for the Panorama Type, choose Equirectangular:
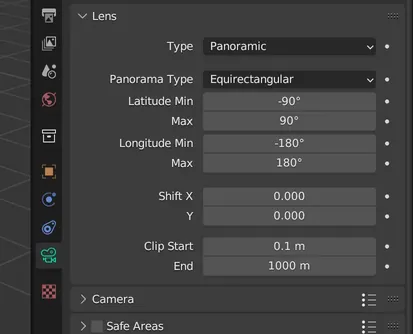
By the way, don’t expect to be able to see a preview of the panoramic view in the Viewport. You can see this projection only when rendering.
First light
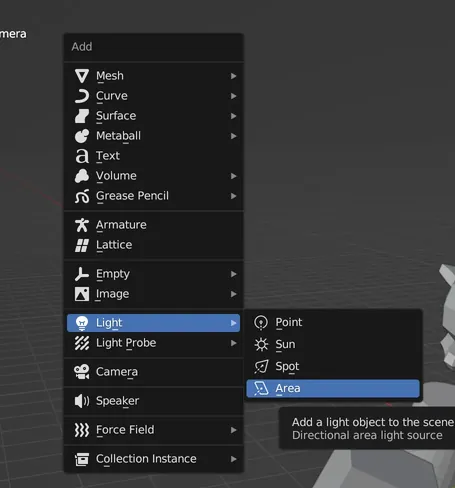
Press SHIFT + A and create an Area light in the Light menu:
Move it away from the center, make it bigger and rotate it toward the center (the exact position doesn’t matter):
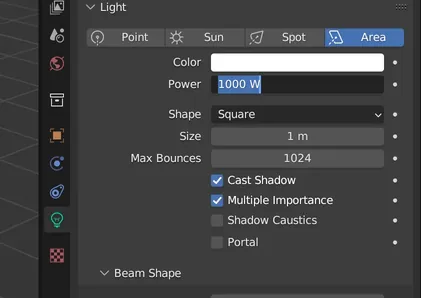
In the Object Data Properties tab, in the Light section, set its intensity to 1000W:
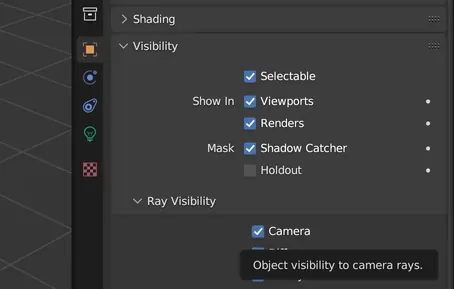
In the Object Properties tab, in the Visibility section, check the Camera checkbox to make sure the light source is visible:
First render
Time to render the scene.
Press F12, wait a little for the render to finish and see what you get:
As you can see, we get a beautiful equirectangular render.
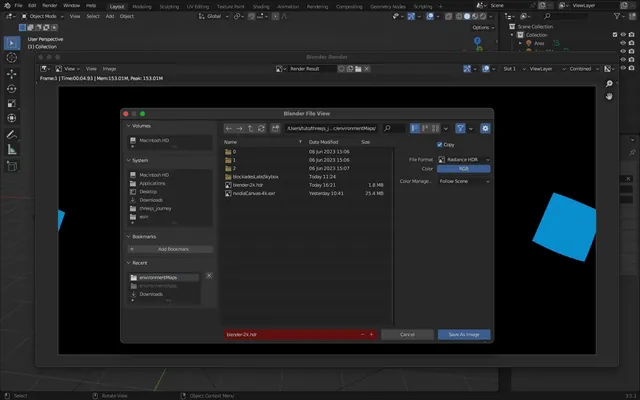
Save as HDR
Press ALT + S while hovering over the render.
Choose a name at the bottom. We are going to go for blender-2k.hdr.
For the File Format, choose Radiance HDR.
Finally save it in the /static/environmentMaps/ folder.

Implementing
Although it’s not a very interesting environment map, we can try it in our Three.js project.
Change the path of the one we’ve already loaded to /environmentMaps/blender-2k.hdr:
rgbeLoader.load('/environmentMaps/blender-2k.hdr', (environmentMap) =>
{
    // ...
})
And it’s working!
Studio lighting
We could create a full scene with cool effects, buildings, planets, etc. but it would take quite a long time. Instead, we are going to create a simple yet awesome looking studio setup.
Back to Blender: delete all objects (not the light) by selecting them and pressing X.
We are going to duplicate the light twice, set one light source to blue, another one to orange and place them around the scene.
Try this on your own. Duplicate with SHIFT + D, make sure the lights are turned toward the center and set the color of the second to orange and the color of the third to blue.
Render again with F12.
Looks boring? Wait until you see the result in Three.js.
Save again with ALT + S, use the same settings as before (Radiance HDR and studio-2k.hdr), replace the previous file and reload the page.
Since the image is boring, you can deactivate the background so that we enjoy just the lighting:
rgbeLoader.load('/environmentMaps/studio-2k.hdr', (environmentMap) =>
{
    environmentMap.mapping = THREE.EquirectangularReflectionMapping

    // scene.background = environmentMap
    scene.environment = environmentMap
})
Don’t forget to save your Blender file somewhere.
AI generated environment using NVIDIA Canvas 49:10
What if we could just ask an AI to generate an environment map for us?
The first solution we are going to use is NVIDIA Canvas.
While I’m recording this lesson, the software is in beta and only works on Windows, which is why we are not going to spend too much time on it.
If you don’t have Windows, you can follow out of curiosity, but stick around, as there is another AI tool coming right after.
Setup
First, download NVIDIA Canvas from the website https://www.nvidia.com/en-us/studio/canvas/
Install it like any software package and open the NVIDIA Canvas application.
On opening, you can choose between a “standard” image and a “panorama”. Go for panorama:
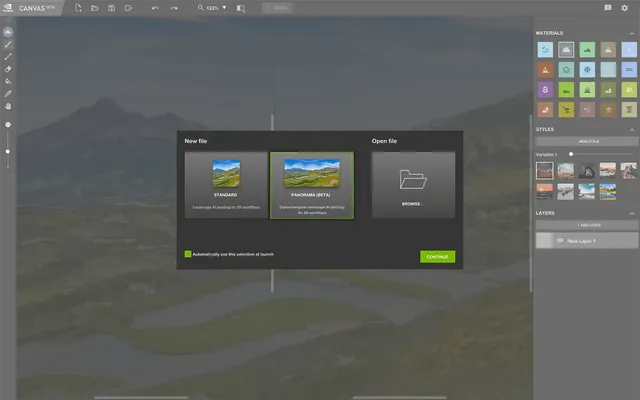
The idea behind NVIDIA Canvas is that you roughly draw shapes using specific colors corresponding to visual elements (clouds, grass, rivers, trees, etc.) and the software will use AI to generate a realistic version.
Materials
On the right side of the screen, there is a Materials section containing the available colors / elements.
Hover over them if you want the name of the material.
And at this point, you can choose a material and start drawing:
Tool
On the left side of the screen, you can change your tool to draw lines, erase, pick a material, fill, change the brush size, etc.
Styles
Below the Materials, there is a Styles section where you can change the style of the generated panorama.
And if you kind of like the style, but would like to test a variation, use the Variation slider:
Tips
Remember that, since it’s a equirectangular projection, the top and bottom parts of the canvas are right above and below the camera. Don’t add too many details there:
You can draw directly in the generated panorama:
You can also use layers that work like any 2D software tool.
But since we are just quickly drafting a rough version, we tend to forget in which layer we are, which means that feature is not very useful.
Export
When you are happy with the result (don’t be too picky), click on the export button, name it nvidiaCanvas-4k.exr, and save it in the /static/environmentMaps/ folder (replace the existing file).
Implementing
For those who can’t use NVIDIA Canvas, the generated environment map is already available in /static/environmentMaps/nvidiaCanvas-4k.exr.
You might have noticed that the extension is .exr and not .hdr.
Our exported file is also an “HDR” image regarding the range of the colors stored, but the encoding is different. EXR can also store layers and has an alpha channel.
In our case, it’s not making a big difference, but still, we need to use a different loader.
Start by commenting the HDR (RGBE) version:
// // HDR (RGBE) equirectangular
// rgbeLoader.load('/environmentMaps/blender-2k.hdr', (environmentMap) =>
// {
//     environmentMap.mapping = THREE.EquirectangularReflectionMapping

//     // scene.background = environmentMap
//     scene.environment = environmentMap
// })
Then import the EXRLoader and instantiate it like the other loaders:
import { EXRLoader } from 'three/addons/loaders/EXRLoader.js'

/**
 * Loaders
 */
// ...
const exrLoader = new EXRLoader()
Use it to load the '/environmentMaps/nvidiaCanvas-4k.exr' file, set the mapping to THREE.EquirectangularReflectionMapping and apply it to both the background and the environment:
// HDR (EXR) equirectangular
exrLoader.load('/environmentMaps/nvidiaCanvas-4k.exr', (environmentMap) =>
{
    environmentMap.mapping = THREE.EquirectangularReflectionMapping

    scene.background = environmentMap
    scene.environment = environmentMap
})
Thoughts
NVIDIA Canvas is still in beta and the tool lacks important features like HDR (RGBE) export, lights management, choosing the resolution, being able to draw more than landscapes, etc. On the other hand, it really works, it’s impressive and it’s worth keeping an eye on.
Follow @NVIDIAStudio on Twitter.
AI generated environment map using BlockadeLabs 01:03:00
Let’s continue our AI journey to generate environment maps with Skybox Lab by BlockadeLabs.
I have to warn you, what you see on your screen might be different from what I came up with when I was recording this lesson. The tool is changing very fast and features are being added regularly.
Open Skybox Lab. Since it’s a website, this one should work on every device.
Out of the box, you already get a nice looking environment map. You can drag and drop to move the camera and use the mouse wheel to zoom in and out.
Generating
If you’ve been using AI, you are probably familiar with the idea of a prompt. At the bottom of the page, there is a text input where you can ask the AI to generate something. And that something is only limited by your imagination.
Note that the prompts I’m using will likely result in a different output for you since the AI generates a random scene every time.
To the right of the text input, there is a select input where you can choose the style.
Go ahead, have fun, and see what the AI comes up with. You can ask for objects, colors, locations, time of the day, etc.
Generating the environment map can take quite some time. It depends on the servers and how busy they are, but you usually have to wait between 30 seconds and 2 minutes.
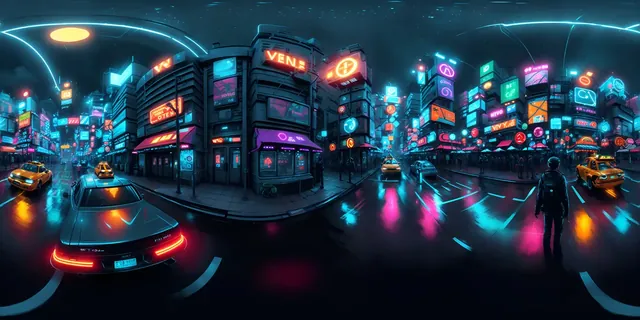
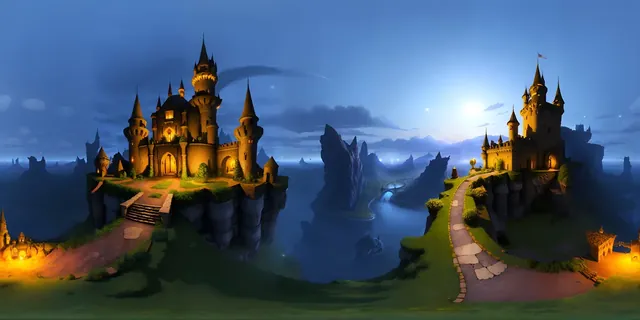
Here are some examples of prompts and the style:
neon city, orange lights, taxi using Digital Painting style:
castles at night using Fantasy Land style:
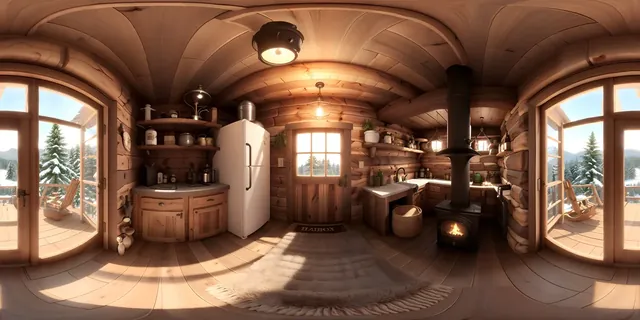
cozy wood cabin with cauldron and potions using Interior Views style:
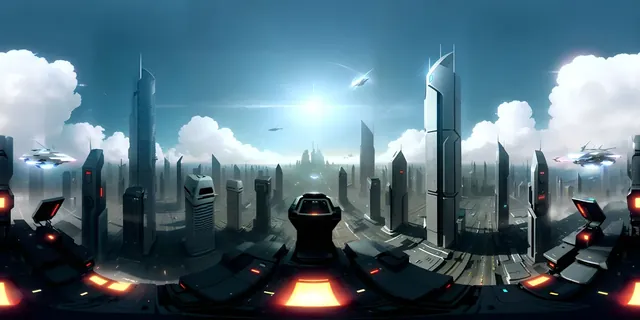
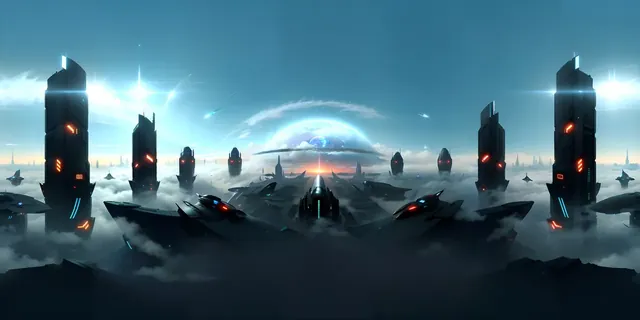
white sky scrapers in clouds at day time using SciFi style:
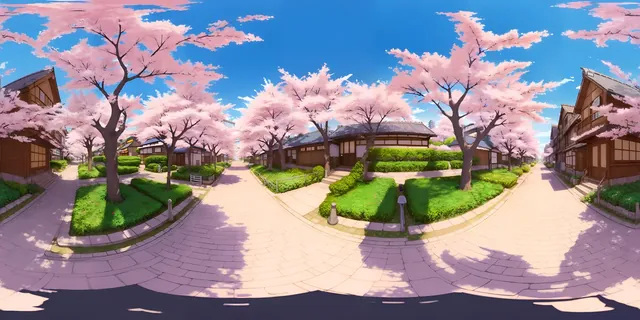
japan streets with cherry blossom in summer, high contrast using Anime Art Style style:
Downloading
Once you’re happy with the result (again, don’t be too picky), click on the download button.
Some generated environment maps are already available in the /static/environmentMaps/blockadesLabsSkybox/ folder. You can put yours in there too.
Implementing
As you can see, generated environment maps are equirectangular LDR images. I’m hoping to see HDR in the future, but LDR will do the trick for now.
Comment the HDR (EXR) equirectangular:
// // HDR (EXR) equirectangular
// exrLoader.load('/environmentMaps/nvidiaCanvas-4k.exr', (environmentMap) =>
// {
//     environmentMap.mapping = THREE.EquirectangularReflectionMapping

//     scene.background = environmentMap
//     scene.environment = environmentMap
// })
Since it’s a simple .jpg file, we can use the TextureLoader.
Instantiate a TextureLoader:
/**
 * Loaders
 */
// ...
const textureLoader = new THREE.TextureLoader()
Use it to load the the environment map:
// LDR equirectangular
const environmentMap = textureLoader.load('/environmentMaps/blockadesLabsSkybox/anime_art_style_japan_streets_with_cherry_blossom_.jpg')
Set its mapping to THREE.EquirectangularReflectionMapping:
environmentMap.mapping = THREE.EquirectangularReflectionMappingSet its colorSpace to THREE.SRGBColorSpace:
environmentMap.colorSpace = THREE.SRGBColorSpaceYou’ll learn more about color space in a later lesson.
Assign it to the background and environment properties of scene:
scene.background = environmentMap
scene.environment = environmentMap
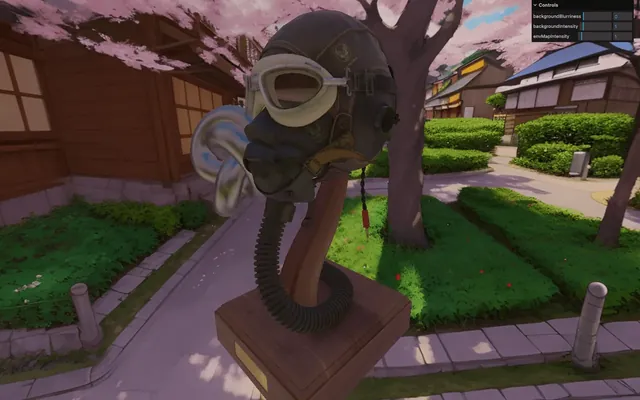
Since the environment map is in LDR, you might want to increase the default environmentIntensity on scene:
scene.environmentIntensity = 4More features
Depth
By checking the Generate Depth, and generating the environment map again, clicking on the download button will also download a grayscale depth map (you might have to allow your browser to download multiple files):
This can be used to create a parallax effect, fog or whatever you can think of. However, we are not going to use that.
Sketch-to-skybox
On the left, you have access to tools you can use to draw shapes directly on the environment. Generated elements will try to match those shapes.
You can watch a demo of this Sketch-to-skybox feature right here: https://twitter.com/BlockadeLabs/status/1659263006415659008
It’s a bit random but it can be interesting to make sure there are objects at specific spots.
Thoughts
Environment maps generated by Skybox Labs are absolutely gorgeous, but you need to spend some time trying prompts and styles in order to get the hang of it.
The Blockade Labs team keeps on improving the tool and you might even have access to new features that weren’t available when I recorded this lesson.
Stay curious and follow @blockadelabs on Twitter.
Ground projected environment map 01:16:25
One of the most annoying things when using an environment map as the background, is that objects look like they are flying. This is due to the fact that the environment map is infinitely far away.
We could create a plane below and try to make it look and feel like it’s part of the environment map, but there is an even better solution named “ground projected skybox”.
First, comment the LDR equirectangular environment map:
// // LDR equirectangular
// const environmentMap = textureLoader.load('/environmentMaps/blockadesLabsSkybox/interior_views_cozy_wood_cabin_with_cauldron_and_p.jpg')
// environmentMap.mapping = THREE.EquirectangularReflectionMapping
// environmentMap.colorSpace = THREE.SRGBColorSpace

// scene.background = environmentMap
// scene.environment = environmentMap
Then, let’s use one of the HDR environment maps from the beginning of this lesson, but only as the environment (not background):
// Ground projected skybox
rgbeLoader.load('/environmentMaps/2/2k.hdr', (environmentMap) =>
{
    environmentMap.mapping = THREE.EquirectangularReflectionMapping
    scene.environment = environmentMap
})
Reduce the environmentIntensity on scene:
scene.environmentIntensity = 1
Implementing
Import the GroundedSkybox class:
import { GroundedSkybox } from 'three/addons/objects/GroundedSkybox.js'In the callback function of the environment map, instantiate GroundedSkybox, send the environmentMap as the parameter followed by 15 and 70. Finally, add it to the scene:
rgbeLoader.load('/environmentMaps/2/2k.hdr', (environmentMap) =>
{
    // ...

    // Skybox
    const skybox = new GroundedSkybox(environmentMap, 15, 70)
    scene.add(skybox)
})
What you see as the background is a simple squished sphere.
The first parameter is the environment texture we want to use, the second parameter is the height of that sphere and the third parameter is the radius.
Out of curiosity, let’s see what this sphere really looks like by activating the wireframe on its material:
rgbeLoader.load('/environmentMaps/2/2k.hdr', (environmentMap) =>
{
    // ...

    // Skybox
    const skybox = new GroundedSkybox(environmentMap, 15, 70)
    skybox.material.wireframe = true
    scene.add(skybox)
})
You can see that the bottom of the sphere is being flatten, but it’s too low.
We can fix that by moving the whole skybox up with position.y set to the height of the sphere (15 in this case):
// Ground projected skybox
rgbeLoader.load('/environmentMaps/2/2k.hdr', (environmentMap) =>
{
    // ...

    // Skybox
    const skybox = new GroundedSkybox(environmentMap, 15, 70)
    skybox.material.wireframe = true
    skybox.position.y = 15
    scene.add(skybox)
})
The bottom of the squished sphere now matches our model perfectly. Let’s deactivate the wireframe:
// Ground projected skybox
rgbeLoader.load('/environmentMaps/2/2k.hdr', (environmentMap) =>
{
    // ...

    // Skybox
    const skybox = new GroundedSkybox(environmentMap, 15, 70)
    // skybox.material.wireframe = true
    skybox.position.y = 15
    scene.add(skybox)
})
It’s now up to you to find the perfect value for the radius and height so that it fits the environment map you are using.
Note that this trick won’t always work, especially if some objects in the environment map image are near the center.
Real-time environment map 01:23:39
The last technique I want to show you is how to create a dynamic environment map where we render the scene on each frame and use the result as the environment directly in Three.js.
Setup
Start by commenting the ground-projected skybox:
// // Ground projected skybox
// rgbeLoader.load('/environmentMaps/2/2k.hdr', (environmentMap) =>
// {
//     environmentMap.mapping = THREE.EquirectangularReflectionMapping
//     scene.environment = environmentMap

//     const skybox = new GroundProjectedSkybox(environmentMap)
//     skybox.radius = 120
//     skybox.height = 11
//     skybox.scale.setScalar(50)
//     scene.add(skybox)

//     gui.add(skybox, 'radius', 1, 200, 0.1).name('skyboxRadius')
//     gui.add(skybox, 'height', 1, 100, 0.1).name('skyboxHeight')
// })
This section is going to require a bit more code than the previous ones. Make sure to separate it visually from the rest of the code:
/**
 * Real time environment map
 */
We are going to insert the LDR wood cabin environment map again, but only as a background of the scene:
// Base environment map
const environmentMap = textureLoader.load('/environmentMaps/blockadesLabsSkybox/interior_views_cozy_wood_cabin_with_cauldron_and_p.jpg')
environmentMap.mapping = THREE.EquirectangularReflectionMapping
environmentMap.colorSpace = THREE.SRGBColorSpace

scene.background = environmentMap
We could have used any other environment map from earlier, but this one looks good and is quite dark, which is going to come in handy shortly.
Holy donut
We are going to create a torus (or donut) surrounding the scene and try to make that torus illuminate and reflect on the surface of our objects.
Use a TorusGeometry and call the object holyDonut because it sounds cool:
// Holy donut
const holyDonut = new THREE.Mesh(
    new THREE.TorusGeometry(8, 0.5),
    new THREE.MeshBasicMaterial({ color: 'white' })
)
holyDonut.position.y = 3.5
scene.add(holyDonut)
You could add anything you want to the environment map, but let’s stick to something simple for the sake of the lesson.
Next, we are going to make the holy donut rotate.
At the beginning of the tick function, right after the elapsedTime, we are going to test if holyDonut exists so that we can deactivate that part easily:
const tick = () =>
{
    // Time
    const elapsedTime = clock.getElapsedTime()

    // Real time environment map
    if(holyDonut)
    {
    }

    // ...
}
Use elapsedTime on the rotation:
const tick = () =>
{
    // Time
    const elapsedTime = clock.getElapsedTime()

    // Real time environment map
    if(holyDonut)
    {
        holyDonut.rotation.x = elapsedTime
    }

    // ...
}
And to make the animation slightly more interesting, let’s use a Math.sin(...) and multiply it:
const tick = () =>
{
    // Time
    const elapsedTime = clock.getElapsedTime()

    // Real time environment map
    if(holyDonut)
    {
        holyDonut.rotation.x = Math.sin(elapsedTime) * 2
    }

    // ...
}
Cube render target
The main idea is that we are going to render the scene inside our own environment map texture and that it’s going to be a cube texture.
To render into a cube texture, we need to use a WebGLCubeRenderTarget. Render targets are textures in which we can store renders of any scene.
The first parameter is the resolution of each side of the cube (let’s use 256):
// Cube render target
const cubeRenderTarget = new THREE.WebGLCubeRenderTarget(256)
The second parameter is an object whose properties will be used to set up the render target.
The only property that matters here is type in which we can choose the type of value that will be stored. Since we want the same behaviour as an HDR with a high range of data, we should use THREE.HalfFloatType or THREE.FloatType.
Float uses 32 bits to store a wide range of values.
HalfFloat uses only 16 bits, but it’s still quite a wide range, the difference won’t be noticeable and it’s better for performance since it requires less memory:
const cubeRenderTarget = new THREE.WebGLCubeRenderTarget(
    256,
    {
        type: THREE.FloatType
    }
)
Even though there is nothing rendered in the cubeRenderTarget yet, we can assign it to the environment of the scene:
scene.environment = cubeRenderTarget.texture
Camera
Since we need to render one texture for each face of a cube, we need to render 6 square textures. We could use a PerspectiveCamera, do some maths, make sure the field of view fills one side perfectly, do the 6 renders, and combine them. Or we can use the CubeCamera which will do that for us.
The first parameter is the near, the second parameter is the far, and the third parameter is the WebGLCubeRenderTarget in which to save the renders:
// Cube camera
const cubeCamera = new THREE.CubeCamera(0.1, 100, cubeRenderTarget)
Render on each frame
Back to our tick function, we can now render the scene in the cubeCamera by calling its update method and sending it the renderer and the scene:
const tick = () =>
{
    // ...

    // Real time environment map
    if(holyDonut)
    {
        holyDonut.rotation.x = Math.sin(elapsedTime) * 2

        cubeCamera.update(renderer, scene)
    }

    // ...
}
And we get our environment map illumination back, but this time with the holy donut being part of it.
Since we are using a high-range texture on the render target, we can make the cube color go beyond the 0 to 1 range.
To do that, change the color of the holyDonut to a Color instance to which we send 10, 4, 2 which should look bright, but kind of yellow/orangy too:
const holyDonut = new THREE.Mesh(
    new THREE.TorusGeometry(8, 0.5),
    new THREE.MeshBasicMaterial({ color: new THREE.Color(10, 4, 2) })
)
Although it’s hard to notice, there is a bug.
To see it, change the roughness of the torus knot to 0 and watch the reflection:
const torusKnot = new THREE.Mesh(
    // ...
    new THREE.MeshStandardMaterial({ roughness: 0, metalness: 1, color: 0xaaaaaa })
)
As you can see, all objects in the scene are now part of the environment map.
It’s not necessarily a big deal and it depends on what you want in your environment map, but the helmet and the torus knot are blocking the light which is not ideal.
Layers
To fix that, we are going to use Layers. Layers work like categories and can be set on any object inheriting from Object3D (like a Mesh).
By setting layers on a camera, this camera will only see objects matching the same layers.
As an example, if a camera has its layers set to 1 and 2, it’ll only see objects that have layers set to 1 or 2.
By default, all objects and camera layers are set to 0.
To change the layers of an object or a camera, we can use 3 methods:
object.layers.enable(...)which will add a layer;object.layers.disable(...)which will remove a layer;object.layers.set(...)which will enable a layer and disable all other layers automatically.
In our case, we want the cubeCamera to only see the holyDonut, so let’s set its layers to 1:
const cubeCamera = new THREE.CubeCamera(0.1, 100, cubeRenderTarget)
cubeCamera.layers.set(1)
We then want our holyDonut to be visible for both the default camera and the cubeCamera. And since the default layer is 0, we just need to add 1:
const holyDonut = new THREE.Mesh(
    new THREE.TorusGeometry(8, 0.5),
    new THREE.MeshBasicMaterial({ color: new THREE.Color(10, 4, 2) })
)
holyDonut.layers.enable(1)
We’ve fixed the bug and the cubeCamera is only rendering the holyDonut.
Thoughts
Be careful with real-time environment maps. Doing 6 renders on each frame can be quite a lot in terms of performance. This is why you should keep an eye on the frame rate, try to use the smallest possible resolution on the WebGLCubeRenderTarget, and keep the scene that is being rendered in the environment map simple.
Also, be careful with layers. It’s easy to get lost in what is being rendered. In addition, note that lights aren’t affected by layers.
Going further 01:43:52
And we are done! You now have all the tools to make beautiful environment maps that will make your scene shine.
Share the results on Twitter using the #threejsJourney hashtag or on the Three.js Journey Discord server. I’d love to see your work!