Introduction 00:00
When it comes to shaders, lighting is a very difficult topic that solely justifies the use of Three.js.
Implementing lights in Three.js is as simple as instantiating a class such as DirectionalLight or PointLight and adding that instance to the scene.
But behind those pre-made classes are very complex algorithms trying to recreate real-life lighting using complex physically-based formulas and I’m not even talking about how the light settings are injected into the shaders.
What a relief not to have to write those algorithms, right? Well, guess what? We are going to do it ourselves.
You might wonder why would we inflict such pain on ourselves and there are multiple reasons for it.
Firstly, for the sake of learning. The various formulas and concepts we are going to discover will step up your shader game and can be used in many other topics.
Secondly, you don’t always need Three.js built-in lights. If you create a custom shader and want to add a simple shade so that it feels like there is some light coming from the side, good luck with implementing Three.js lights into your custom shader.
Thirdly, to create cool effects as we are going to see in the next lessons.
We are not going to push the concept as far as Three.js built-in lights, but we are going to create some of the most common lights which are the point light, the directional light, and the ambient light:

Also, note that the implementation we are going to do is not physics-based. It’s more of an old-school and performant approach, quite similar to the Phong shading with minor tweaks.
Most of the calculations will be done in the fragment shader in order to avoid visual artifacts. Yet, it could be done easily in the vertex shader, which is actually what we call Gouraud shading.
Setup 03:20
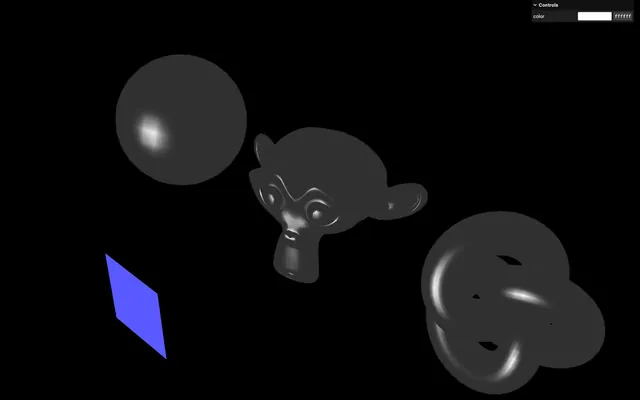
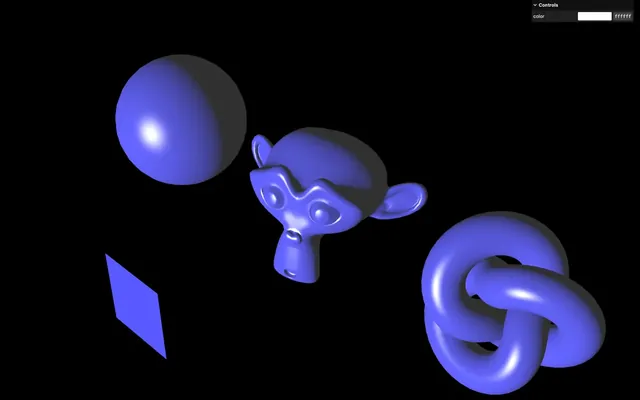
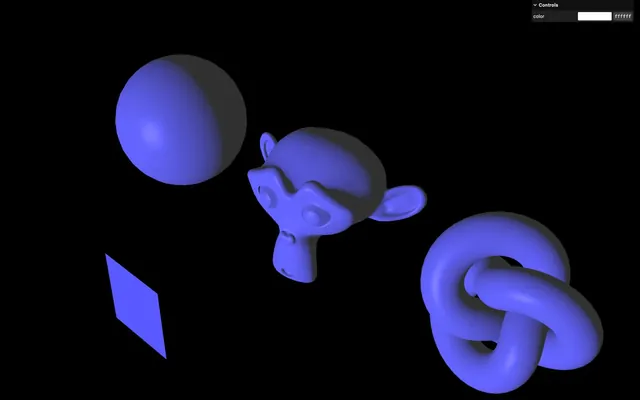
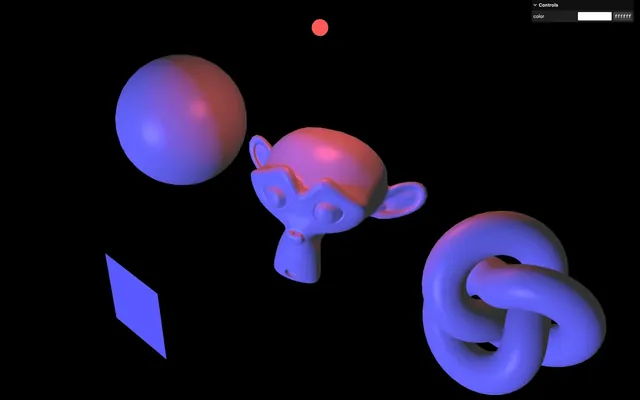
The starter already contains the following:
- 3 rotating objects: a sphere, Suzanne, and a torus knot
- A single instance of ShaderMaterial for all 3 objects
- A basic shader already featured in the
src/shaders/shading/folder (I wasn’t inspired) with avertex.glsland afragment.glsl - An instance of
lil-guiwith acolortweak that controls theuColoruniform is sent to the fragment shader. - The
vite-plugin-glsldependency to handle GLSL files OrbitControlsto rotate around
Ambient light 05:03
Let’s start with the simplest of the three and create an ambient light. It’s not the most impactful one, but starting with it will help us understand the structure we are going to adopt and how we combine the light we calculate with the initial color of the material.
An ambient light applies a uniform light on the surface of the objects, regardless of their orientation. It’s not realistic, but in small doses, it helps lighten up the part of the objects in the shade as if the light was bouncing on walls and getting back to the object.
We are going to put all the code related to the light in a separate function from the start.
In the fragment shader, before the main(), create an ambientLight function returning a vec3:
vec3 ambientLight()
{
    return vec3(0.0, 0.0, 0.0);
}

void main()
{
    vec3 color = uColor;

    // Final color
    gl_FragColor = vec4(color, 1.0);
    #include <tonemapping_fragment>
    #include <colorspace_fragment>
}
Using a separate function is good, but not just for other projects. By doing so, we will be able to add more lights just by calling the function again. We will demonstrate that later in the lesson.
We are returning a vec3 because light can be colored, and currently, it seems that the light is off since we set it to 0.0, 0.0, 0.0.
This might sound silly, but it’s actually the perfect opportunity to understand how we should combine the light with the original color of the object.
In main(), right after creating the color variable, create a light variable to vec3(0.0) and add the output of ambientLight() to it using +=:
void main()
{
    vec3 color = uColor;

    // Lights
    vec3 light = vec3(0.0);
    light += ambientLight();

    // ...
}
light will contain the various light info we are going to calculate, starting with ambientLight(). But how do we combine it with the color?
Here’s a clue. In real life, if there is no light, what should be the perceived color of the objects? Black, indeed.
Combining the light with the initial color is as simple as multiplying one with the other:
void main()
{
    vec3 color = uColor;

    // Lights
    vec3 light = vec3(0.0);
    light += ambientLight();
    color *= light;

    // ...
}
A common mistake would have been to add the light to color. Yes, each light is going to be added to the light, but the light needs to be multiplied by the object's color.
Back to our ambientLight(): we want to return something else than black.
We are going to add two parameters, the light color as a vec3 lightColor and the light intensity as a float lightIntensity which we are going to multiply and return:
vec3 ambientLight(vec3 lightColor, float lightIntensity)
{
    return lightColor * lightIntensity;
}
We need to update how we call the function accordingly and we are going to start with a dimmed white:
void main()
{
    // ...
    light += ambientLight(vec3(1.0), 0.2);
    // ...
}

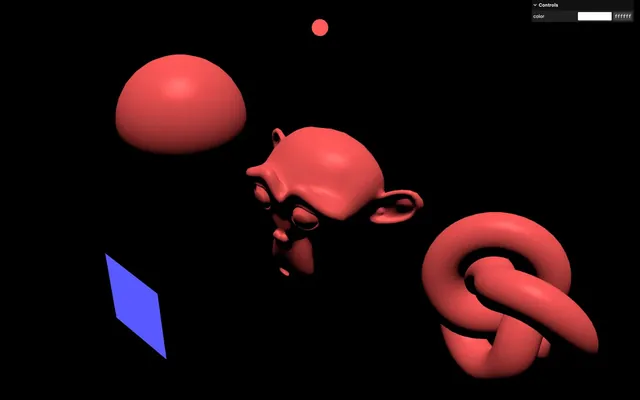
One interesting test we can conduct is to set a light to a perfect red and change the color of the objects to blue using the debug panel:
void main()
{
    // ...
    light += ambientLight(vec3(1.0, 0.0, 0.0), 0.2);
    // ...
}
We can’t see the objects anymore. Does it make sense?
In real life, if an object is perfectly blue and the only light source is red, you won’t see the object because it will absorb the light and not reflect it back to your eyes.
Let’s configure a very dimmed white light:
void main()
{
    // ...
    light += ambientLight(vec3(1.0), 0.03);
    // ...
}
Although it’s a bit far-fetched, we are going to comment each parameter when calling ambientLight():
void main()
{
    // ...

    light += ambientLight(
        vec3(1.0), // Light color
        0.03       // Light intensity
    );

    // ...
}
It’ll come in handy for the more complex lights we are going to see in a minute.
Also, note that the intensity and the color could have been merged into one parameter since the lightColor parameter isn’t limited to the 0 to 1 range. Yet, it makes more sense and the added bonus is that we can tweak the intensity without changing the color.
Before moving to the next light, we are going to put the ambient light in a separate file.
In src/shaders/, create an includes/ folder.
In that folder, create an ambientLight.glsl file and put the ambientLight function in it:
vec3 ambientLight(vec3 lightColor, float lightIntensity)
{
    return lightColor * lightIntensity;
}
In fragment.glsl, replace the function by the #include:
#include ../includes/ambientLight.glsl

void main()
{
    // ...
}
And we are done with the ambient light.
Directional Light 15:49
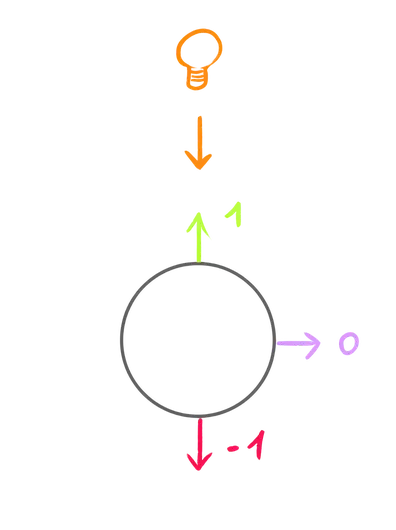
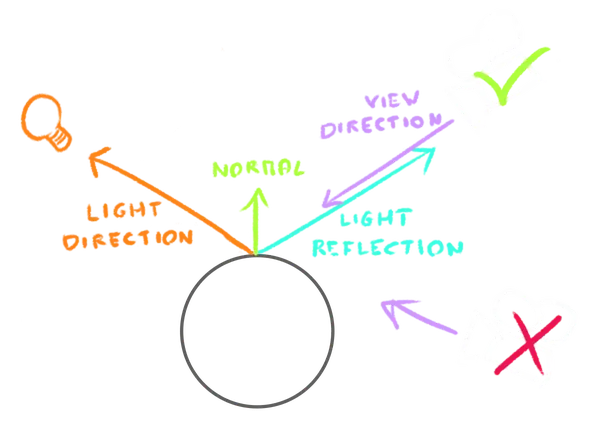
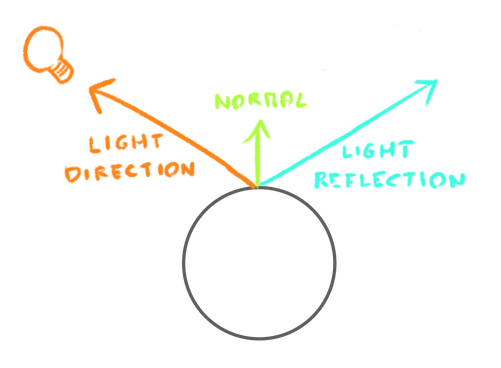
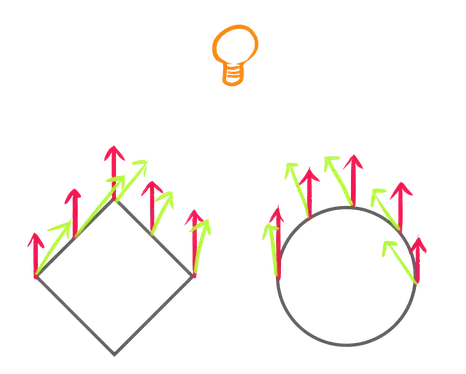
The directional light works very similarly, but the intensity varies according to the orientation of the face and the direction of the light.
If the face faces the light, it’ll receive the full power of the light. If the face is at a perfect 90° angle, it won’t receive any of the light. Values in between will be interpolated:
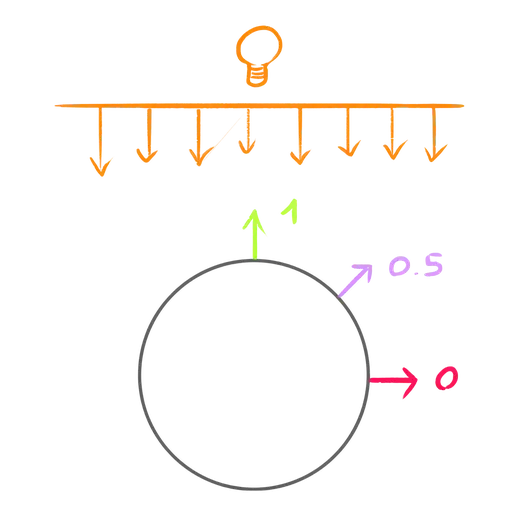
Also, note that we consider the light rays to be parallel and the intensity to be constant regardless of the distance (just like the Three.js DirectionalLight).
In the fragment.glsl, right before the main(), copy the ambientLight function and rename it directionalLight:
vec3 directionalLight(vec3 lightColor, float lightIntensity)
{
    return lightColor * lightIntensity;
}

void main()
{
    // ...
}
We could have created this function in a different file from the start, but I like working with functions in the same file at the beginning and separating them once they are ready.
Comment the ambientLight() and call the directionalLight() instead with the following parameters:
void main()
{
    // ...

    // light += ambientLight(
    //     vec3(1.0), // Light color
    //     0.03       // Light intensity
    // );

    light += directionalLight(
        vec3(0.1, 0.1, 1.0), // Light color
        1.0                  // Light intensity
    );

    // ...
}
Shading
We want the value to change according to the orientation of the face and the direction of the light.
Normal
Let’s start with the orientation of the face and we already know what we need: the normal.
In the vertex.glsl, create a vec3 vNormal varying and assign the normal to it at the end of main():
varying vec3 vNormal;

void main()
{
    // ...

    // Varying
    vNormal = normal;
}
If you remember from the previous lessons, we’ve just made two mistakes. Let’s move on for now and we will fix those mistakes once we can see them.
In the fragment shader, retrieve the vNormal:
varying vec3 vNormal;Send it to the directionalLight function as normal:
vec3 directionalLight(vec3 lightColor, float lightIntensity, vec3 normal)
{
    // ...
}

void main()
{
    // ...

    light += directionalLight(
        vec3(0.1, 0.1, 1.0), // Light color
        1.0,                 // Light intensity,
        vNormal              // Normal
    );

    // ...
}
Light direction
We have the face orientation, we now need the light direction.
To make things more convenient, instead of providing the direction straight to the function, we are going to provide the position of the light and calculate the orientation from it.
Add a lightPosition parameter to the directionalLight function and send it a vec3(0.0, 0.0, 3.0), which should be in front of the object:
vec3 directionalLight(vec3 lightColor, float lightIntensity, vec3 normal, vec3 lightPosition)
{
    // ...
}

void main()
{
    // ...

    light += directionalLight(
        vec3(0.1, 0.1, 1.0), // Light color
        1.0,                 // Light intensity,
        vNormal,             // Normal
        vec3(0.0, 0.0, 3.0)  // Light position
    );

    // ...
}
Right, so we’ve sent the light position, but we want the direction. The difference between the two is that the direction is normalized (with a length of 1).
At the beginning of directionalLight, normalize lightPosition using normalize and save it as lightDirection:
vec3 directionalLight(vec3 lightColor, float lightIntensity, vec3 normal, vec3 lightPosition)
{
    vec3 lightDirection = normalize(lightPosition);

    return lightColor * lightIntensity;
}
Helper
In order to understand where the light comes from, we are going to add a plane in the scene representing it.
In script.js, add the following Mesh using a PlaneGeometry and a MeshBasicMaterial:
/**
 * Light helpers
 */
const directionalLightHelper = new THREE.Mesh(
    new THREE.PlaneGeometry(),
    new THREE.MeshBasicMaterial()
)
scene.add(directionalLightHelper)
Tweak the position and the material so that it matches the light.
directionalLightHelper.material.color.setRGB(0.1, 0.1, 1)
directionalLightHelper.material.side = THREE.DoubleSide
directionalLightHelper.position.set(0, 0, 3)
Dot product
Back to fragment.glsl and the directionalLight function.
We have the face orientation as normal and we have the light direction as lightDirection.
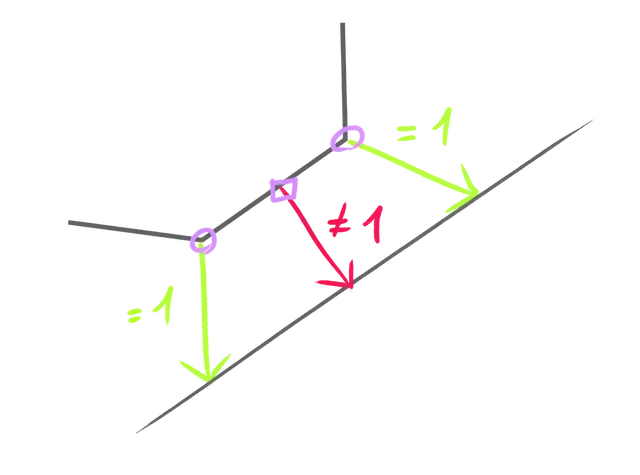
- If they are in opposite direction, we want
1 - If they are at a 90° angle, we want
0 - In between, we want the interpolated value
This is a perfect job for the dot product.
In the directionalLight, call dot on normal and lightDirection, and save the result in a float shading variable:
vec3 directionalLight(vec3 lightColor, float lightIntensity, vec3 normal, vec3 lightPosition)
{
    // ...

    // Shading
    float shading = dot(normal, lightDirection);

    return lightColor * lightIntensity;
}
Send the result as a vec3 to the return to see how it looks:
vec3 directionalLight(vec3 lightColor, float lightIntensity, vec3 normal, vec3 lightPosition)
{
// ...
// return lightColor * lightIntensity;
return vec3(shading);
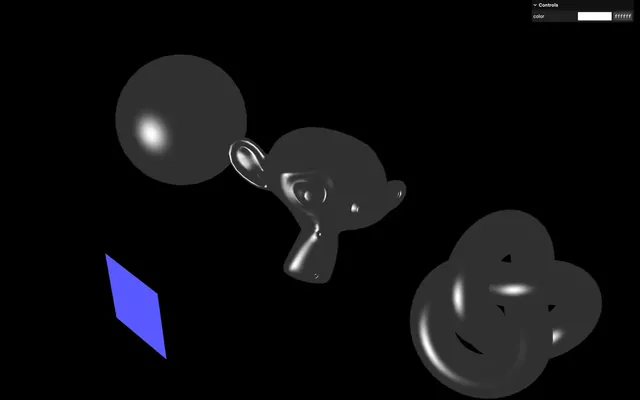
}Not bad, but there is something wrong. Although the light doesn’t move, it feels like it follows the object's rotation.
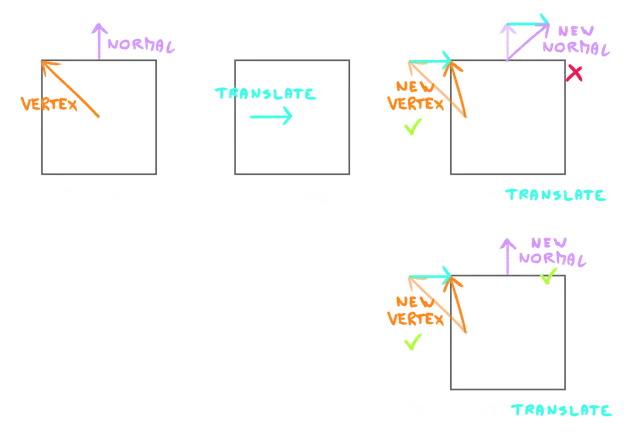
It’s because we forgot to apply the object transformation to the normal and this was our first mistake when setting up the normal.
In vertex.glsl, apply the modelMatrix on the normal like we do for the position, but set the fourth value to 0.0 and save it as a vec4 modelNormal:
varying vec3 vNormal;

void main()
{
    // ...

    // Model normal
    vec4 modelNormal = modelMatrix * vec4(normal, 0.0);

    // Varying
    vNormal = normal;
}
Then assign it to vNormal instead of normal, but don’t forget to swizzle only the xyz because vNormal is a vec3:
varying vec3 vNormal;

void main()
{
    // ...

    // Varying
    vNormal = modelNormal.xyz;
}
As a reminder, when applying the modelMatrix, setting the fourth value of the vec4 to 0.0 applies only the rotation and scale, not the translation:
Back in fragment.glsl and the directionalLight function, instead of sending shading to the return, we can multiply the previously calculated light with shading:
vec3 directionalLight(vec3 lightColor, float lightIntensity, vec3 normal, vec3 lightPosition)
{
    // ...

    return lightColor * lightIntensity * shading;
}
Fix the darkness
Let’s uncomment the ambient light to see how they combine:
void main()
{
    // ...

    light += ambientLight(
        vec3(1.0), // Light color
        0.03       // Light intensity
    );

    light += directionalLight(
        vec3(0.1, 0.1, 1.0), // Light color
        1.0,                 // Light intensity,
        vNormal,             // Normal
        vec3(0.0, 0.0, 3.0)  // Light position
    );

    // ...
}
There are two problems. Since there is an ambient light, the part in the shade should not be fully black, and the part between the shade and the light looks weirdly green.
Both issues come from the same problem. Our directional light can return values below 0 because the dot product is negative when the vectors are opposites:
Have you ever heard of a light that produces less than 0 light? Me neither.
To fix that, in the directionalLight function, clamp the shading to 0.0 using max:
vec3 directionalLight(vec3 lightColor, float lightIntensity, vec3 normal, vec3 lightPosition)
{
    // ...
    float shading = dot(normal, lightDirection);
    shading = max(0.0, shading);

    // ...
}
Much better.
Specular
Unfortunately, we are missing a key element, and it’s the light reflection. Yes, the light is illuminating the surface, but in real life we can also see the light itself reflecting on the surface of the object and we call this “specular”.
Hang on, this is the trickiest part of the lesson.
In order to calculate the specular, we are going to calculate the reflecting vector of the light on the surface and compare it to the view vector.
The more they are aligned, the more specular:
View Direction
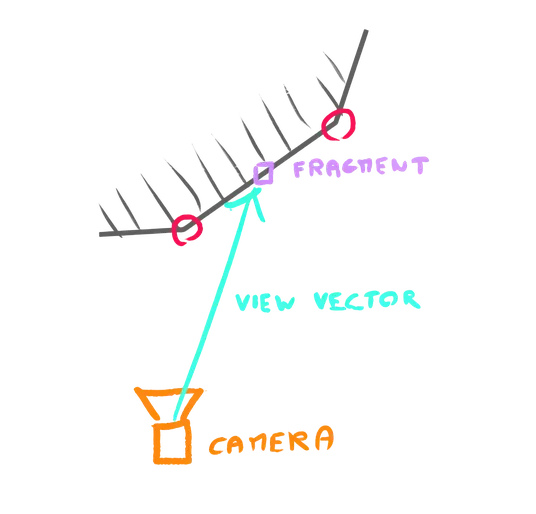
First, we need to know the viewing direction. It’s a vector going from the view (our camera position), toward the fragment position.
We already have the camera position thanks to the cameraPosition built-in uniform. We now need the fragment position, which we can get thanks to the modelPosition from the vertex shader. We are going to use a varying.
In the vertex shader, create a vec3 vPosition and assign the modelPosition.xyz to it at the end of main() (just like we did for the vNormal):
varying vec3 vNormal;
varying vec3 vPosition;

void main()
{
    // ...

    // Varying
    vNormal = modelNormal.xyz;
    vPosition = modelPosition.xyz;
}
In fragment.glsl, retrieve the vPosition:
varying vec3 vPosition;To calculate the view direction, we need the vector from the cameraPosition, to the vPosition.
Calculating the vector between two vectors is as simple as subtracting the destination from the origin:
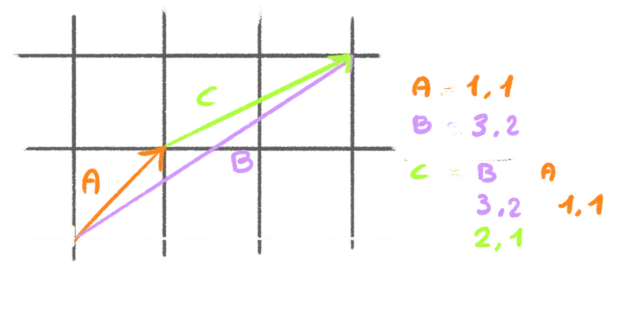
In this case, subtracting vPosition by cameraPosition, which we are going to do at the beginning of the main() because this information is not specific to the directionalLight and can be used for other matters:
void main()
{
    vec3 viewDirection = vPosition - cameraPosition;
    // ...
}
To get the actual direction, all we need to do is make sure that the length of the vector is 1 and we can do that with normalize:
void main()
{
    vec3 viewDirection = normalize(vPosition - cameraPosition);
    // ...
}
We can add a vec3 viewDirection parameter to the directionLight function and send it the viewDirection we’ve just calculated:
vec3 directionalLight(vec3 lightColor, float lightIntensity, vec3 normal, vec3 lightPosition, vec3 viewDirection)
{
    // ...
}

void main()
{
    // ...

    light += directionalLight(
        vec3(0.1, 0.1, 1.0), // Light color
        1.0,                 // Light intensity,
        vNormal,             // Normal
        vec3(0.0, 0.0, 3.0), // Light position
        viewDirection        // View direction
    );

    // ...
}
Reflection
We have the surface orientation as normal, we have the view direction as viewDirection, and we now need the reflection of the light:
Good news: GLSL implements a function named reflect which does exactly that.
Since it’s specific to the light itself and it depends on its position, we are going to calculate it in the directionalLight function.
Call reflect, send it the lightDirection and the normal, and save it as a vec3 lightReflection:
vec3 directionalLight(vec3 lightColor, float lightIntensity, vec3 normal, vec3 lightPosition, vec3 viewDirection)
{
    vec3 lightDirection = normalize(lightPosition);
    vec3 lightReflection = reflect(lightDirection, normal);

    // ...
}
We want the reflection of the light coming toward the surface, but the lightDirection is currently the exact opposite and corresponds to a vector going toward the light:
We can simply invert lightDirection:
vec3 directionalLight(vec3 lightColor, float lightIntensity, vec3 normal, vec3 lightPosition, vec3 viewDirection)
{
    vec3 lightDirection = normalize(lightPosition);
    vec3 lightReflection = reflect(- lightDirection, normal);

    // ...
}
Dot product
We have the view direction as viewDirection and we have the light reflection as lightReflection.
We are ready to compare them and we are going to use the usual dot.
Call dot, send it the viewDirection and lightReflection, and save it as a float specular:
vec3 directionalLight(vec3 lightColor, float lightIntensity, vec3 normal, vec3 lightPosition, vec3 viewDirection)
{
    // ...

    // Specular
    float specular = dot(lightReflection, viewDirection);

    return lightColor * lightIntensity * shading;
}
Send it to the return as a vec3 out of curiosity:
vec3 directionalLight(vec3 lightColor, float lightIntensity, vec3 normal, vec3 lightPosition, vec3 viewDirection)
{
    // ...

    // Specular
    float specular = dot(lightReflection, viewDirection);

    // return lightColor * lightIntensity * shading;
    return vec3(specular);
}
It’s an interesting result, but there are a few things we need to tweak.
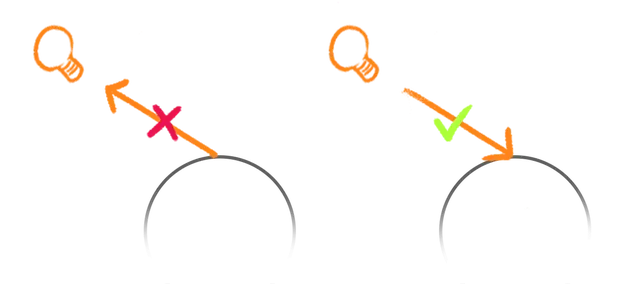
First of all, the reflection is on the wrong side. This makes sense because of what the dot product returns.
If the vectors are going in the same direction, we get 1 which is the opposite of what we want.
One easy fix would be to invert the dot:
vec3 directionalLight(vec3 lightColor, float lightIntensity, vec3 normal, vec3 lightPosition, vec3 viewDirection)
{
    // ...

    // Specular
    float specular = - dot(lightReflection, viewDirection);

    // ...
}
The second issue is how big the specular is. We would expect a more subtitle reflection point and we can do that by bringing the value down, which should ring a bell. We are going to use pow and send it 20.0, which is quite high:
vec3 directionalLight(vec3 lightColor, float lightIntensity, vec3 normal, vec3 lightPosition, vec3 viewDirection)
{
    // ...

    // Specular
    float specular = - dot(lightReflection, viewDirection);
    specular = pow(specular, 20.0);

    // ...
}
Much better.
If you wonder why most of the surface looks slightly illuminated, it’s because of the ambientLight(), which is not an issue.
You might have noticed something weird at the back of the objects. If you use an even power, you get a white area like a second specular:
If you use an odd power, you get a black area:
In both cases, the problem is caused by the result of the dot which is negative in the back.
We can fix that by clamping the value to 0.0 with a max before applying the pow:
vec3 directionalLight(vec3 lightColor, float lightIntensity, vec3 normal, vec3 lightPosition, vec3 viewDirection)
{
    // ...

    // Specular
    float specular = - dot(lightReflection, viewDirection);
    specular = max(0.0, specular);
    specular = pow(specular, 20.0);

    // ...
}
It almost looks like a good specular, but what is this grid artifact?
The purpose of doing the calculations in the fragment was to avoid this kind of artifacts.
And this is actually the second mistake we made when setting up the normal.
If you remember from the previous lessons, this artifact is caused by the normal not having a length of 1 because of the interpolation:
In the main() function, create a normalized version of the vNormal, save it as normal, and send it to the directionalLight function instead of vNormal:
void main()
{
    vec3 normal = normalize(vNormal);
    // ...

    light += directionalLight(
        vec3(0.1, 0.1, 1.0), // Light color
        1.0,                 // Light intensity,
        normal,              // Normal
        vec3(0.0, 0.0, 3.0), // Light position
        viewDirection        // View direction
    );

    // ...
}
Let’s control the specular power using a parameter.
Add a float specularPower to the directionalLight parameters and set it to 20.0 when calling the function:
uniform vec3 uColor;

varying vec3 vNormal;
varying vec3 vPosition;

#include ../includes/ambientLight.glsl

vec3 directionalLight(vec3 lightColor, float lightIntensity, vec3 normal, vec3 lightPosition, vec3 viewDirection, float specularPower)
{
    // ...
    specular = pow(specular, specularPower);

    // ...
}

void main()
{
    // ...

    light += directionalLight(
        vec3(0.1, 0.1, 1.0), // Light color
        1.0,                 // Light intensity,
        normal,              // Normal
        vec3(0.0, 0.0, 3.0), // Light position
        viewDirection,       // View direction
        20.0                 // Specular power
    );

    // ...
}
We are currently returning the specular only. We need to combine it with the current light shading.
This is where opinions diverge and you can get quite a different result.
One could simply add it to the light:
vec3 directionalLight(vec3 lightColor, float lightIntensity, vec3 normal, vec3 lightPosition, vec3 viewDirection, float specularPower)
{
    // ...

    return lightColor * lightIntensity * shading + specular;
}
This looks good, but it’s not accurate since the light should be blue and probably not that white and bright.
In that case, we could also multiply it by the lightColor:
vec3 directionalLight(vec3 lightColor, float lightIntensity, vec3 normal, vec3 lightPosition, vec3 viewDirection, float specularPower)
{
    // ...

    return lightColor * lightIntensity * shading + lightColor * specular;
}

But shouldn’t it also depend on the lightIntensity?
vec3 directionalLight(vec3 lightColor, float lightIntensity, vec3 normal, vec3 lightPosition, vec3 viewDirection, float specularPower)
{
    // ...

    return lightColor * lightIntensity * shading + lightColor * lightIntensity * specular;
}
In this case, there is no difference because the lightIntensity is set to 1, but it would have been different otherwise.
This formula could be simplified like this:
vec3 directionalLight(vec3 lightColor, float lightIntensity, vec3 normal, vec3 lightPosition, vec3 viewDirection, float specularPower)
{
    // ...

    return lightColor * lightIntensity * (shading + specular);
}
Although it’s a lot less visible, I think it makes sense and looks realistic, which is why we are going to stick with it.
And we are done with the directionalLight.
Before moving to the next light, we are going to put the function in a separate file.
In src/shaders/includes/, create a directionalLight.glsl file and put the directionalLight function in it:
vec3 directionalLight(vec3 lightColor, float lightIntensity, vec3 normal, vec3 lightPosition, vec3 viewDirection, float specularPower)
{
    vec3 lightDirection = normalize(lightPosition);
    vec3 lightReflection = reflect(- lightDirection, normal);

    // Shading
    float shading = dot(normal, lightDirection);
    shading = max(0.0, shading);

    // Specular
    float specular = - dot(lightReflection, viewDirection);
    specular = max(0.0, specular);
    specular = pow(specular, specularPower);

    return lightColor * lightIntensity * (shading + specular);
}
In fragment.glsl, replace the function by the #include:
#include ../includes/ambientLight.glsl
#include ../includes/directionalLight.glsl

void main()
{
    // ...
}
Point light 01:00:07
Let’s handle the final light which is the point light.
Be reassured, since it’s very similar to the directional light, we just need to fix two main differences:
- We now consider the light to come from a point and not a general direction.
- We want the light to decay, meaning that’ll be weaker with the distance.
In the fragment.glsl, right before the main(), copy the directionalLight function and rename it pointLight:
vec3 pointLight(vec3 lightColor, float lightIntensity, vec3 normal, vec3 lightPosition, vec3 viewDirection, float specularPower)
{
    // ...
}

void main()
{
    // ...
}
Comment the ambientLight(), the directionalLight() and call the pointLight() instead with the light color to vec3(1.0, 0.1, 0.1) (mostly red) and the light position to vec3(0.0, 2.5, 0.0) (slightly above the scene):
void main()
{
    // ...

    // light += ambientLight(
    //     vec3(1.0), // Light color
    //     0.03       // Light intensity
    // );

    // light += directionalLight(
    //     vec3(0.1, 0.1, 1.0), // Light color
    //     1.0,                 // Light intensity,
    //     normal,              // Normal
    //     vec3(0.0, 0.0, 3.0), // Light position
    //     viewDirection,       // View direction
    //     20.0                 // Specular power
    // );

    light += pointLight(
        vec3(1.0, 0.1, 0.1), // Light color
        1.0,                 // Light intensity,
        normal,              // Normal
        vec3(0.0, 2.5, 0.0), // Light position
        viewDirection,       // View direction
        20.0                 // Specular power
    );

    // ...
}

Helper
Just like for the directional light, let’s add a helper.
In script.js, add the following Mesh, this time using a IcosahedronGeometry, a MeshBasicMaterial and parameters matching the light we wrote in the shader:
const pointLightHelper = new THREE.Mesh(
    new THREE.IcosahedronGeometry(0.1, 2),
    new THREE.MeshBasicMaterial()
)
pointLightHelper.material.color.setRGB(1, 0.1, 0.1)
pointLightHelper.position.set(0, 2.5, 0)
scene.add(pointLightHelper)
Direction
The first thing we are going to fix is the orientation.
The light should be 2.5 units above the center of the scene (slightly above Suzanne). But if you watch the sphere, you can see that it doesn’t look that way:
We need to fix the lightDirection so that it’s a vector going from the surface of the object, toward the light:
And to do that, we need the position of the fragment. Fortunately, we already have access to it in the fragment shader as vPosition.
Add a vec3 position parameter to the pointLight function and send vPosition when calling the pointLight function:
// ...

vec3 pointLight(vec3 lightColor, float lightIntensity, vec3 normal, vec3 lightPosition, vec3 viewDirection, float specularPower, vec3 position)
{
    // ...
}

void main()
{
    // ...

    light += pointLight(
        vec3(1.0, 0.1, 0.1), // Light color
        1.0,                 // Light intensity,
        normal,              // Normal
        vec3(0.0, 2.5, 0.0), // Light position
        viewDirection,       // View direction
        20.0,                // Specular power
        vPosition            // Position
    );

    // ...
}
To calculate the correct orientation, we first need the vector from the position to the lightPosition. We can do that by subtracting position from lightPosition and saving it as a vec3 lightDelta:
vec3 pointLight(vec3 lightColor, float lightIntensity, vec3 normal, vec3 lightPosition, vec3 viewDirection, float specularPower, vec3 position)
{
    vec3 lightDelta = lightPosition - position;
    // ...
}
The light direction is no other than the lightDelta normalised and we can simply replace lightPosition with lightDelta when calculating lightDirection:
vec3 pointLight(vec3 lightColor, float lightIntensity, vec3 normal, vec3 lightPosition, vec3 viewDirection, float specularPower, vec3 position)
{
    vec3 lightDelta = lightPosition - position;
    vec3 lightDirection = normalize(lightDelta);
    // ...
}
Decay
The next and final part to get our point light working is the distance decay.
We want the light intensity to diminish with the distance.
First, we need to know how far the surface is from the light, and we already have this information.
Since lightDelta is a vector going from the fragment position to the light, its length is the distance we need.
Create a float lightDistance variable and assign the length of lightDelta to it using length:
vec3 pointLight(vec3 lightColor, float lightIntensity, vec3 normal, vec3 lightPosition, vec3 viewDirection, float specularPower, vec3 position)
{
    vec3 lightDelta = lightPosition - position;
    float lightDistance = length(lightDelta);
    // ...
}
We now want the value to start at 1 when the distance is 0 and to reduce progressively.
Before the return, create a decay variable, assign it 1.0, and subtract the lightDistance:
vec3 pointLight(vec3 lightColor, float lightIntensity, vec3 normal, vec3 lightPosition, vec3 viewDirection, float specularPower, vec3 position)
{
    // ...

    // Decay
    float decay = 1.0 - lightDistance;

    return lightColor * lightIntensity * (shading + specular);
}
Return a vec3() of decay in order to see what we end up with:
vec3 pointLight(vec3 lightColor, float lightIntensity, vec3 normal, vec3 lightPosition, vec3 viewDirection, float specularPower, vec3 position)
{
    // ...

    // Decay
    float decay = 1.0 - lightDistance;

    // return lightColor * lightIntensity * (shading + specular);
    return vec3(decay);
}

We get nothing because the light decays too fast. The point light is currently 2.5 units above Suzanne and after 1 unit, the decay is already down to 0.0:
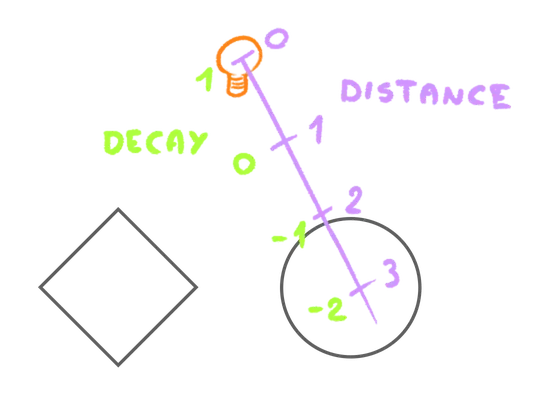
We can fix that by multiplying lightDistance by a small number like 0.3:
vec3 pointLight(vec3 lightColor, float lightIntensity, vec3 normal, vec3 lightPosition, vec3 viewDirection, float specularPower, vec3 position)
{
    // ...
    float decay = 1.0 - lightDistance * 0.3;

    // ...
}
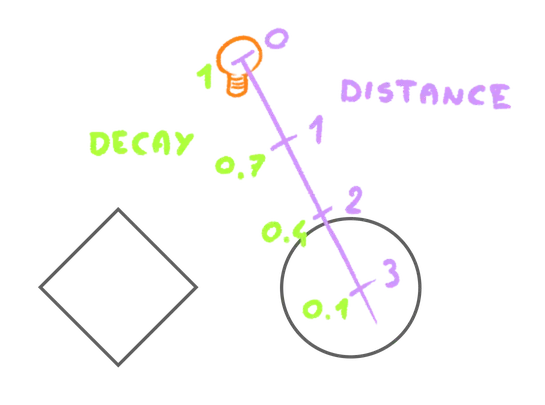
And we can control that from the parameters.
Add a float lightDecay parameter to pointLight and set it to 0.25 when calling the function, then multiply it with lightDistance when calculating decay:
vec3 pointLight(vec3 lightColor, float lightIntensity, vec3 normal, vec3 lightPosition, vec3 viewDirection, float specularPower, vec3 position, float lightDecay)
{
    // ...

    // Decay
    float decay = 1.0 - lightDistance * lightDecay;

    // ...
}

void main()
{
    // ...

    light += pointLight(
        vec3(1.0, 0.1, 0.1), // Light color
        1.0,                 // Light intensity,
        normal,              // Normal
        vec3(0.0, 2.5, 0.0), // Light position
        viewDirection,       // View direction
        20.0,                // Specular power
        vPosition,           // Position
        0.25                 // Light decay
    );

    // ...
}
We can now return the light and multiply it by the decay:
vec3 pointLight(vec3 lightColor, float lightIntensity, vec3 normal, vec3 lightPosition, vec3 viewDirection, float specularPower, vec3 position, float lightDecay)
{
    // ...

    return lightColor * lightIntensity * decay * (shading + specular);
}
And don’t forget to clamp the decay to 0.0 using max() so that potential negative values don’t mess up the other lights:
vec3 pointLight(vec3 lightColor, float lightIntensity, vec3 normal, vec3 lightPosition, vec3 viewDirection, float specularPower, vec3 position, float lightDecay)
{
    // ...

    // Decay
    float decay = 1.0 - lightDistance * lightDecay;
    decay = max(0.0, decay);

    // ...
}
And we are done with the point light. Let’s put it in a separate file.
In src/shaders/includes/, create a pointLight.glsl file and put the pointLight function in it:
vec3 pointLight(vec3 lightColor, float lightIntensity, vec3 normal, vec3 lightPosition, vec3 viewDirection, float specularPower, vec3 position, float lightDecay)
{
    vec3 lightDelta = lightPosition - position;
    float lightDistance = length(lightDelta);
    vec3 lightDirection = normalize(lightDelta);
    vec3 lightReflection = reflect(- lightDirection, normal);

    // Shading
    float shading = dot(normal, lightDirection);
    shading = max(0.0, shading);

    // Specular
    float specular = - dot(lightReflection, viewDirection);
    specular = max(0.0, specular);
    specular = pow(specular, specularPower);

    // Decay
    float decay = 1.0 - lightDistance * lightDecay;
    decay = max(0.0, decay);

    return lightColor * lightIntensity * decay * (shading + specular);
}
In fragment.glsl, replace the function by the #include:
#include ../includes/ambientLight.glsl
#include ../includes/directionalLight.glsl
#include ../includes/pointLight.glsl

void main()
{
    // ...
}
Conclusion 01:12:53
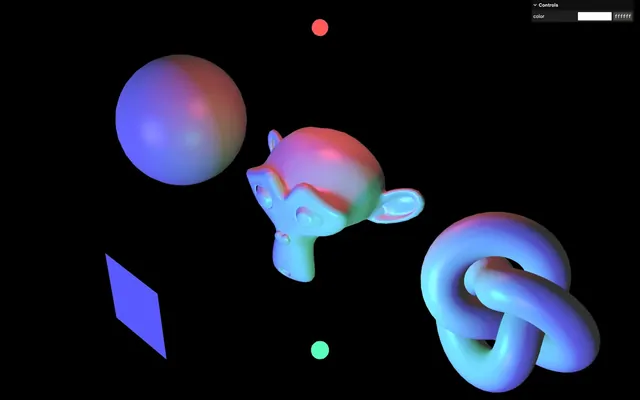
We are done with the light and we can uncomment the three of them:
void main()
{
    // ...

    light += ambientLight(
        vec3(1.0), // Light color
        0.03       // Light intensity
    );

    light += directionalLight(
        vec3(0.1, 0.1, 1.0), // Light color
        1.0,                 // Light intensity,
        normal,              // Normal
        vec3(0.0, 0.0, 3.0), // Light position
        viewDirection,       // View direction
        20.0                 // Specular power
    );

    light += pointLight(
        vec3(1.0, 0.1, 0.1), // Light color
        1.0,                 // Light intensity,
        normal,              // Normal
        vec3(0.0, 2.5, 0.0), // Light position
        viewDirection,       // View direction
        20.0,                // Specular power
        vPosition,           // Position
        0.2                  // Light decay
    );

    // ...
}
The cool part with the structure we used is that we can add more light just by calling the functions again with different parameters:
void main()
{
    // ...

    light += ambientLight(
        // ...
    );

    light += directionalLight(
        // ...
    );

    light += pointLight(
        // ...
    );

    light += pointLight(
        vec3(0.1, 1.0, 0.5), // Light color
        1.0,                 // Light intensity,
        normal,              // Normal
        vec3(2.0, 2.0, 2.0), // Light position
        viewDirection,       // View direction
        20.0,                // Specular power
        vPosition,           // Position
        0.2                  // Light decay
    );

    // ...
}
You can add the corresponding helper in the scene if you want:
const pointLightHelper2 = new THREE.Mesh(
    new THREE.IcosahedronGeometry(0.1, 2),
    new THREE.MeshBasicMaterial()
)
pointLightHelper2.material.color.setRGB(0.1, 1.0, 0.5)
pointLightHelper2.position.set(2, 2, 2)
scene.add(pointLightHelper2)
Although it’s not physically based and we took shortcuts, especially when it comes to specular and point light decay, it looks realistic and it’s performant.
We now understand light shading basics and we can use it to add cool effects to our custom shaders.
Understand that we’ve only scratched the surface of the topic and light can go a lot further, especially when you think about environment maps, PBR, shadows, normals, etc.
Going further 01:15:58
As always, feel free to go further. Here are some suggestions:
- Animate the lights.
- Add more control over the specular.
- Support other types of lights like the hemisphere light.
- Control the lights using the debug panel.
And if you want to learn more about light shading, have a look at the OGLDEV channel and more specifically the following videos: