Introduction 00:00
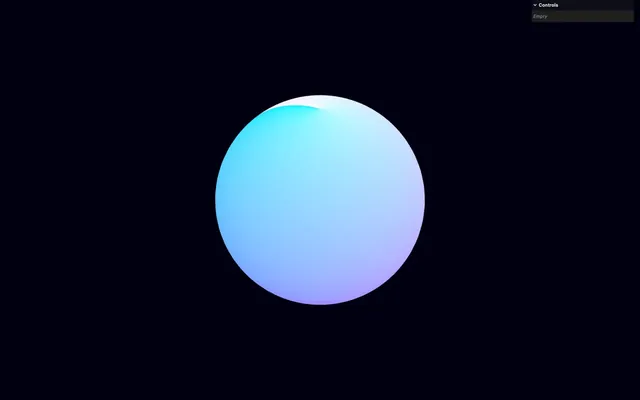
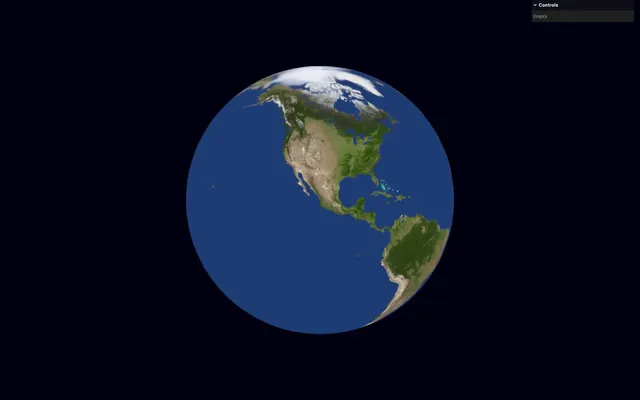
Creating a realistic Earth might sound simple. Create a sphere, slap a nice Earth texture on it and we’re good to go, right?
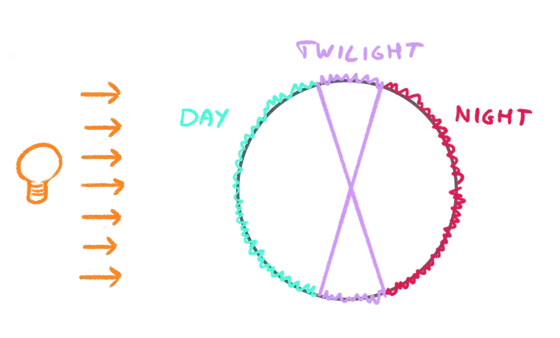
Unfortunately, there is a lot more going on:
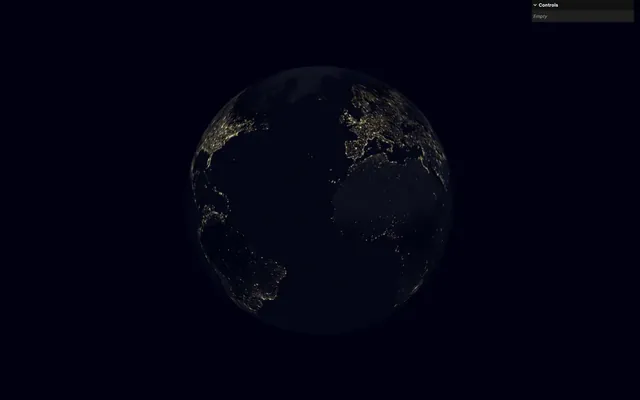
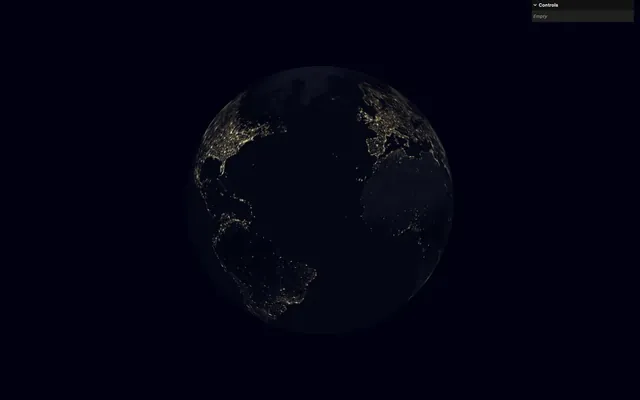
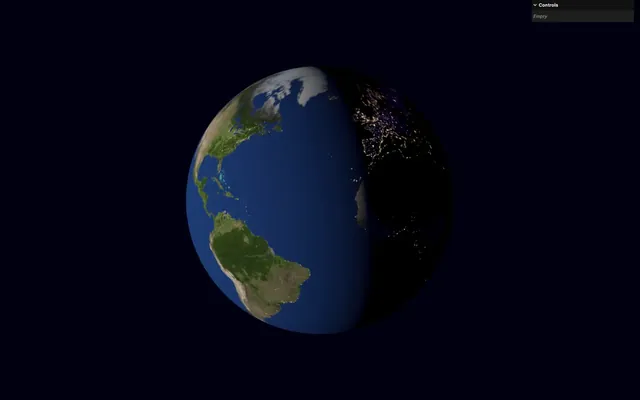
- Cities in the dark side are illuminated
- There are clouds
- The Sun’s reflection is mostly visible on the oceans, not on the continents
- The part between the day and the night called twilight looks red-ish
- The atmosphere creates a glow all around the Earth, feeling like a volume

We are not going for a physics-based rendering with complex scientific formulas, but that won’t prevent the final result from looking good and realistic.
Setup 02:09
The starter already contains the following:
- A well-subdivided sphere rotating slowly
- A basic shader is already included in the
src/shaders/earth/folder with avertex.glsland afragment.glsl - An instance of
lil-guiwith no tweak yet - The
vite-plugin-glsldependency to handle GLSL files OrbitControlsto rotate around- A
TextureLoaderinstance
As for the shader itself:
- The
uvis sent to the fragment asvUvand displayed ongl_FragColor - The
modelPositionis sent to the fragment asvPositionand used to calculate theviewDirectionvariable (vector going from the camera to the fragment position) - The transformed
normalis sent to the fragment asvNormaland normalized again asnormalto prevent grid artifacts
It’s quite a lot for a starter, but those are concepts we have already learned and practiced a few times in previous lessons.
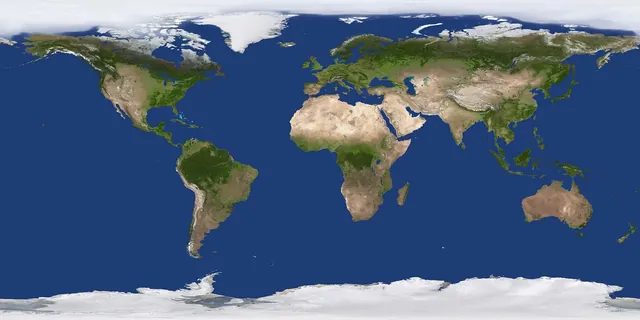
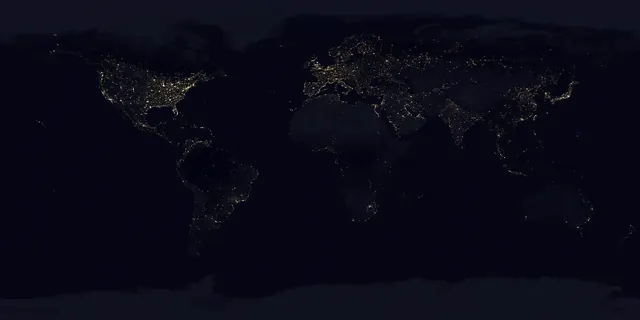
Earth textures 05:08
In this lesson, we are going to use Earth textures. Yet, the code can easily be applied to other planets and even exotic or procedurally generated ones.
We are going to use the textures you can find on Solar System Scope. It’s a website providing various planet textures under CC Attribution 4.0 license, which requires providing appropriate credit. If you put the website live, make sure to show those credits somewhere on the page.
The Earth textures are already available in the static/earth/ folder.
The day.jpg and the night.jpg files are two separated textures. We are going to send both to the shader and mix between them according to the orientation of the sun. They have been encoded in sRGB.
The specularClouds.jpg contains the specular texture (where it’s reflective) into the red channel and the clouds texture into the green channel. Combining data like this reduces the amount of memory we allocate to the GPU. The texture is encoded in linear.
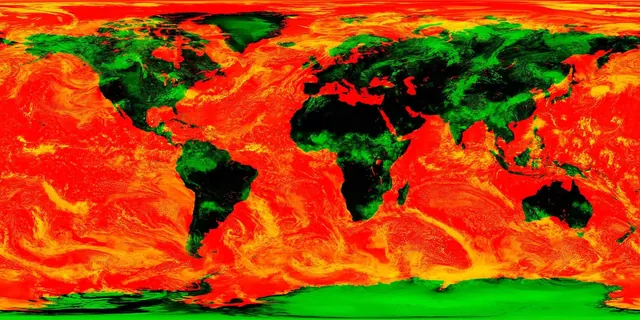
All textures have been resized to a 4096x2048 resolution and compressed for the web.
Load
Let’s load all three textures.
At the beginning of the Earth section, use the textureLoader to load() the following textures:
./earth/day.jpg./earth/night.jpg./earth/specularClouds.jpg
/**
 * Earth
 */
// Textures
const earthDayTexture = textureLoader.load('./earth/day.jpg')
const earthNightTexture = textureLoader.load('./earth/night.jpg')
const earthSpecularCloudsTexture = textureLoader.load('./earth/specularClouds.jpg')
The day.jpg and night.jpg have been encoded in sRGB since they will be used for display and we need to inform Three.js of that.
Update their colorSpace to THREE.SRGBColorSpace:
// Textures
const earthDayTexture = textureLoader.load('./earth/day.jpg')
earthDayTexture.colorSpace = THREE.SRGBColorSpace

const earthNightTexture = textureLoader.load('./earth/night.jpg')
earthNightTexture.colorSpace = THREE.SRGBColorSpace

const earthSpecularCloudsTexture = textureLoader.load('./earth/specularClouds.jpg')
Send all three of them to the earthMaterial as the following uniforms using the Uniform class:
uDayTextureuNightTextureuSpecularCloudsTexture
const earthMaterial = new THREE.ShaderMaterial({
    // ...
    uniforms:
    {
        uDayTexture: new THREE.Uniform(earthDayTexture),
        uNightTexture: new THREE.Uniform(earthNightTexture),
        uSpecularCloudsTexture: new THREE.Uniform(earthSpecularCloudsTexture)
    }
})
In fragment.glsl, retrieve all three uniforms as sampler2D:
uniform sampler2D uDayTexture;
uniform sampler2D uNightTexture;
uniform sampler2D uSpecularCloudsTexture;
Day / night color 13:02
We want to show the uDayTexture on the side of the earth facing the sun and the uNightTexture on the other side.
First, set the color to vec3(0.0):
void main()
{
    // ...
    vec3 color = vec3(0.0);

    // ...
}

Pick the color on the uDayTexture using the texture() method and the vUv, then do the same with the uNightTexture. We only need the rgb channels and we can save those in vec3 variables:
void main()
{
    // ...

    // Day / night color
    vec3 dayColor = texture(uDayTexture, vUv).rgb;
    vec3 nightColor = texture(uNightTexture, vUv).rgb;

    // Final color
    // ...
}
Let’s try the dayColor on the color:
void main()
{
    // ...

    // Day / night color
    vec3 dayColor = texture(uDayTexture, vUv).rgb;
    vec3 nightColor = texture(uNightTexture, vUv).rgb;
    color = dayColor;

    // ...
}
And the nightColor on the color:
void main()
{
    // ...

    // Day / night color
    vec3 dayColor = texture(uDayTexture, vUv).rgb;
    vec3 nightColor = texture(uNightTexture, vUv).rgb;
    color = nightColor;

    // ...
}
Both are working.
It’s time to mix them, and mix is the actual function we are going to use. However, mix requires a mixing factor controlling how much of one or the other to take.
We want this mixing factor to be 1.0 on the side facing the sun and 0.0 on the other side:

We are going to use the usual dot product. It is very similar to what we did with the directional light shading, and, first, we need a direction for the light.
For now, we are going to create that sun direction in the GLSL and later we are going to control it using a uniform.
Before the Day / night color section, create a vec3 uSunDirection and set it to vec3(0.0, 0.0, 1.0):
void main()
{
    // ...

    // Sun orientation
    vec3 uSunDirection = vec3(0.0, 0.0, 1.0);

    // Day / night color
    // ...
}
We are going to save the dot of the uSunDirection with the normal in a float sunOrientation variable:
void main()
{
    // ...

    // Sun orientation
    vec3 uSunDirection = vec3(0.0, 0.0, 1.0);
    float sunOrientation = dot(uSunDirection, normal);

    // Day / night color
    // ...
}
Out of curiosity, you can send it to the color and comment the Day / night part:
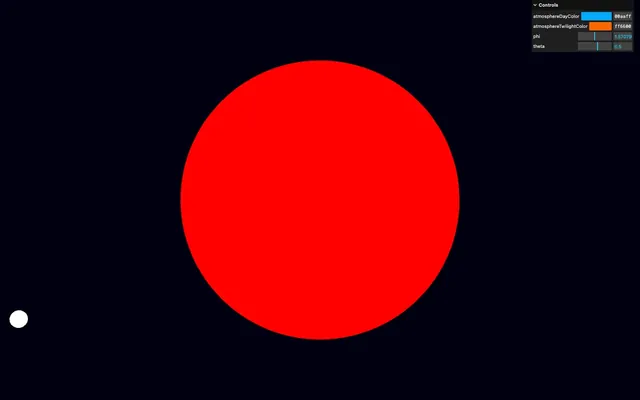
void main()
{
    // ...

    // Sun orientation
    vec3 uSunDirection = vec3(0.0, 0.0, 1.0);
    float sunOrientation = dot(uSunDirection, normal);
    color = vec3(sunOrientation);

    // // Day / night color
    // vec3 dayColor = texture(uDayTexture, vUv).rgb;
    // vec3 nightColor = texture(uNightTexture, vUv).rgb;
    // color = nightColor;

    // ...
}
The bright part is going to be the day texture and the dark part is going to be the night texture.
Remove the color test:
void main()
{
    // ...

    // Sun orientation
    vec3 uSunDirection = vec3(0.0, 0.0, 1.0);
    float sunOrientation = dot(uSunDirection, normal);

    // Day / night color
    vec3 dayColor = texture(uDayTexture, vUv).rgb;
    vec3 nightColor = texture(uNightTexture, vUv).rgb;
    color = nightColor;

    // ...
}
We are now going to create a dayMix variable equal to that sunOrientation, then use it to mix between the dayColor and the nightColor:
void main()
{
    // ...
    float dayMix = sunOrientation;
    vec3 dayColor = texture(uDayTexture, vUv).rgb;
    vec3 nightColor = texture(uNightTexture, vUv).rgb;
    color = mix(nightColor, dayColor, dayMix);

    // ...
}
It’s already pretty good, but let’s remap, clamp, and smooth the transition between the two textures using the smoothstep function:
void main()
{
    // ...

    // Day / night color
    float dayMix = smoothstep(- 0.25, 0.5, sunOrientation);
    vec3 dayColor = texture(uDayTexture, vUv).rgb;
    vec3 nightColor = texture(uNightTexture, vUv).rgb;
    color = mix(nightColor, dayColor, dayMix);

    // ...
}
Sun 24:12
For now, the sun is only managed as a direction in the GLSL.
We are going to handle it in JavaScript, send it as a uniform, and show a mesh on its location to help us visualize it.
In script.js, after the Earth section, add a Sun section:
/**
 * Sun
 */
Like in one of the previous lessons, we are going to use the Spherical class to handle the coordinates and convert them to a Vector3.
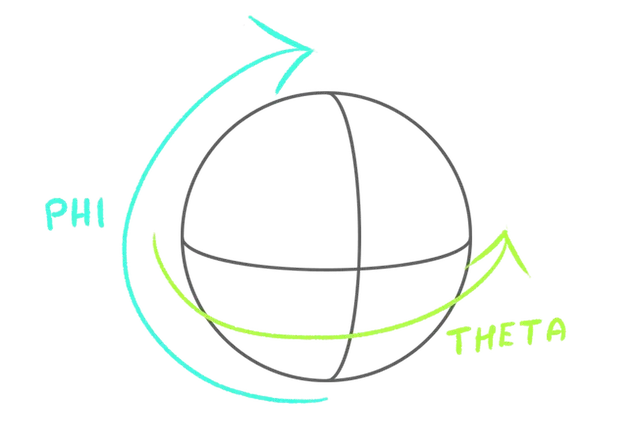
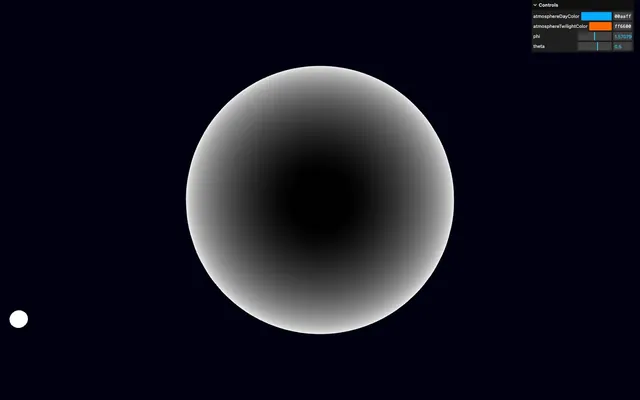
Create a sunSpherical variable containing the following Spherical coordinates and a sunDirection containing a default Vector3:
// Coordinates
const sunSpherical = new THREE.Spherical(1, Math.PI * 0.5, 0.5)
const sunDirection = new THREE.Vector3()
We are going to update the sunDirection in a function which will come in handy later.
Create a updateSun function and call it immediately:
// Update
const updateSun = () =>
{
}

updateSun()
In the updateSun function, update the sunDirection according to the sunSpherical using the setFromSpherical() method:
const updateSun = () =>
{
    // Sun direction
    sunDirection.setFromSpherical(sunSpherical)
}
Since the sunSpherical radius is set to 1, sunDirection length should be 1, meaning it’s already normalized.
But to visualize it properly, we are going to create a debug mesh.
Right before the updateSun function, create a debugSun mesh using a IcosahedronGeometry and a MeshBasicMaterial, then add it to the scene:
// Debug
const debugSun = new THREE.Mesh(
    new THREE.IcosahedronGeometry(0.1, 2),
    new THREE.MeshBasicMaterial()
)
scene.add(debugSun)
In the updateSun function, copy the values from the sunDirection to the debugSun.position using the copy() method:
const updateSun = () =>
{
    // Sun direction
    sunDirection.setFromSpherical(sunSpherical)

    // Debug
    debugSun.position.copy(sunDirection)
}
Unfortunately, with the radius being 1 and the Earth's radius being 2, the mesh is still inside the Earth.
To move it away, we can use the multiplyScalar() method on debugSun.position right after the copy():
const updateSun = () =>
{
    // Sun direction
    sunDirection.setFromSpherical(sunSpherical)

    // Debug
    debugSun.position.copy(sunDirection).multiplyScalar(5)
}
When chaining methods like this, I like to add line breaks to make it clear that there are multiple methods being called:
const updateSun = () =>
{
// Sun direction
sunDirection.setFromSpherical(sunSpherical)
// Debug
debugSun.position
.copy(sunDirection)
.multiplyScalar(5)
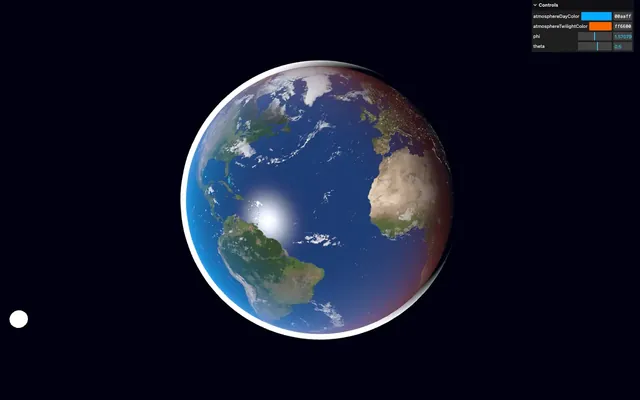
}We can now add tweaks for the phi and theta angles of the sunSpherical and call updateSun when the tweak changes:
// Tweaks
gui
    .add(sunSpherical, 'phi')
    .min(0)
    .max(Math.PI)
    .onChange(updateSun)

gui
    .add(sunSpherical, 'theta')
    .min(- Math.PI)
    .max(Math.PI)
    .onChange(updateSun)
Our sun coordinates are ready. We now need to send them to the shader.
Create a uSunDirection uniform on earthMaterial and set it to a Vector3 using the Uniform class:
const earthMaterial = new THREE.ShaderMaterial({
    // ...
    uniforms:
    {
        // ...
        uSunDirection: new THREE.Uniform(new THREE.Vector3(0, 0, 1))
    }
})
Update the uSunDirection in the updateSun function:
const updateSun = () =>
{
    // ...

    // Uniforms
    earthMaterial.uniforms.uSunDirection.value.copy(sunDirection)
}
In fragment.glsl, retrieve the uniform as a vec3 and delete the temporary one we created in the main():
// ...
uniform vec3 uSunDirection;

// ...

void main()
{
    // Sun orientation
    float sunOrientation = dot(uSunDirection, normal);

    // ...
}
Anisotropy 34:55
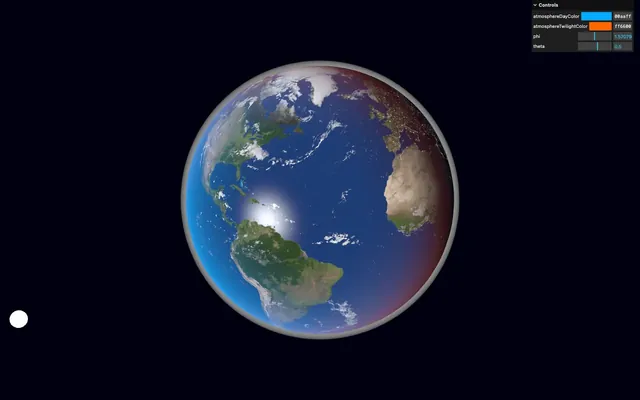
If you check the textures at a narrow angle, you’ll notice that they are slightly blurred:
This makes perfect sense because of the texture resolution and the magnification filter. We could try another magFilter on the texture, but there is actually another solution named "anisotropy".
anisotropy is a property available on textures that will improve the sharpness of the texture when seen at a narrow angle by applying different levels of filtering.
A fancy definition, but the idea is simple. The higher the anisotropy, the sharper the texture, and the default value is 1.
But be careful, there are hardware limitations and you can’t use any value on anisotropy.
One way of determining the limitation, is to use the following instruction after instantiating the renderer:
renderer.capabilities.getMaxAnisotropy()And you can console.log() it:
console.log(renderer.capabilities.getMaxAnisotropy())
But to keep things simple, we are going to use a value of 8 which will look good and should work on all devices.
Set an anisotropy to 8 on all three textures:
const earthDayTexture = textureLoader.load('./earth/day.jpg')
earthDayTexture.colorSpace = THREE.SRGBColorSpace
earthDayTexture.anisotropy = 8

const earthNightTexture = textureLoader.load('./earth/night.jpg')
earthNightTexture.colorSpace = THREE.SRGBColorSpace
earthNightTexture.anisotropy = 8

const earthSpecularCloudsTexture = textureLoader.load('./earth/specularClouds.jpg')
earthSpecularCloudsTexture.anisotropy = 8
Textures are sharp, even at a narrow angle.
Also note that the anisotropy can have a performance impact.
Clouds 39:29
Let’s add some clouds.
One practice I see a lot consists of adding the clouds on a sphere on top of the actual earth, which enables some flexibility like rotating the clouds independently.
Unfortunately, rotating the clouds as a full mesh doesn’t look very good and we would need to make the sphere slightly bigger to prevent z-fighting which can look a bit weird.
Instead, we are going to add the clouds directly in the shader and not animate them.
We are going to use the specularCloudsTexture that we already sent to the shader as uSpecularCloudsTexture and only use its green channel, where the clouds are stored:
We need the texture for both the specular and the clouds. Instead of calling texture() twice, we are going to do it once, swizzle the r and g channels only, and save it as a vec2 specularCloudColor variable:
void main()
{
    // ...

    // Specular cloud color
    vec2 specularCloudColor = texture(uSpecularCloudsTexture, vUv).rg;
}
You can send it to the color out of curiosity:
void main()
{
    // ...

    // Specular cloud color
    vec2 specularCloudColor = texture(uSpecularCloudsTexture, vUv).rg;
    color = vec3(specularCloudColor, 0.0);

    // Final color
    gl_FragColor = vec4(color, 1.0);
    #include <tonemapping_fragment>
    #include <colorspace_fragment>
}
Remove the color test:
void main()
{
    // ...

    // Specular cloud color
    vec2 specularCloudColor = texture(uSpecularCloudsTexture, vUv).rg;

    // Final color
    gl_FragColor = vec4(color, 1.0);
    #include <tonemapping_fragment>
    #include <colorspace_fragment>
}

We are going to create white clouds by mixing the initial color with a vec3(1.0) according to the green channel of the specularCloudColor.
Create a float cloudsMix variable and save the specularCloudColor.g in it:
void main()
{
    // ...

    // Clouds
    float cloudsMix = specularCloudColor.g;

    // Final color
    // ...
}
Update the color by using a mix of color and vec3(1.0) (white) according to cloudsMix:
void main()
{
    // ...

    // Clouds
    float cloudsMix = specularCloudColor.g;
    color = mix(color, vec3(1.0), cloudsMix);

    // ...
}
It seems to work, but the clouds are way too intense and cover most of the surface.
We are going to remap the value so that we only see what would have been the dense part of the clouds.
Use smoothstep on specularCloudColor.g with limits set between a 0.5 and 1.0 :
void main()
{
    // ...

    // Clouds
    float cloudsMix = smoothstep(0.5, 1.0, specularCloudColor.g);
    color = mix(color, vec3(1.0), cloudsMix);

    // ...
}
The higher the first parameter of smoothstep, the less clouds we get.
It’s looking good, but the clouds are fully white on the night side of the Earth. We could make them darker, but they would occlude the city lights, which we would like to avoid.
Instead, we are going to make them disappear when it’s night and we can do that by multiplying cloudsMix by dayMix that we used to mix between the day and night textures:
void main()
{
// ...
// Clouds
float cloudsMix = smoothstep(0.5, 1.0, specularCloudColor.g);
cloudsMix *= dayMix;
color = mix(color, vec3(1.0), cloudsMix);
// ...
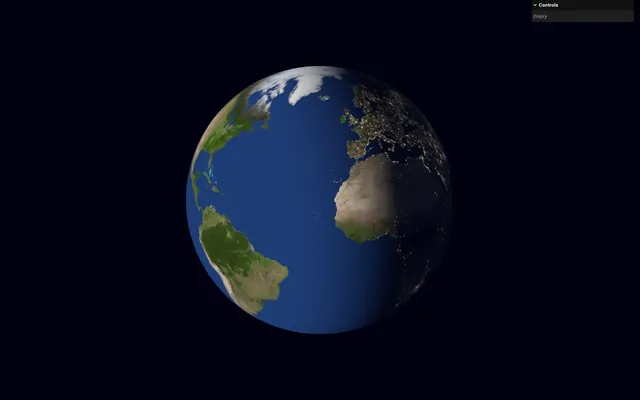
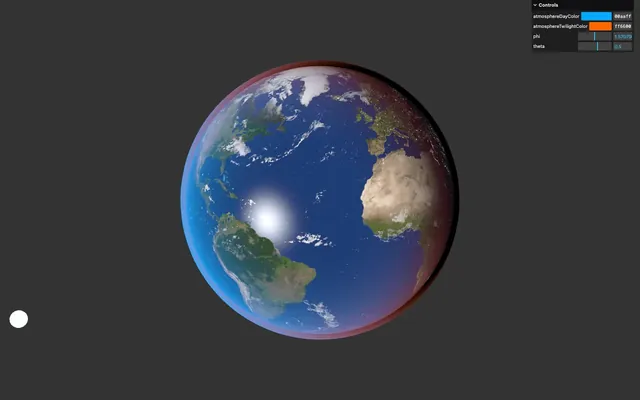
}Atmosphere 47:55
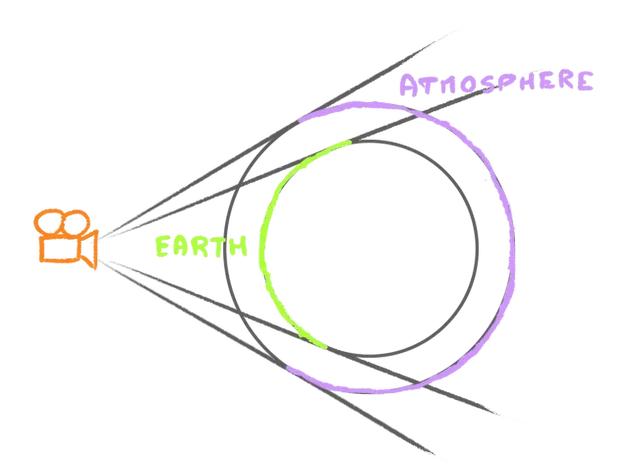
One beautiful aspect of planets is the atmosphere and how the light passes through it.
This effect is more pronounced at a narrow angle because we see more of the atmosphere:
It looks blueish on the day side, it’s invisible on the night side and it looks redish in the twilight, which is where the day side meets the night side.
Gradient
To start with, we want a gradient going from blueish on the day side to redish on the twilight.
We are going to use uniforms and tweaks in order to find the perfect colors and have fun.
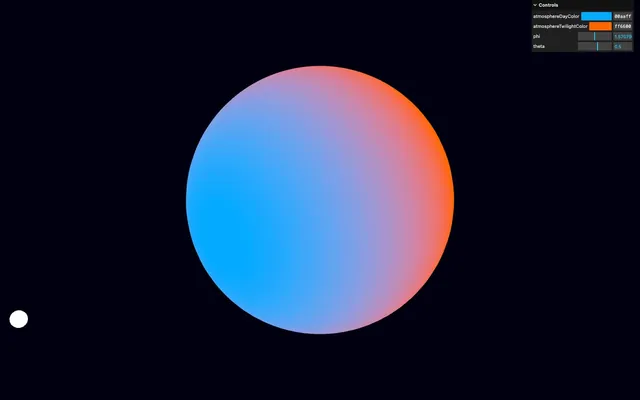
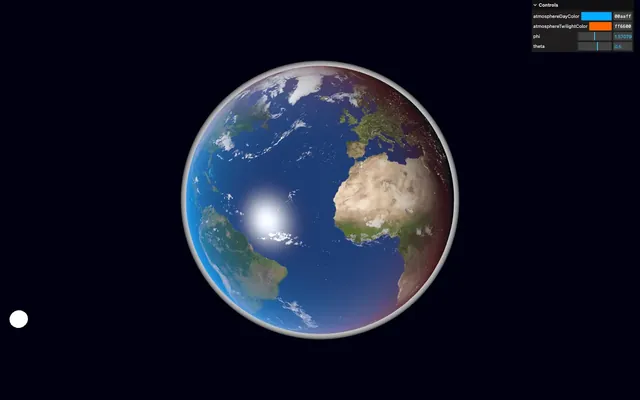
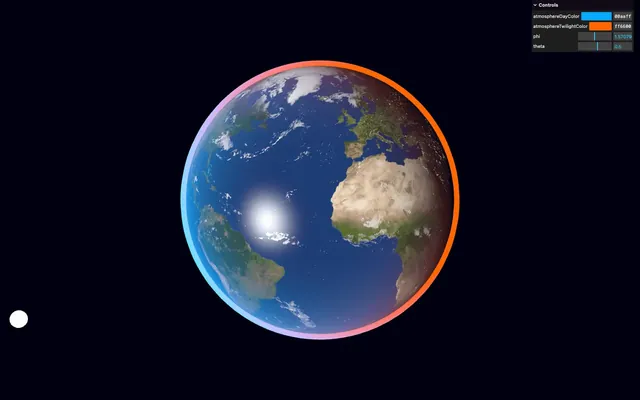
In script.js, at the beginning of the Earth part, create a earthParameters object and set an atmosphereDayColor property to '#00aaff' and an atmosphereTwilightColor property to '#ff6600':
/**
 * Earth
 */
const earthParameters = {}
earthParameters.atmosphereDayColor = '#00aaff'
earthParameters.atmosphereTwilightColor = '#ff6600'
Create the corresponding uniforms named uAtmosphereDayColor and uAtmosphereTwilightColor using the Uniform and Color classes:
const earthMaterial = new THREE.ShaderMaterial({
    // ...
    uniforms:
    {
        // ...
        uAtmosphereDayColor: new THREE.Uniform(new THREE.Color(earthParameters.atmosphereDayColor)),
        uAtmosphereTwilightColor: new THREE.Uniform(new THREE.Color(earthParameters.atmosphereTwilightColor))
    }
})
Create tweaks using the addColor() method on gui and update the corresponding uniforms when the tweak changes:
const earthParameters = {}
earthParameters.atmosphereDayColor = '#00aaff'
earthParameters.atmosphereTwilightColor = '#ff6600'

gui
    .addColor(earthParameters, 'atmosphereDayColor')
    .onChange(() =>
    {
        earthMaterial.uniforms.uAtmosphereDayColor.value.set(earthParameters.atmosphereDayColor)
    })

gui
    .addColor(earthParameters, 'atmosphereTwilightColor')
    .onChange(() =>
    {
        earthMaterial.uniforms.uAtmosphereTwilightColor.value.set(earthParameters.atmosphereTwilightColor)
    })
In fragment.glsl, retrieve the two color uniforms as vec3:
uniform vec3 uAtmosphereDayColor;
uniform vec3 uAtmosphereTwilightColor;
We now need to mix between uAtmosphereDayColor and the uAtmosphereTwilightColor according to the orientation to the sun and we can reuse the sunOrientation we created earlier.
Create a float atmosphereDayMix variable and remap the sunOrientation using a smoothstep similar to what we did with the dayMix:
void main()
{
    // ...

    // Atmosphere
    float atmosphereDayMix = smoothstep(- 0.5, 1.0, sunOrientation);

    // Final color
    // ...
}
Mix between the uAtmosphereTwilightColor and the uAtmosphereDayColor according to the atmosphereDayMix and save the result as a vec3 atmosphereColor variable:
void main()
{
    // ...

    // Atmosphere
    float atmosphereDayMix = smoothstep(- 0.5, 1.0, sunOrientation);
    vec3 atmosphereColor = mix(uAtmosphereTwilightColor, uAtmosphereDayColor, atmosphereDayMix);

    // Final color
    // ...
}
Assign it to the color to see what we get:
void main()
{
    // ...

    // Atmosphere
    float atmosphereDayMix = smoothstep(- 0.5, 1.0, sunOrientation);
    vec3 atmosphereColor = mix(uAtmosphereTwilightColor, uAtmosphereDayColor, atmosphereDayMix);
    color = atmosphereColor;

    // Final color
    // ...
}
Fresnel
The atmosphere gradient looks okay, but we need to mix it with the color without replacing it entirely as we are doing right now.
As we said earlier, the atmosphere is more visible on the edges of the planet. We need the usual fresnel.
Before the Atmosphere part, calculate the Fresnel using the dot of the viewDirection and the normal as we did in previous lessons:
void main()
{
    // ...

    // Fresnel
    float fresnel = dot(viewDirection, normal);

    // Atmosphere
    // ...
}
Comment the Atmosphere part and send the fresnel to the color as a vec3 to see what we get:
void main()
{
    // ...

    // Fresnel
    float fresnel = dot(viewDirection, normal);
    color = vec3(fresnel);

    // // Atmosphere
    // float atmosphereDayMix = smoothstep(- 0.5, 1.0, sunOrientation);
    // vec3 atmosphereColor = mix(uAtmosphereTwilightColor, uAtmosphereDayColor, atmosphereDayMix);
    // color = atmosphereColor;

    // ...
}
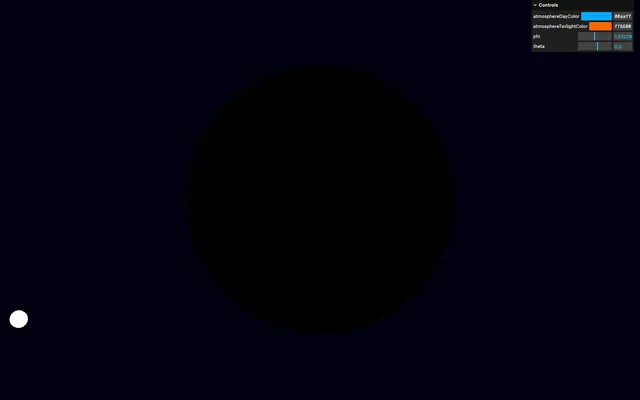
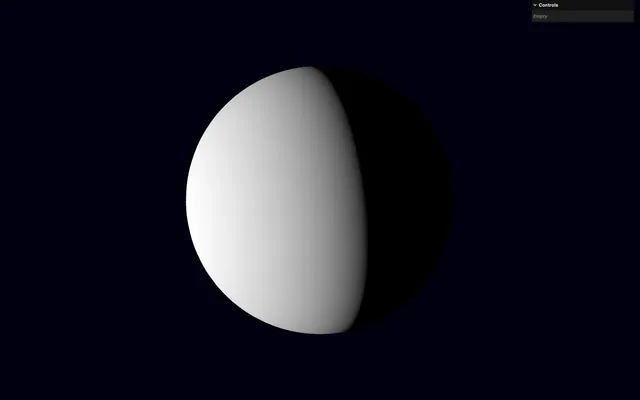
Nothing but black. And the reason is that the normals are going in the opposite direction of the view, ending up in values going from -1.0 to 0.0:
As a quick fix, we can add 1:
void main()
{
    // ...

    // Fresnel
    float fresnel = dot(viewDirection, normal) + 1.0;
    color = vec3(fresnel);

    // ...
}

Let’s push the fresnel more on the edges by using a pow on it:
void main()
{
    // ...

    // Fresnel
    float fresnel = dot(viewDirection, normal) + 1.0;
    fresnel = pow(fresnel, 2.0);
    color = vec3(fresnel);

    // ...
}
Remove the color test with the fresnel and reinsert the atmosphere part:
void main()
{
    // ...

    // Fresnel
    float fresnel = dot(viewDirection, normal) + 1.0;
    fresnel = pow(fresnel, 2.0);

    // Atmosphere
    float atmosphereDayMix = smoothstep(- 0.5, 1.0, sunOrientation);
    vec3 atmosphereColor = mix(uAtmosphereTwilightColor, uAtmosphereDayColor, atmosphereDayMix);
    color = atmosphereColor;

    // ...
}

Combine
We have the color gradient, we have the Fresnel. It’s time to combine them and we can do that using the usual mix to mix between the color and the atmosphereColor according to the fresnel:
void main()
{
    // ...

    // Atmosphere
    float atmosphereDayMix = smoothstep(- 0.5, 1.0, sunOrientation);
    vec3 atmosphereColor = mix(uAtmosphereTwilightColor, uAtmosphereDayColor, atmosphereDayMix);
    color = mix(color, atmosphereColor, fresnel);

    // ...
}
Not bad, bud the atmosphere is way too visible on the night side of the Earth.
Fortunately, we already have a variable lowering as it transitions to the night and that’s the atmosphereDayMix.
Multiply the fresnel by atmosphereDayMix in the mix:
void main()
{
// ...
color = mix(color, atmosphereColor, fresnel * atmosphereDayMix);
// ...
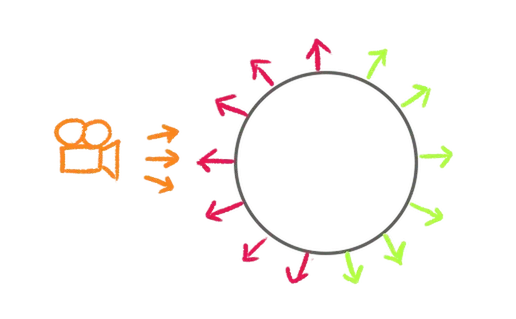
}Specular 01:06:01
Our Earth is missing the reflection of the sun.
We are going to do exactly what we did for the directional light custom shading. And later, we are going to use the uSpecularCloudsTexture to make only the water area reflective.
Since it’s exactly what we did in a previous lesson, we are going to move through this quite quickly.
First, we need the reflecting vector of the sun:
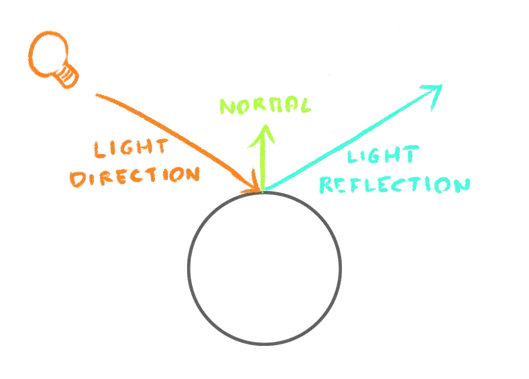
We can calculate it using the reflect function on the uSunDirection according to the normal, but be careful, we need the vector going from the sun toward the Earth, meaning we need to negate the uSunDirection:
void main()
{
    // ...

    // Specular
    vec3 reflection = reflect(- uSunDirection, normal);

    // Final color
    // ...
}
If reflection and viewDirection are aligned, we want a high value. Otherwise, we want the value to decrease. We can do that using the dot:
void main()
{
// ...
// Specular
vec3 reflection = reflect(- uSunDirection, normal);
float specular = dot(reflection, viewDirection);
// ...
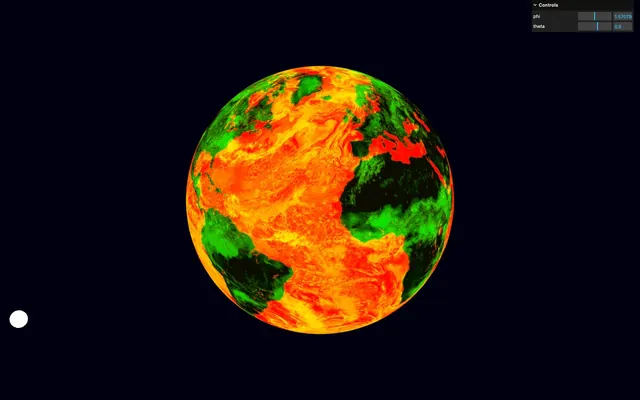
}Let’s test what we get by sending it to the color as a vec3():
void main()
{
    // ...

    // Specular
    vec3 reflection = reflect(- uSunDirection, normal);
    float specular = dot(reflection, viewDirection);
    color = vec3(specular);

    // ...
}
We made a classic mistake and we need the opposite. To do so, we can simply negate the dot:
void main()
{
    // ...

    // Specular
    vec3 reflection = reflect(- uSunDirection, normal);
    float specular = - dot(reflection, viewDirection);
    color = vec3(specular);

    // ...
}
Clamp it with a max:
void main()
{
    // ...

    // Specular
    vec3 reflection = reflect(- uSunDirection, normal);
    float specular = - dot(reflection, viewDirection);
    specular = max(specular, 0.0);
    color = vec3(specular);

    // ...
}
And shrink it with a pow:
void main()
{
    // ...

    // Specular
    vec3 reflection = reflect(- uSunDirection, normal);
    float specular = - dot(reflection, viewDirection);
    specular = max(specular, 0.0);
    specular = pow(specular, 32.0);
    color = vec3(specular);

    // ...
}
That’s a good specular.
Instead of replacing color, add to it:
void main()
{
    // ...

    // Specular
    vec3 reflection = reflect(- uSunDirection, normal);
    float specular = - dot(reflection, viewDirection);
    specular = max(specular, 0.0);
    specular = pow(specular, 32.0);
    color += specular;

    // ...
}
It’s almost perfect, but the white reflection is way too strong and prevents us from enjoying the warm twilight when viewed from behind:
We want the specular to have the color of atmosphereColor, but only when that specular is on the edges. You guessed it, we need the fresnel.
Create a vec3 specularColor and assign it a mix of vec3(1.0) (white) and atmosphereColor according to the fresnel. Assign it to the color if you want to see how it looks:
void main()
{
    // ...

    // Specular
    // ...

    vec3 specularColor = mix(vec3(1.0), atmosphereColor, fresnel);
    color = specularColor;

    // ...
}
On the edges, we get the atmosphere color and at the center we get white.
Put back the specular on the color, but multiply it by the specularColor:
void main()
{
// ...
vec3 specularColor = mix(vec3(1.0), atmosphereColor, fresnel);
color += specular * specularColor;
// Final color
// ...
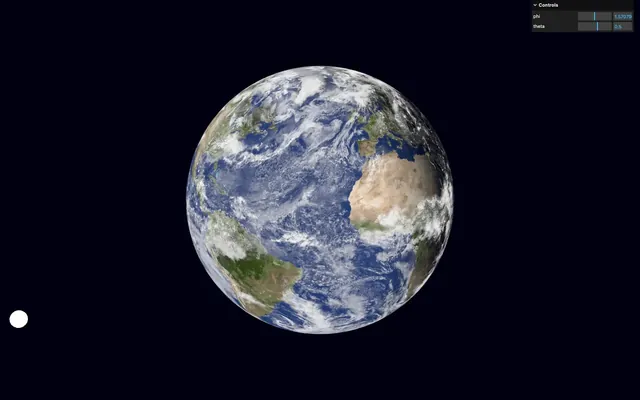
}The specular is now warm like the atmosphere when seen from behind.
We are almost done. All we need to do now is multiply the specular by the specular map which is available in the r channel of specularCloudColor:
void main()
{
    // ...

    // Specular
    // ...
    specular *= specularCloudColor.r;

    vec3 specularColor = mix(vec3(1.0), atmosphereColor, fresnel);
    color += specular * specularColor;

    // ...
}
Only the water areas are now reflecting the sun.
We could make the continents slightly reflective, but the contrast looks nice too.
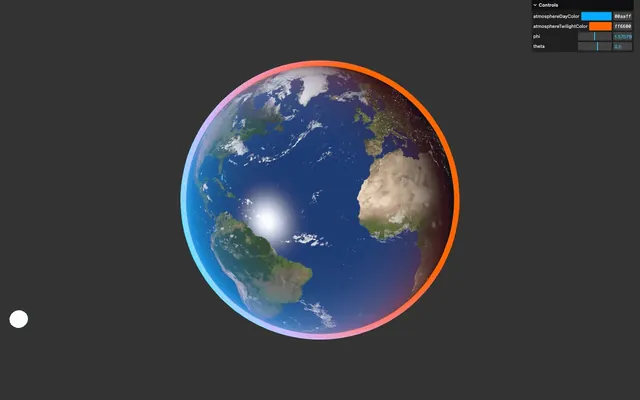
Atmosphere 01:16:46
We are done with the globe itself, but we are missing a key element that would add a lot to the visual of our Earth and it’s the actual atmosphere.
I’m not talking about the atmosphere color that we already have on the globe. I’m talking about the volumetric atmosphere surrounding the Earth.
Theory
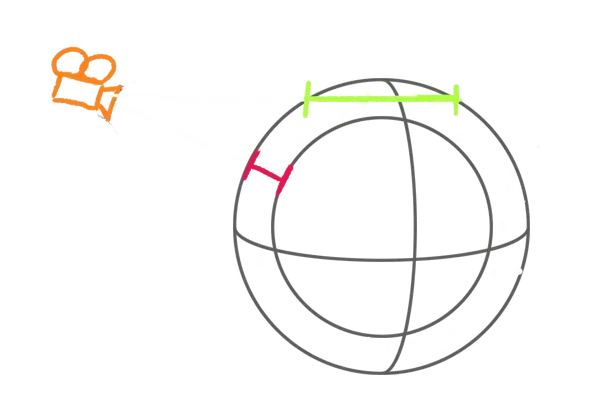
We are going to fake that atmosphere by creating a sphere slightly bigger, only showing the back side of that sphere, and making it fade out on the edge using a classic Fresnel:
The color of the atmosphere being the same as the one we set on the Earth, we will be able to re-use what we written for the Earth shader.
Base
Let’s create the atmosphere sphere first.
We can re-use the earthGeometry, but we need a different material.
Create a atmosphereMaterial using a ShaderMaterial without any property for now:
// Atmosphere
const atmosphereMaterial = new THREE.ShaderMaterial()
Create the atmosphere mesh using the earthGeometry and the atmosphereMaterial:
const atmosphere = new THREE.Mesh(earthGeometry, atmosphereMaterial)
scene.add(atmosphere)
We get some z-fighting because the two spheres are in the same place and they are flickering because the Earth is rotating but not the atmosphere, which is not a problem. After all, we are going to make the atmosphere bigger by 0.04:
// Atmosphere
const atmosphereMaterial = new THREE.ShaderMaterial()

const atmosphere = new THREE.Mesh(earthGeometry, atmosphereMaterial)
atmosphere.scale.set(1.04, 1.04, 1.04)
scene.add(atmosphere)
1.015 would be more realistic and accurate, but too thin to be noticeable.
We now want to see only the back side by setting the side to THREE.BackSide and let’s take the opportunity to set the transparent to true since we already know we’re going to play with the alpha:
const atmosphereMaterial = new THREE.ShaderMaterial({
    side: THREE.BackSide,
    transparent: true
})

Shader
As mentioned earlier, the shader will be similar to the Earth shader, which is why we are going to start by duplicating the whole src/shaders/earth/ folder and call it atmosphere/.
Let’s go through the vertex and fragment shaders of the atmosphere and decide on what to keep and what to ditch.
In src/shaders/atmosphere/vertex.glsl:
- Remove the
vUvvarying - Keep the rest
varying vec3 vNormal;
varying vec3 vPosition;

void main()
{
    // Position
    vec4 modelPosition = modelMatrix * vec4(position, 1.0);
    gl_Position = projectionMatrix * viewMatrix * modelPosition;

    // Model normal
    vec3 modelNormal = (modelMatrix * vec4(normal, 0.0)).xyz;

    // Varyings
    vNormal = modelNormal;
    vPosition = modelPosition.xyz;
}
In src/shaders/atmosphere/fragment.glsl:
- Remove uniforms related to textures
- Remove the
vUvvarying - Keep the
viewDirection,normalandcolor - Keep the
sunOrientation - Remove the
Day / nightpart - Remove the
Specular cloudspart - Remove the
Cloudspart - Remove the
fresnelpart (we are going to do it from scratch later) - Keep the
Atmospherepart - Remove only the
fresnelmultiplication from theAtmosphere - Remove the
Specularpart
uniform vec3 uSunDirection;
uniform vec3 uAtmosphereDayColor;
uniform vec3 uAtmosphereTwilightColor;

varying vec3 vNormal;
varying vec3 vPosition;

void main()
{
    vec3 viewDirection = normalize(vPosition - cameraPosition);
    vec3 normal = normalize(vNormal);
    vec3 color = vec3(0.0);

    // Sun orientation
    float sunOrientation = dot(uSunDirection, normal);

    // Atmosphere
    float atmosphereDayMix = smoothstep(- 0.5, 1.0, sunOrientation);
    vec3 atmosphereColor = mix(uAtmosphereTwilightColor, uAtmosphereDayColor, atmosphereDayMix);
    color = mix(color, atmosphereColor, atmosphereDayMix);

    // Final color
    gl_FragColor = vec4(color, 1.0);
    #include <tonemapping_fragment>
    #include <colorspace_fragment>
}
And this is why a well organised and fragmented code will always be beneficial.
Import the two shaders as atmosphereVertexShader and atmosphereFragmentShader:
import atmosphereVertexShader from './shaders/atmosphere/vertex.glsl'
import atmosphereFragmentShader from './shaders/atmosphere/fragment.glsl'
Add them to the vertexShader and fragmentShader of the atmosphereMaterial and copy the uSunDirection, uAtmosphereDayColor and uAtmosphereTwilightColor uniforms from the earthMaterial:
const atmosphereMaterial = new THREE.ShaderMaterial({
    vertexShader: atmosphereVertexShader,
    fragmentShader: atmosphereFragmentShader,
    uniforms:
    {
        uSunDirection: new THREE.Uniform(new THREE.Vector3(0, 0, 1)),
        uAtmosphereDayColor: new THREE.Uniform(new THREE.Color(earthParameters.atmosphereDayColor)),
        uAtmosphereTwilightColor: new THREE.Uniform(new THREE.Color(earthParameters.atmosphereTwilightColor))
    },
    // ...
})
We get something, but we are not done yet.
In the color tweaks, update the atmosphereMaterial uniforms:
gui
    .addColor(earthParameters, 'atmosphereDayColor')
    .onChange(() =>
    {
        earthMaterial.uniforms.uAtmosphereDayColor.value.set(earthParameters.atmosphereDayColor)
        atmosphereMaterial.uniforms.uAtmosphereDayColor.value.set(earthParameters.atmosphereDayColor)
    })

gui
    .addColor(earthParameters, 'atmosphereTwilightColor')
    .onChange(() =>
    {
        earthMaterial.uniforms.uAtmosphereTwilightColor.value.set(earthParameters.atmosphereTwilightColor)
        atmosphereMaterial.uniforms.uAtmosphereTwilightColor.value.set(earthParameters.atmosphereTwilightColor)
    })
In the updateSun function, update the atmosphereMaterial uniforms:
const updateSun = () =>
{
    // Sun direction
    sunDirection.setFromSpherical(sunSpherical)

    // Debug
    debugSun.position
        .copy(sunDirection)
        .multiplyScalar(5)

    // Uniforms
    earthMaterial.uniforms.uSunDirection.value.copy(sunDirection)
    atmosphereMaterial.uniforms.uSunDirection.value.copy(sunDirection)
}
You can’t really see it, but the night area is not transparent, it’s black.
To see that issue more clearly, in script.js, change the setClearColor() to something brighter:
renderer.setClearColor('#333333')
This area is black because we mix the atmosphereColor with the base color, but the base color is black.
For now, let’s just add the atmosphereColor to the color without mix:
void main()
{
    // ...

    // Atmosphere
    // ...
    color += atmosphereColor;

    // ...
}
And put back the setClearColor() to '#000011':
renderer.setClearColor('#000011')

Alpha
We need the alpha to lower fast at the very edge of the sphere but also on the night side.
Edge alpha
The alpha should be 1.0 near the edge and 0.0 at the exact edge:
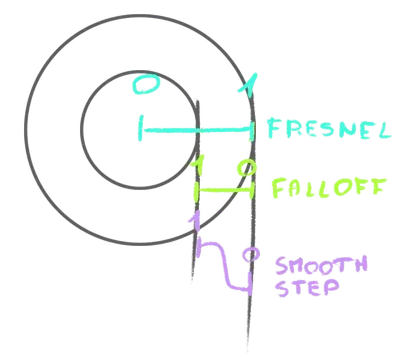
It’s exactly what we did in the Hologram lesson.
Create a float edgeAlpha variable and use the classic formula for the Fresnel:
void main()
{
    // ...

    // Alpha
    float edgeAlpha = dot(viewDirection, normal);

    // Final color
    // ...
}
Send it to the color as a vec3 to see what we get:
void main()
{
    // ...

    // Alpha
    float edgeAlpha = dot(viewDirection, normal);
    color = vec3(edgeAlpha);

    // ...
}
Let’s remap the value using a smoothstep so that the gradient is pushed on the edge:
void main()
{
    // ...

    // Alpha
    float edgeAlpha = dot(viewDirection, normal);
    edgeAlpha = smoothstep(0.0, 0.5, edgeAlpha);
    color = vec3(edgeAlpha);

    // ...
}
Day alpha
Our edgeAlpha is ready. We now want a dayAlpha that will be high on the day side and low on the night side.
To do so, we can remap the sunOrientation using a smootshtep and send it to the color instead of the edgeAlpha:
void main()
{
    // ...

    // Alpha
    float edgeAlpha = dot(viewDirection, normal);
    edgeAlpha = smoothstep(0.0, 0.5, edgeAlpha);

    float dayAlpha = smoothstep(- 0.5, 0.0, sunOrientation);
    color = vec3(dayAlpha);

    // ...
}
Remove the color test:
void main()
{
    // ...

    // Alpha
    float edgeAlpha = dot(viewDirection, normal);
    edgeAlpha = smoothstep(0.0, 0.5, edgeAlpha);

    float dayAlpha = smoothstep(- 0.5, 0.0, sunOrientation);

    // ...
}
Combining
We have our two alphas. Let’s combine them into a float alpha and send it to the alpha channel of gl_FragColor:
void main()
{
// ...
float alpha = edgeAlpha * dayAlpha;
// Final color
gl_FragColor = vec4(color, alpha);
// ...
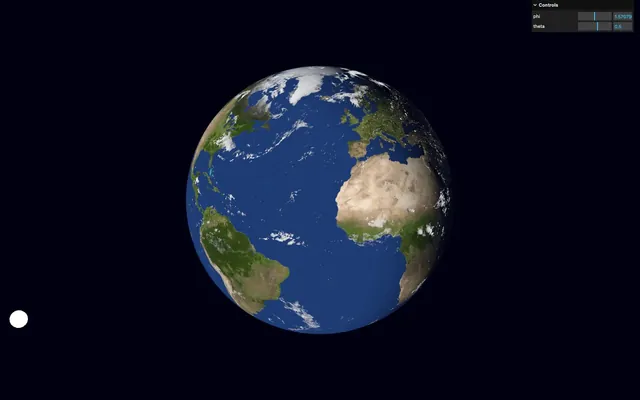
}We have a nice atmosphere that merges perfectly with the Earth, which means we are done with the lesson.
Going further 01:37:45
As always, there is room for improvement.
Here are suggestions:
- Add more tweaks
- Test with other planet textures
- Rotate the earth according to the real-life rotation relative to the sun
- Animate the clouds by adding some displacement on the UV.
- Add Lensflare (example) for the sun (textures are provided in
static/lenses/). - Add stars or a Milky Way environment map in the back