Introduction 00:00
In this lesson, we are going to transform a plane into a procedural terrain with mountains, water, beaches, plateaus, etc. using shaders:

We’ve already learned most of the techniques we are going to use and it’s an opportunity to practice while discovering a few more tricks.
Setup 01:04
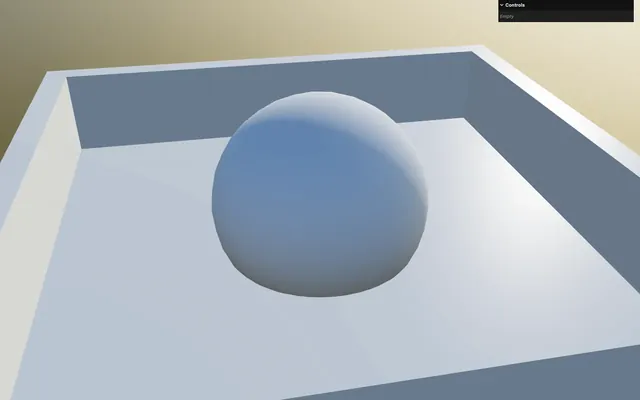
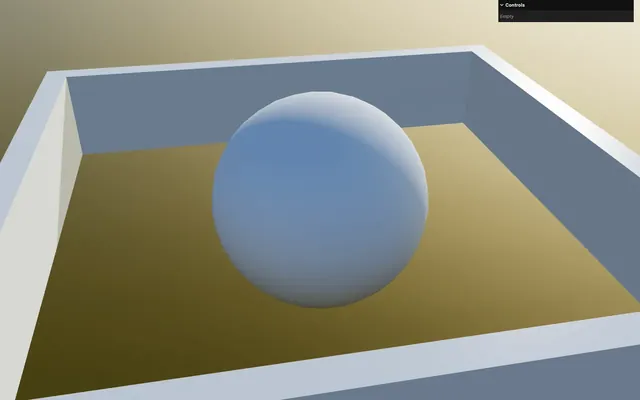
The starter already contains the following:
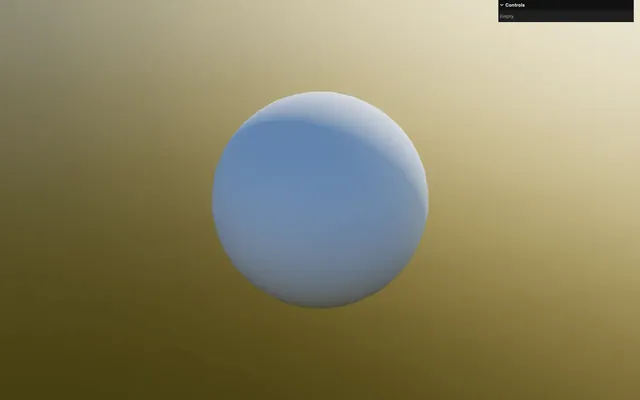
- A placeholder sphere with a MeshStandardMaterial applied to it
- An HDR environment map for the background, which is also there to light up the scene
- A DirectionalLight to light up the scene even more and cast shadows
- The
vite-plugin-glsldependency to handle GLSL files OrbitControlsto rotate around- The
three-custom-shader-materialdependency to enhance built-in materials
Board 01:50
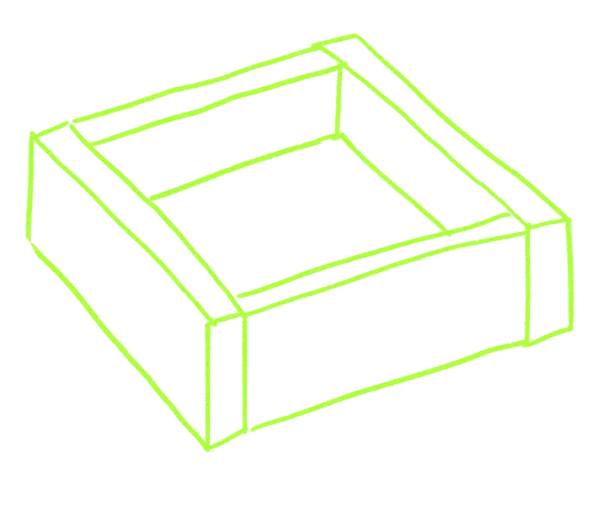
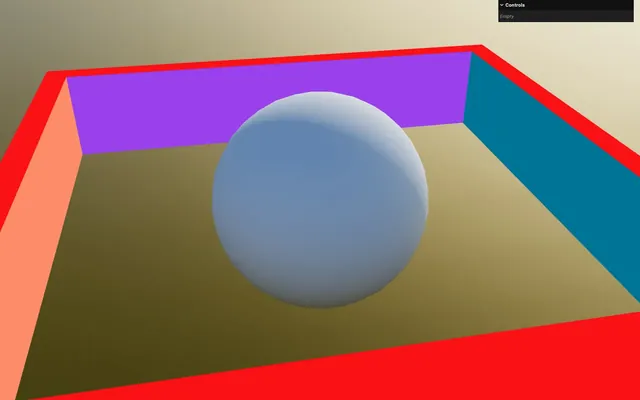
Instead of starting right away with the terrain, we are going to create the board around it. This board needs to look like this:
Although it looks quite simple, creating a hole in a plain geometry is actually rather difficult and there are many ways to do it, yet no simple one.
We could use the LatheGeometry with only 4 segments.
We could use ExtrudeGeometry.
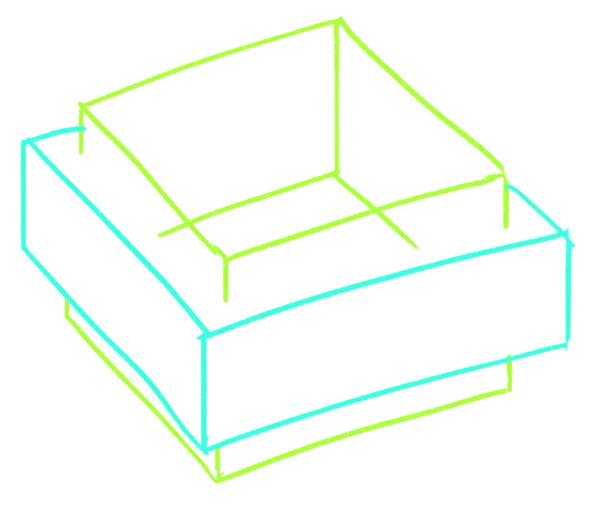
We could create 4 BoxGeometry arranged in a specific way:
We could even create the model in a 3D software like Blender and import it.
All those solutions should get you the right result, but there is one more solution that I want you to discover and it’s the three-bvh-csg.
CSG stands for Constructive Solid Geometry, and BVH stands for Bounding Volume Hierarchy. Although very interesting, we are not going to explain those two topics.
To put it in a nutshell, three-bvh-csg enables boolean operations between geometries. As an example, you can use a sphere geometry to poke a hole in a box geometry.
In our case, we are going to start from box geometry, and then create a slightly smaller box geometry sticking out above and below. Then we are going to ask that last one to poke a hole in the first one:
Dependency
three-bvh-csg is available on NPM: https://www.npmjs.com/package/three-bvh-csg
Install the library using npm install and force the version to 0.0.16:
npm install three-bvh-csg@0.0.16We force the version to make sure it works with the lesson.
Brushes
Each base shape that will be used in the operation is called a Brush.
Import Brush from 'three-bvh-csg':
import { Brush } from 'three-bvh-csg'After the Placeholder section, add a Board section:
/**
 * Placeholder
 */
// ...

/**
 * Board
 */
We need two Brushes, one for the base shape and one to poke a hole in it.
To instantiate a Brush, we need to send it a Three.js geometry.
Let’s start with the base shape that we are going to name boardFill and instantiate a Brush using a BoxGeometry:
// Brushes
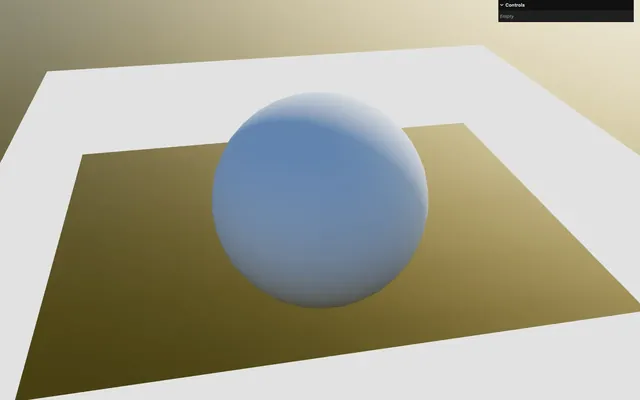
const boardFill = new Brush(new THREE.BoxGeometry(11, 2, 11))We can’t see it, but the shape exists.
Next, let’s create the Brush that will poke a hole. Instantiate a new Brush using a BoxGeometry again, but change its size so that it’s tighter but higher. Finally, name it boardHole:
// Brushes
const boardFill = new Brush(new THREE.BoxGeometry(11, 2, 11))
const boardHole = new Brush(new THREE.BoxGeometry(10, 2.1, 10))
Evaluate
We have our two brushes; now, we want to poke a hole in boardFill using boardHole.
We need to instantiate an Evaluator.
Import Evaluator from 'three-bvh-csg':
import { Evaluator, Brush } from 'three-bvh-csg'Instantiate it after the Brushes:
// Evaluate
const evaluator = new Evaluator()
In this case, we are going to use the Evaluator to execute only one operation, but note that one Evaluator can be used for multiple operations.
We can now use the evaluate() method of evaluator. This method requires the two Brushes as the initial two parameters, but also the type of operation as the third parameter.
Since we want to poke a whole, we need to use the SUBTRACTION operation.
Import SUBTRACTION from 'three-bvh-csg':
import { SUBTRACTION, Evaluator, Brush } from 'three-bvh-csg'Call evaluate() on evaluator, send it the boardFill, boardHole and SUBTRACTION, and save it as board:
// Evaluate
const evaluator = new Evaluator()
const board = evaluator.evaluate(boardFill, boardHole, SUBTRACTION)
Let’s console.log() it:
// Evaluate
const evaluator = new Evaluator()
const board = evaluator.evaluate(boardFill, boardHole, SUBTRACTION)
console.log(board)
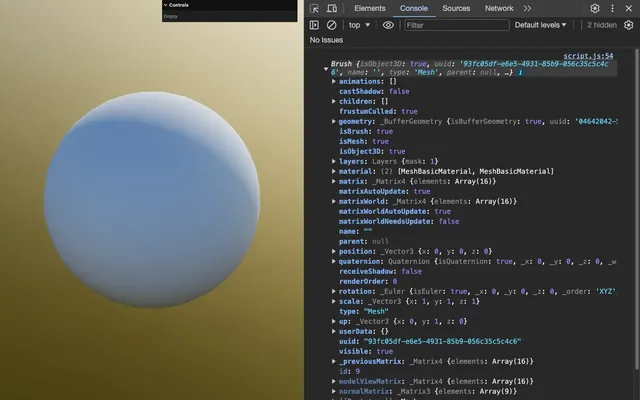
board is also a Brush, but more importantly, Brush seems to inherit from Object3D, meaning that we can add it directly to the scene:
// Evaluate
const evaluator = new Evaluator()
const board = evaluator.evaluate(boardFill, boardHole, SUBTRACTION)
scene.add(board)
board is like a mesh and it currently has a white MeshBasicMaterial applied to it.
Materials
Right now, we could change its material to a nice MeshStandardMaterial and call it a day, but for the sake of learning, let’s try a few things.
First, if you console.log() the board.material property, you see the following:
const board = evaluator.evaluate(boardFill, boardHole, SUBTRACTION)
console.log(board.material)
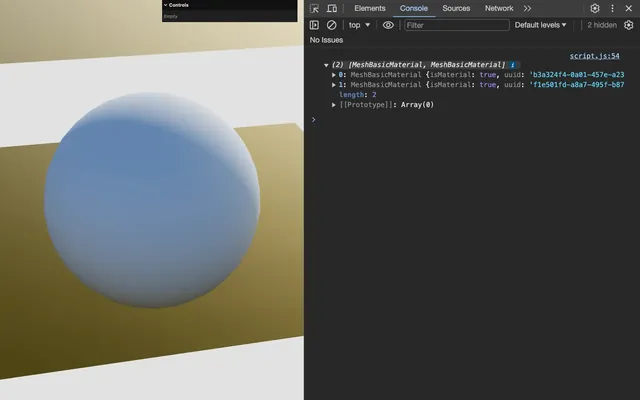
What you see, is an array of materials and that’s because three-bvh-csg preserved the material of the two initial Brushes. But this means that boardFill and boardHole are also like Meshes with their own material.
You can test that by tweaking their material properties before the evaluate():
const boardFill = new Brush(new THREE.BoxGeometry(11, 2, 11))
const boardHole = new Brush(new THREE.BoxGeometry(10, 2.1, 10))

boardFill.material.color.set('red')
boardHole.material = new THREE.MeshNormalMaterial()
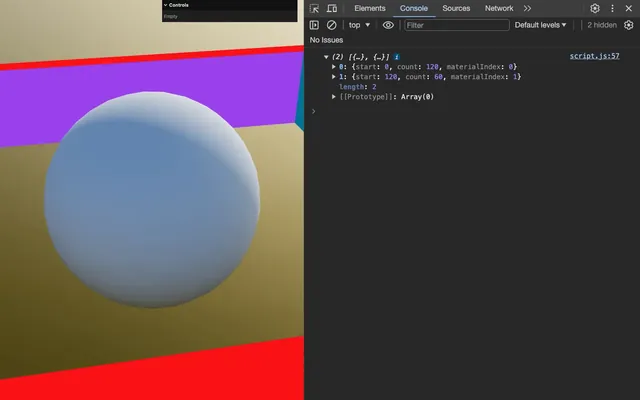
This is made possible by Three.js thanks to what we call groups. Vertices information is separated into groups and the materials will be applied accordingly.
You can test that on the geometry by doing a console.log() of the board.geometry.groups:
console.log(board.geometry.groups)
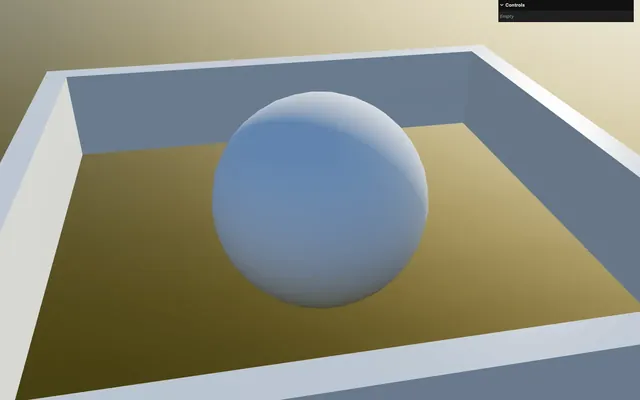
This is all very interesting and can be useful, but not in our case since we want one simple MeshStandardMaterial on the board.
For that reason, remove the groups with by calling clearGroups() on board.geometry:
const board = evaluator.evaluate(boardFill, boardHole, SUBTRACTION)
board.geometry.clearGroups()
And add a MeshStandardMaterial instance manually to the board.material property:
const board = evaluator.evaluate(boardFill, boardHole, SUBTRACTION)
board.geometry.clearGroups()
board.material = new THREE.MeshStandardMaterial({ color: '#ffffff', metalness: 0, roughness: 0.3 })
Brush transform
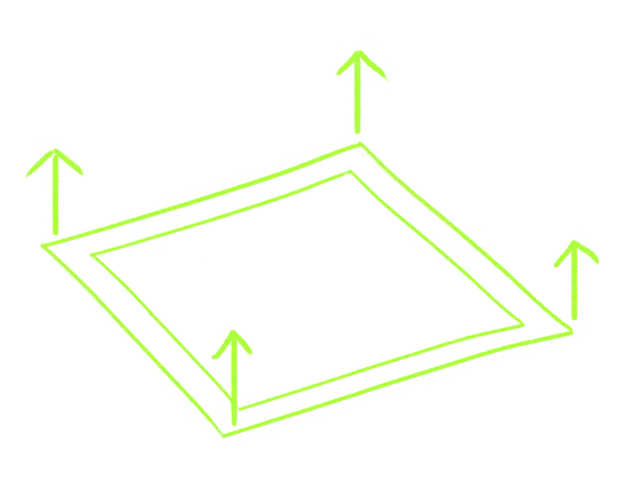
Since Brush inherits from Object3D we can transform it using the traditional position, rotation and scale.
Again, we don’t need to, but for the sake of learning, let’s move the boardHole up so that we add a bottom to our board.
Set the position.y property of boardHole to 0.2:
const boardHole = new Brush(new THREE.BoxGeometry(10, 2.1, 10))
boardHole.position.y = 0.2
Nothing happens because, even though we’ve updated the position, the transform matrix combining the position, rotation and scale, that Three.js uses internally, hasn’t been updated because Three.js updates those only when rendering.
We don’t want to render boardHole as it is, so, instead, we are going to update the matrix ourselves.
After updating the position, call the updateMatrixWorld() method on boardHole:
boardHole.position.y = 0.2
boardHole.updateMatrixWorld()
It’s working, but let’s remove this part since the terrain will fill the inside:
const boardHole = new Brush(new THREE.BoxGeometry(10, 2.1, 10))
// boardHole.position.y = 0.2
// boardHole.updateMatrixWorld()
Shadows
Finally, let’s activate both the casting and receiving of the shadows on board:
const board = evaluator.evaluate(boardFill, boardHole, SUBTRACTION)
// ...
board.castShadow = true
board.receiveShadow = true
scene.add(board)
Terrain base 19:45
Let’s start building that terrain.
First, remove the placeholder sphere and create a Terrain section instead:
/**
 * Terrain
 */

Geometry
For the geometry, we are going to use a highly subdivided PlaneGeometry:
// Geometry
const geometry = new THREE.PlaneGeometry(10, 10, 500, 500)
Instead of rotating the Mesh, we are going to rotate the geometry itself so that we don’t have to take the model transformation into account when calculating the elevation.
Call the rotateX() method on geometry and send it - Math.PI * 0.5:
const geometry = new THREE.PlaneGeometry(10, 10, 500, 500)
geometry.rotateX(- Math.PI * 0.5)
Material
For the material, we want to start from a MeshStandardMaterial and improve it using Custom Shader Material which is already available in the project dependencies.
We are going to instantiate the CustomShaderMaterial directly.
Import CustomShaderMaterial from 'three-custom-shader-material/vanilla':
import CustomShaderMaterial from 'three-custom-shader-material/vanilla'Instantiate a CustomShaderMaterial, save it as material and set the Custom Shader Material and MeshStandardMaterial as follows:
// Material
const material = new CustomShaderMaterial({
    // CSM
    baseMaterial: THREE.MeshStandardMaterial,
    silent: true,

    // MeshStandardMaterial
    metalness: 0,
    roughness: 0.5,
    color: '#85d534'
})
We are not providing any shader or uniform yet, but that won’t prevent the material from working.
Mesh
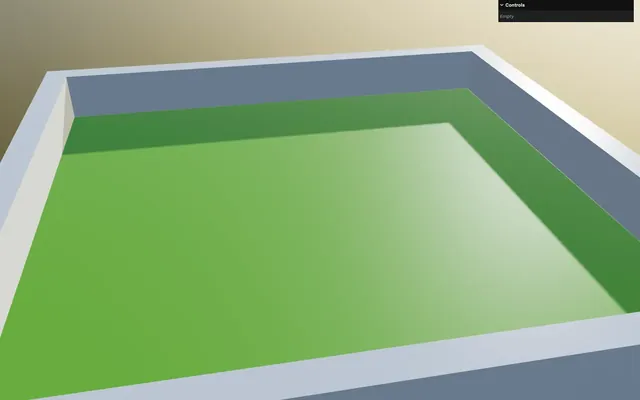
Instantiate a Mesh using the geometry and the material, and save it as terrain:
// Mesh
const terrain = new THREE.Mesh(geometry, material)
Set it to receive and cast shadows, and add it to the scene:
// Mesh
const terrain = new THREE.Mesh(geometry, material)
terrain.receiveShadow = true
terrain.castShadow = true
scene.add(terrain)
Shaders
In the src/shaders/ folder, create a terrain/ folder.
In src/shaders/terrain/ folder, create a vertex.glsl file as follows:
void main()
{
}
Still in the src/shaders/terrain/ folder, create a fragment.glsl file as follows:
void main()
{
    csm_FragColor = vec4(1.0, 0.0, 0.0, 1.0);
}
In script.js, import both as terrainVertexShader and terrainFragmentShader:
import terrainVertexShader from './shaders/terrain/vertex.glsl'
import terrainFragmentShader from './shaders/terrain/fragment.glsl'
Add them to the CustomShaderMaterial using the vertexShader and fragmentShader properties:
const material = new CustomShaderMaterial({
    // CSM
    baseMaterial: THREE.MeshStandardMaterial,
    vertexShader: terrainVertexShader,
    fragmentShader: terrainFragmentShader,
    // ...
}
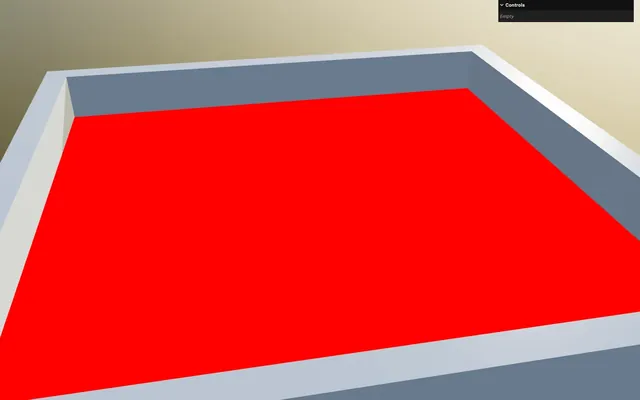
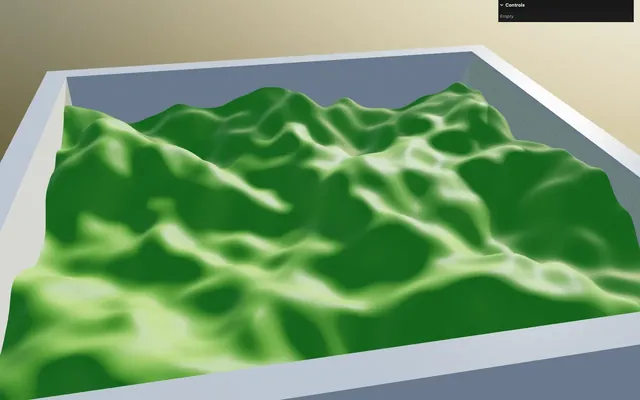
The terrain is red, indicating that the shader is working.
In fragment.glsl, remove the csm_FragColor line:
void main()
{
}
Base elevation
We now want to move the vertices up and down to create the terrain elevation and the process is going to be very similar to what we did in the Raging Sea lesson, but this time, using a Simplex Noise.
getElevation function
We are going to put the code relative to the elevation in a getElevation function.
In vertex.glsl, before the main(), create a getElevation method that returns a float elevation according to a vec2 position:
float getElevation(vec2 position)
{
    float elevation = 0.0;

    return elevation;
}

void main()
{
}
We are using a vec2 parameter because the elevation only varies according to the x and z axes.
In the main() function, call getElevation, send it a swizzle xz of the csm_Position and save it as a float elevation variable:
void main()
{
    // Elevation
    float elevation = getElevation(csm_Position.xz);
}
Add it to the y of csm_Position:
void main()
{
    // Elevation
    float elevation = getElevation(csm_Position.xz);
    csm_Position.y += elevation;
}
Simplex Noise
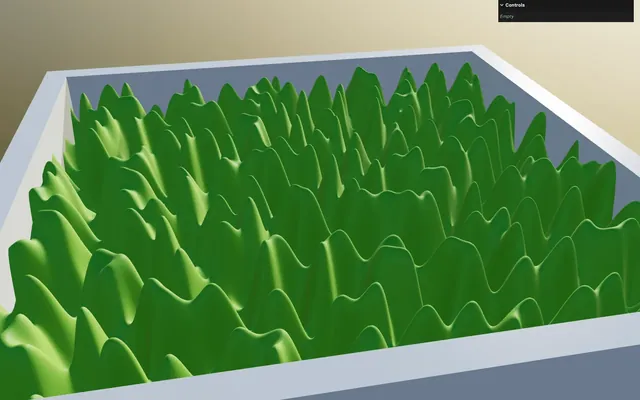
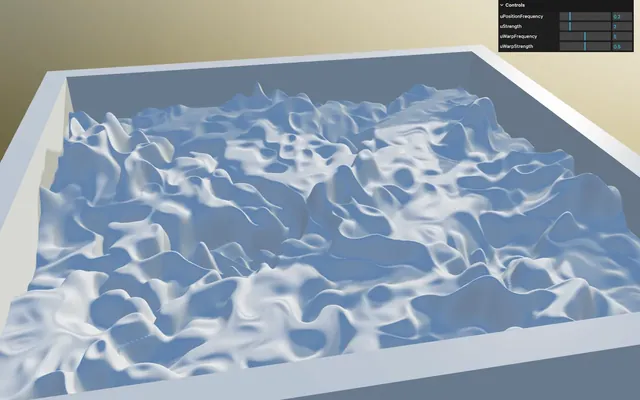
To update the elevation, we are going to use a Simplex Noise which is already available in src/shaders/includes/simplexNoise2d.glsl.
We are using a 2D Simplex Noise because it’s enough. Even though the Simplex Noise scales pretty well with the dimensions, try to use the simplest functions whenever possible for performance reasons.
Before the getElevation function, include ../includes/simplexNoise2d.glsl:
#include ../includes/simplexNoise2d.glsl

float getElevation(vec2 position)
{
    // ...
}
In the getElevation function, call simplexNoise2d() and send it the position. Add the result to elevation:
float getElevation(vec2 position)
{
    float elevation = 0.0;
    elevation += simplexNoise2d(position);

    return elevation;
}
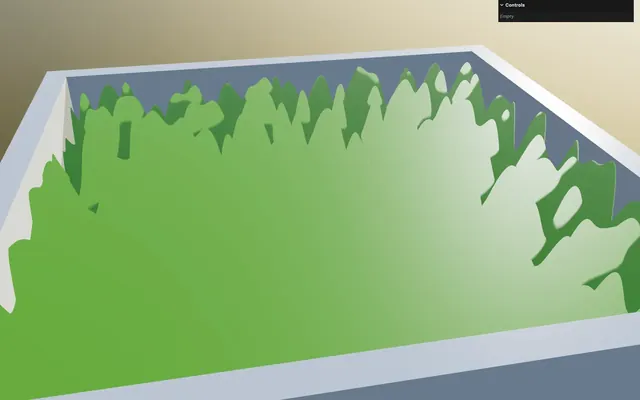
It’s kind of working, but the shading seems broken.
Fix the normals 29:47
As always when updating vertices from the vertex shader, we need to fix the normals. And to compute the normals, we are going to use the classic neighbours’ technique as we did in the Raging Sea lesson.
Since we’ve done it multiple times, we are going to deal with this swiftly.
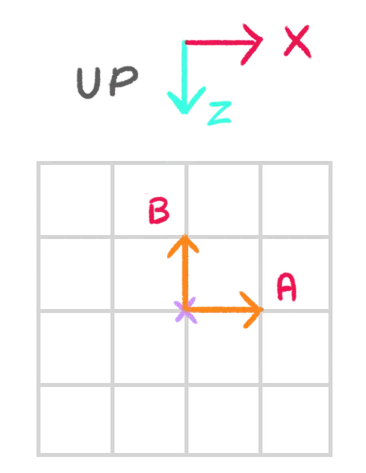
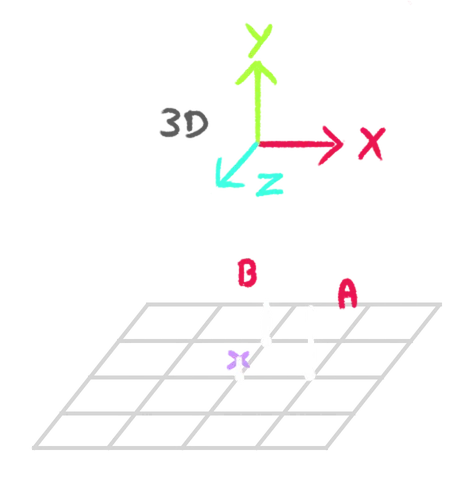
First, we need to find the position of the two neighbours that we are going to name A (in the positive x axis) and B (in the negative z axis). Both are going to be at a shift distance:
At the beginning of the main() function, create a float shift variable to 0.01:
void main()
{
    // Neighbours positions
    float shift = 0.01;

    // ...
}
Create a vec3 positionA variable based on position and going the shift distance on the x axis:
void main()
{
    // Neighbours positions
    float shift = 0.01;
    vec3 positionA = position.xyz + vec3(shift, 0.0, 0.0);

    // ...
}
Do the same for positionB, but going the shift distance on negative z:
void main()
{
    // Neighbours positions
    float shift = 0.01;
    vec3 positionA = position.xyz + vec3(shift, 0.0, 0.0);
    vec3 positionB = position.xyz + vec3(0.0, 0.0, - shift);

    // ...
}
It’s important to go in the negative z direction; otherwise, the normal will be upside down.
Also note that we used position and not csm_Position, but both would have worked the same.
Next, we need to apply the elevation to the neighbours:
Where we calculate the elevation to update the csm_Position.y, do the same to update the positionA.y and positionB.y directly, according to their respective xz:
void main()
{
    // ...

    // Elevation
    float elevation = getElevation(csm_Position.xz);
    csm_Position.y += elevation;
    positionA.y    += getElevation(positionA.xz);
    positionB.y    += getElevation(positionB.xz);
}
Time to compute the normal:
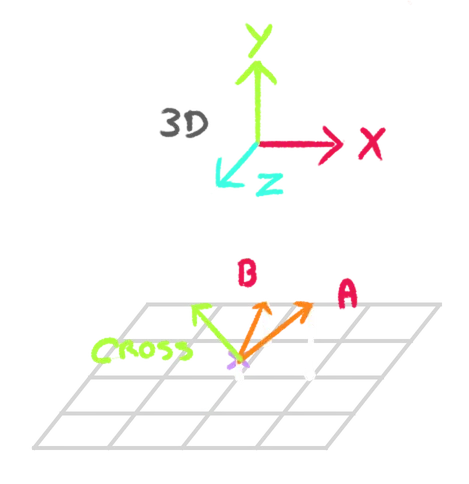
Calculate the vectors going from csm_Position to positionA and to positionB, normalize them and save them as vec3 toA and vec3 toB:
void main()
{
    // ...

    // Compute normal
    vec3 toA = normalize(positionA - csm_Position);
    vec3 toB = normalize(positionB - csm_Position);
}
We can finally compute the final normal using the cross product:
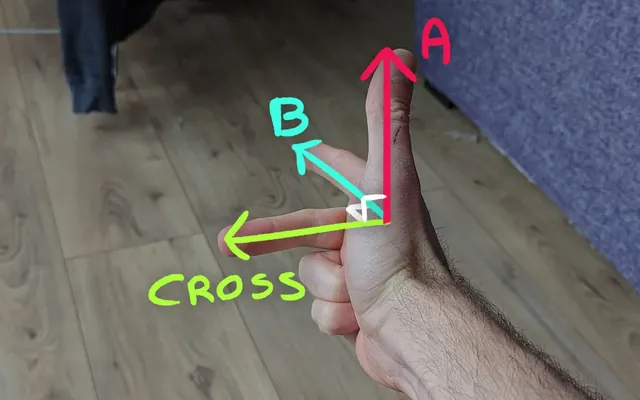
Calculate the cross product of toA with toB using the cross function and assign the output to csm_Normal:
void main()
{
    // ...

    // Compute normal
    vec3 toA = normalize(positionA - csm_Position);
    vec3 toB = normalize(positionB - csm_Position);
    csm_Normal = cross(toA, toB);
}
And since we are not using the original normal attribute anymore, we can remove not only the normal from the geometry attributes but also the uv.
In script.js, after creating the geometry, use the deleteAttribute() method to delete the 'uv' and 'normal' attributes:
const geometry = new THREE.PlaneGeometry(10, 10, 500, 500)
geometry.deleteAttribute('uv')
geometry.deleteAttribute('normal')
Elevation frequency 37:36
We can now work on improving the elevation.
First, we want to reduce the frequency.
For now, we are going to create a uPositionFrequency variable directly in getElevation, but later we are going to use uniforms so that we can tweak them.
In getElevation, create a float uPositionFrequency variable to 0.2 and multiply the position by it:
float getElevation(vec2 position)
{
    float uPositionFrequency = 0.2;

    float elevation = 0.0;
    elevation += simplexNoise2d(position * uPositionFrequency);

    return elevation;
}
To create variations, we are going to apply more simplexNoise2d on the elevation and multiply the frequency by two between each simplexNoise2d:
float getElevation(vec2 position)
{
    float uPositionFrequency = 0.2;

    float elevation = 0.0;
    elevation += simplexNoise2d(position * uPositionFrequency      );
    elevation += simplexNoise2d(position * uPositionFrequency * 2.0);
    elevation += simplexNoise2d(position * uPositionFrequency * 4.0);

    return elevation;
}
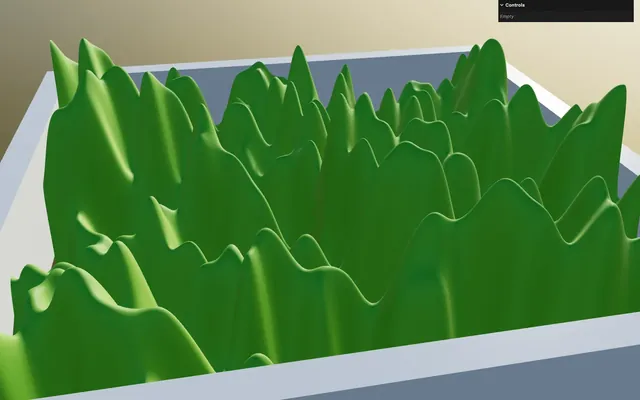
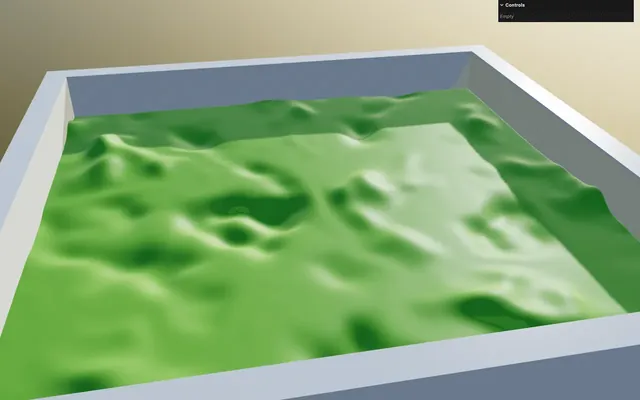
It’s working, but each simplexNoise2d has the same strength. We want the higher frequency to have less effect on the elevation, but we also need to make sure the final elevation never goes above 1.0. Having the elevation below 1.0 will come in handy for later effects.
To do that, we are going to divide the first simplexNoise2d by 2.0, the next one by 4.0, and the next one by 8.0:
float getElevation(vec2 position)
{
    float uPositionFrequency = 0.2;

    float elevation = 0.0;
    elevation += simplexNoise2d(position * uPositionFrequency      ) / 2.0;
    elevation += simplexNoise2d(position * uPositionFrequency * 2.0) / 4.0;
    elevation += simplexNoise2d(position * uPositionFrequency * 4.0) / 8.0;

    return elevation;
}
Creating an automatic loop here like we did for the Raging Sea lesson would be nice, but let’s keep things simple and move forward.
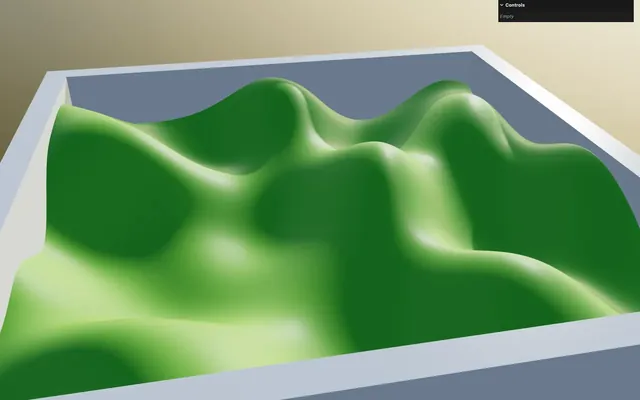
Plateaus 40:54
In real life, we tend to see plateaus near the sea level. It might be due to natural causes or human interference, but at any rate, we want the same result in our procedural terrain.
And to do that, we are going to crush the value down when it’s near 0. If you remember from the previous lesson, we can use a power:
This is why we made sure that the elevation never goes above 1.0.
After applying the simplexNoise2d(), apply a pow of 2.0 to elevation:
float getElevation(vec2 position)
{
    // ...

    elevation = pow(elevation, 2.0);

    return elevation;
}
At this stage, some Linux users might experience a bug where parts of the terrain are invisible. This happens when using pow on negative values. Don't worry, it's going to fix by itself in a minute.
It’s working, but we lost crevices where the elevation should be below 0.
And the reason is that the power of 2 means that we multiply the same number by itself. As an example 0.5 * 0.5 = 0.25. But in the case of negative numbers, -0.5 * -0.5 = 0.25. The value becomes positive when you multiply a negative number by another negative number.
To fix that, we are going to retrieve the sign of elevation before applying the pow and we can use the sign function to do so:
float getElevation(vec2 position)
{
    // ...

    float elevationSign = sign(elevation);
    elevation = pow(elevation, 2.0);

    return elevation;
}
elevationSign will be -1.0 for negative values and 1.0 for positive values.
We can now multiply pow by elevationSign:
float getElevation(vec2 position)
{
    // ...

    float elevationSign = sign(elevation);
    elevation = pow(elevation, 2.0) * elevationSign;

    return elevation;
}
Great, it’s fixed. Well, not really. If we set the power to 3.0, it’s broken again:
float getElevation(vec2 position)
{
    // ...
    elevation = pow(elevation, 3.0) * elevationSign;
    // ...
}
And the reason is that odd power doesn’t need the trick we’ve just applied. As an example -0.5 * -0.5 * -0.5 = -0.125.
To fix that and make sure we always get the right value, we are going to make elevation always positive by using the abs function on it, inside of the pow:
float getElevation(vec2 position)
{
    // ...

    float elevationSign = sign(elevation);
    elevation = pow(abs(elevation), 3.0) * elevationSign;

    return elevation;
}
This is where Linux user experiencing the previously mentioned bug should have it working as it should.
Let’s add back in a power of 2.0:
float getElevation(vec2 position)
{
    // ...
    elevation = pow(abs(elevation), 2.0) * elevationSign;
    // ...
}
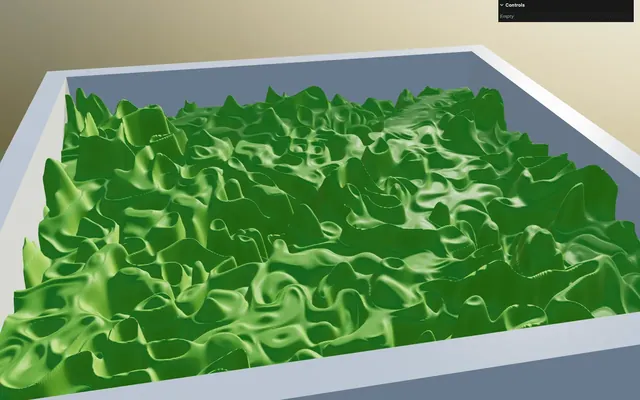
Strength 46:07
Just like we’ve created a float uPositionFrequency variable for the frequency, let’s create a float uStrength variable for the strength and set it to 2.0:
float getElevation(vec2 position)
{
    float uPositionFrequency = 0.2;
    float uStrength = 2.0;

    // ...
}
Multiply the elevation by it after the pow:
float getElevation(vec2 position)
{
    // ...
    elevation *= uStrength;

    return elevation;
}
Later, we will replace those variables with actual uniforms.
Warp 46:49
The elevation looks nice and natural, but we are going to add even more diversity by warping the position.
Create a vec2 warpedPosition variable out of position and use it on all 3 simplexNoise2d():
float getElevation(vec2 position)
{
    // ...

    vec2 warpedPosition = position;

    float elevation = 0.0;
    elevation += simplexNoise2d(warpedPosition * uPositionFrequency      ) / 2.0;
    elevation += simplexNoise2d(warpedPosition * uPositionFrequency * 2.0) / 4.0;
    elevation += simplexNoise2d(warpedPosition * uPositionFrequency * 4.0) / 8.0;

    // ...
}
Create a float uWarpFrequency to 5.0 and a float uWarpStrength to 0.5:
float getElevation(vec2 position)
{
    float uPositionFrequency = 0.2;
    float uStrength = 2.0;
    float uWarpFrequency = 5.0;
    float uWarpStrength = 0.5;

    // ...
}
Add a simplexNoise2d() to warpedPosition. For the parameter, use warpedPosition multiplied by uPositionFrequency (so that it follows the position frequency) multiplied by uWarpFrequency:
float getElevation(vec2 position)
{
    // ...

    vec2 warpedPosition = position;
    warpedPosition += simplexNoise2d(warpedPosition * uPositionFrequency * uWarpFrequency);

    // ...
}
Multiply the whole simplexNoise2d() by uWarpStrength:
float getElevation(vec2 position)
{
    // ...

    vec2 warpedPosition = position;
    warpedPosition += simplexNoise2d(warpedPosition * uPositionFrequency * uWarpFrequency) * uWarpStrength;

    // ...
}
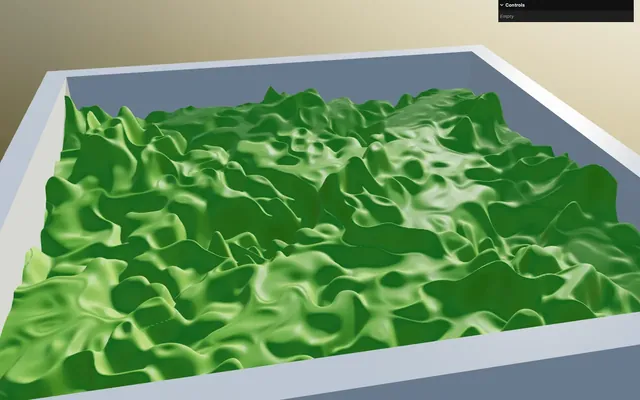
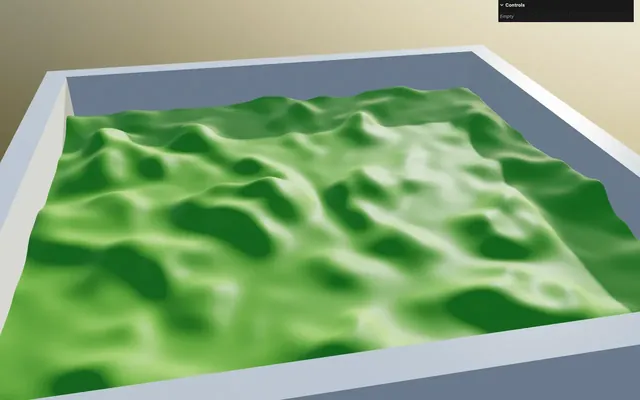
The elevation looks more exotic and the ripples almost look like erosion.
Uniforms 49:40
Time to transform uPositionFrequency, uStrength, uWarpFrequency and uWarpStrength into uniforms so that we can tweak them.
If you remember from the previous lessons, we are going to have a shadow issue which will require us to provide a custom MeshDepthMaterial. We will do that later, but this indicates that we are going to need to provide the uniforms with two materials, which is why we are going to create those uniforms once and use them on both materials.
In script.js, before the material, create a uniforms object and set its properties as follows using the Uniform class:
// Material
const uniforms = {
    uPositionFrequency: new THREE.Uniform(0.2),
    uStrength: new THREE.Uniform(2.0),
    uWarpFrequency: new THREE.Uniform(5),
    uWarpStrength: new THREE.Uniform(0.5),
}

const material = new CustomShaderMaterial({
    // ...
})
Right after setting the uniforms object, create the corresponding tweaks:
const uniforms = {
    // ...
}

gui.add(uniforms.uPositionFrequency, 'value', 0, 1, 0.001).name('uPositionFrequency')
gui.add(uniforms.uStrength, 'value', 0, 10, 0.001).name('uStrength')
gui.add(uniforms.uWarpFrequency, 'value', 0, 10, 0.001).name('uWarpFrequency')
gui.add(uniforms.uWarpStrength, 'value', 0, 1, 0.001).name('uWarpStrength')

Send the uniforms object to the uniforms property of the CustomShaderMaterial:
const slicedMaterial = new CustomShaderMaterial({
    // CSM
    baseMaterial: THREE.MeshStandardMaterial,
    vertexShader: terrainVertexShader,
    fragmentShader: terrainFragmentShader,
    uniforms: uniforms,
    silent: true,

    // ...
})
In vertex.glsl, retrieve the 4 uniforms as float, and delete the temporary variables from the getElevation function:
uniform float uPositionFrequency;
uniform float uStrength;
uniform float uWarpFrequency;
uniform float uWarpStrength;

// ...

float getElevation(vec2 position)
{
    vec2 warpedPosition = position;
    warpedPosition += simplexNoise2d(warpedPosition * uPositionFrequency * uWarpFrequency) * uWarpStrength;

    // ...
}
Translation 53:06
To give more life to the overall, we are going to make the terrain move continuously.
To do that, we are going to apply the time on the warpedPosition.
In script.js, add the uTime uniform using the Uniform class:
const uniforms = {
    uTime: new THREE.Uniform(0),
    // ...
}
In the tick function, update the value of uniforms.uTime using the elapsedTime variable:
const tick = () =>
{
    const elapsedTime = clock.getElapsedTime()

    // Uniforms
    uniforms.uTime.value = elapsedTime

    // ...
}
In vertex.glsl, retrieve the uTime uniform as a float:
uniform float uTime;In the getElevation function, add it to the warpedPosition:
float getElevation(vec2 position)
{
    vec2 warpedPosition = position;
    warpedPosition += uTime;
    // ...
}
This results in both the x and the y of warpedPosition being affected.
Slow down the animation by multiplying uTime by 0.2:
float getElevation(vec2 position)
{
    vec2 warpedPosition = position;
    warpedPosition += uTime * 0.2;
    // ...
}
Fix the shadow 54:52
Although it’s not that obvious thanks to the many details of the terrain, the drop shadows are broken.
Like in the previous lesson, we need to provide a custom depth material.
In script.js, duplicate the material and name it depthMaterial:
const material = new CustomShaderMaterial({
    // ...
})

const depthMaterial = new CustomShaderMaterial({
    // ...
})
Change the baseMaterial to THREE.MeshDepthMaterial:
const depthMaterial = new CustomShaderMaterial({
    // CSM
    baseMaterial: THREE.MeshDepthMaterial,
    // ...
})
Remove the properties associated with MeshStandardMaterial and add the only property associated with MeshDepthMaterial that we need, which is depthPacking to THREE.RGBADepthPacking:
const depthMaterial = new CustomShaderMaterial({
    // CSM
    baseMaterial: THREE.MeshDepthMaterial,
    vertexShader: terrainVertexShader,
    fragmentShader: terrainFragmentShader,
    uniforms: uniforms,
    silent: true,

    // MeshDepthMaterial
    depthPacking: THREE.RGBADepthPacking
})
Remove the fragmentShader since it doesn’t change anything in this case:
const depthMaterial = new CustomShaderMaterial({
    // CSM
    baseMaterial: THREE.MeshDepthMaterial,
    vertexShader: terrainVertexShader,
    uniforms: uniforms,
    silent: true,

    // MeshDepthMaterial
    depthPacking: THREE.RGBADepthPacking
})
Assign the depthMaterial to the customDepthMaterial property of terrain:
const terrain = new THREE.Mesh(geometry, material)
terrain.customDepthMaterial = depthMaterial
Color 57:18
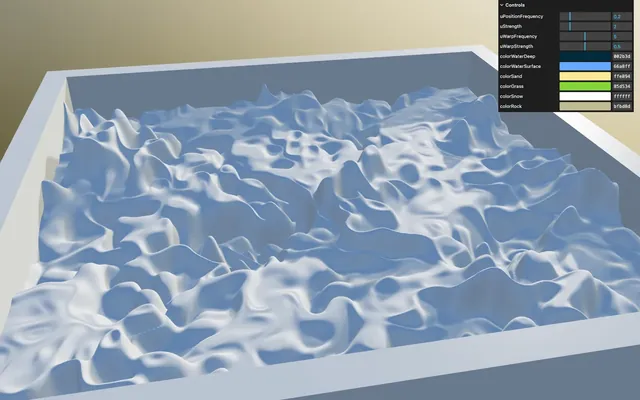
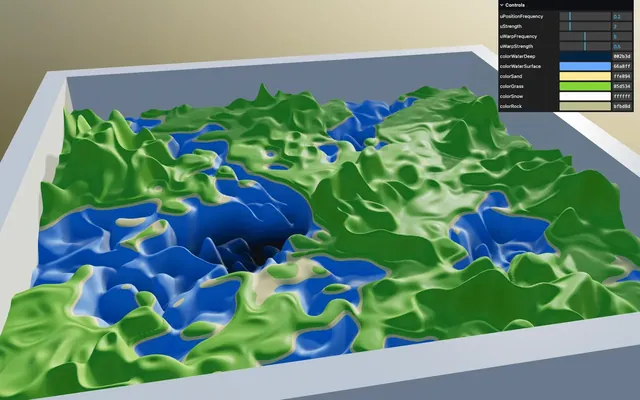
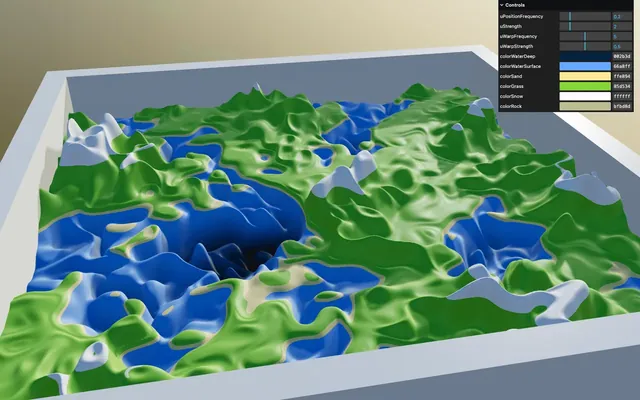
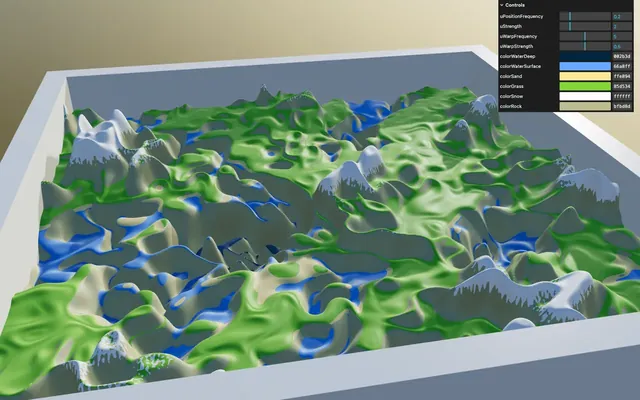
We are going to add various colors and we are going to do it according to the elevation:
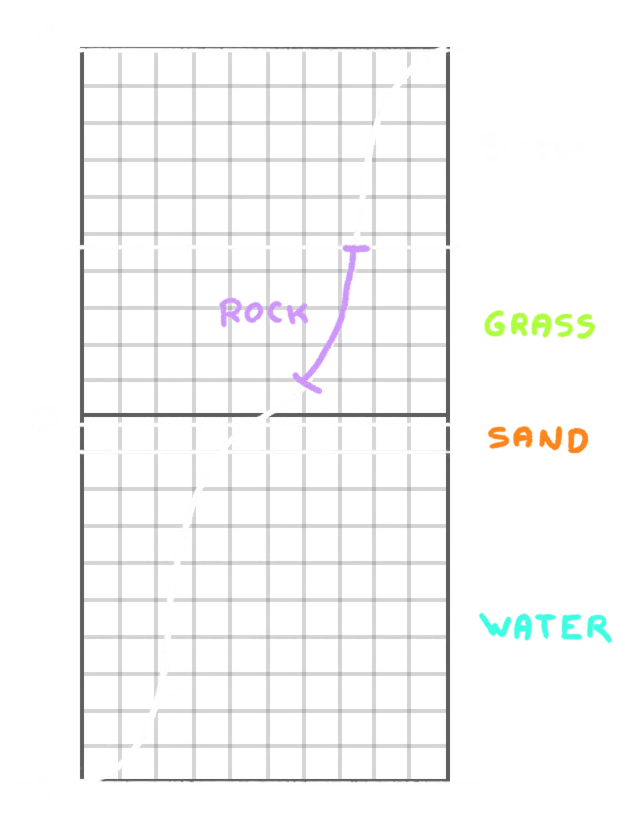
Some colors will change abruptly and some smoothly.
On top of that, we are going to add a rock color but only on near vertical faces.
First, in fragment.glsl, create a vec3 color variable, set it to white and send it to the csm_DiffuseColor:
void main()
{
    // Color
    vec3 color = vec3(1.0);

    // Final color
    csm_DiffuseColor = vec4(color, 1.0);
}
Each color we add is going to update the color.
Uniforms
We are going to need 6 colors. Instead of creating them one by one, or waiting until the end before adding the uniforms, let’s add all of them from the beginning:
- water deep:
#002b3d - water surface:
#66a8ff - sand:
#ffe894 - grass:
#85d534 - snow:
#ffffff - rock:
#bfbd8d
We are going to use the usual technique of creating the colors as properties independent from Three.js, add create corresponding tweaks to the debug panel and inject their values into Color uniforms.
In script.js, right before the uniforms object, add the following colors to the debugObject:
// Material
debugObject.colorWaterDeep = '#002b3d'
debugObject.colorWaterSurface = '#66a8ff'
debugObject.colorSand = '#ffe894'
debugObject.colorGrass = '#85d534'
debugObject.colorSnow = '#ffffff'
debugObject.colorRock = '#bfbd8d'

const uniforms = {
    // ...
}
Inject those properties into the corresponding uniforms using the Color class and the Uniform class:
const uniforms = {
    // ...
    uColorWaterDeep: new THREE.Uniform(new THREE.Color(debugObject.colorWaterDeep)),
    uColorWaterSurface: new THREE.Uniform(new THREE.Color(debugObject.colorWaterSurface)),
    uColorSand: new THREE.Uniform(new THREE.Color(debugObject.colorSand)),
    uColorGrass: new THREE.Uniform(new THREE.Color(debugObject.colorGrass)),
    uColorSnow: new THREE.Uniform(new THREE.Color(debugObject.colorSnow)),
    uColorRock: new THREE.Uniform(new THREE.Color(debugObject.colorRock)),
}
Add the corresponding tweaks using the addColor() method:
gui.addColor(debugObject, 'colorWaterDeep')
gui.addColor(debugObject, 'colorWaterSurface')
gui.addColor(debugObject, 'colorSand')
gui.addColor(debugObject, 'colorGrass')
gui.addColor(debugObject, 'colorSnow')
gui.addColor(debugObject, 'colorRock')
Using the onChange() method after each addColor(), update the corresponding uniform with the set() method:
gui.addColor(debugObject, 'colorWaterDeep').onChange(() => uniforms.uColorWaterDeep.value.set(debugObject.colorWaterDeep))
gui.addColor(debugObject, 'colorWaterSurface').onChange(() => uniforms.uColorWaterSurface.value.set(debugObject.colorWaterSurface))
gui.addColor(debugObject, 'colorSand').onChange(() => uniforms.uColorSand.value.set(debugObject.colorSand))
gui.addColor(debugObject, 'colorGrass').onChange(() => uniforms.uColorGrass.value.set(debugObject.colorGrass))
gui.addColor(debugObject, 'colorSnow').onChange(() => uniforms.uColorSnow.value.set(debugObject.colorSnow))
gui.addColor(debugObject, 'colorRock').onChange(() => uniforms.uColorRock.value.set(debugObject.colorRock))
In fragment.glsl, retrieve all 6 uniforms as vec3:
uniform vec3 uColorWaterDeep;
uniform vec3 uColorWaterSurface;
uniform vec3 uColorSand;
uniform vec3 uColorGrass;
uniform vec3 uColorSnow;
uniform vec3 uColorRock;
Position varying
We want to use those colors according to the elevation.
We need that elevation from the vertex shader, but instead of just sending the elevation, we are going to send the whole csm_Position, which will come in handy soon.
In vertex.glsl, create a vec3 vPosition varying and send it the csm_Position:
varying vec3 vPosition;

// ...

void main()
{
    // ...

    // Varyings
    vPosition = csm_Position;
}
In fragment.glsl, retrieve the vec3 vPosition varying:
varying vec3 vPosition;Water
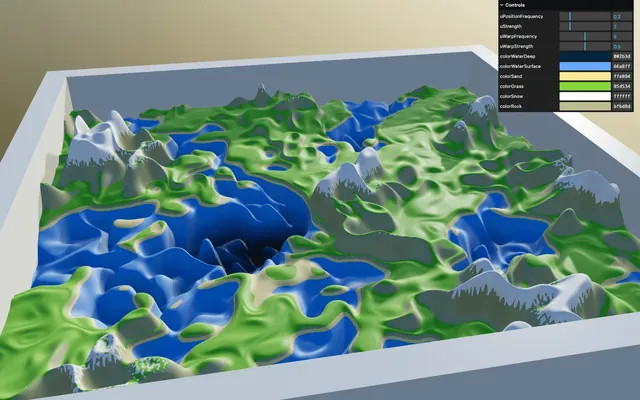
We are going to proceed from the bottom up and start with the water.
We want to mix between the uColorWaterDeep and the uColorWaterSurface when the vPosition.y goes from -1.0 to -0.1.
We are going to use a smoothstep on vPosition.y from -1.0 to -0.1 and save the result as a float surfaceWaterMix:
void main()
{
    // ...

    // Water
    float surfaceWaterMix = smoothstep(- 1.0, - 0.1, vPosition.y);

    // ...
}
Next, use the mix function to mix between uColorWaterDeep and uColorWaterSurface according to surfaceWaterMix and assign the result to color:
void main()
{
    // ...

    // Water
    float surfaceWaterMix = smoothstep(- 1.0, - 0.1, vPosition.y);
    color = mix(uColorWaterDeep, uColorWaterSurface, surfaceWaterMix);

    // ...
}
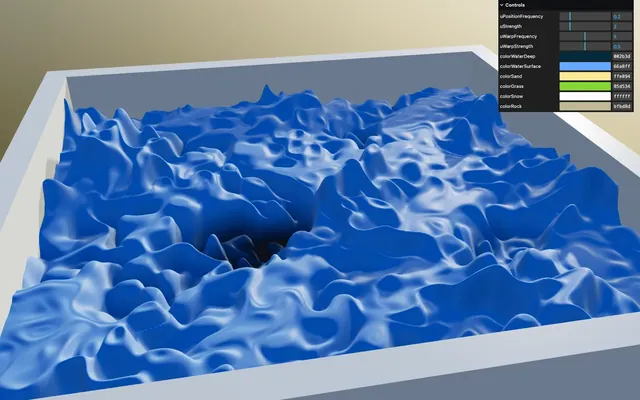
Welcome to Waterworld.
Sand
We are going to clearly divide the water and the sand.
Instead of using an if statement, we are going to use the step function.
After the water part, use a step on the vPosition.y with a threshold to -0.1 and assign it to a float sandMix variable:
void main()
{
    // ...

    // Water
    // ...

    // Sand
    float sandMix = step(- 0.1, vPosition.y);

    // ...
}
Use the mix function to mix between color and uColorSand according to sandMix, and assign the result to color:
void main()
{
    // ...

    // Sand
    float sandMix = step(- 0.1, vPosition.y);
    color = mix(color, uColorSand, sandMix);

    // ...
}

Grass
Let’s go through the exact same process, but this time around for the grass.
Name the variable grassMix and set the threshold to -0.06:
void main()
{
    // ...

    // Sand
    // ...

    // Grass
    float grassMix = step(- 0.06, vPosition.y);

    // ...
}
Use the mix function to mix between color and uColorGrass according to grassMix, and assign the result to color:
void main()
{
    // ...

    // Grass
    float grassMix = step(- 0.06, vPosition.y);
    color = mix(color, uColorGrass, grassMix);

    // ...
}
Snow
And again, but for the snow.
Name the variable snowMix and set the threshold to 0.45:
void main()
{
    // ...

    // Grass
    // ...

    // Snow
    float snowMix = step(0.45, vPosition.y);

    // ...
}
Use the mix function to mix between color and uColorSnow according to snowMix and assign the result to color:
void main()
{
    // ...

    // Snow
    float snowMix = step(0.45, vPosition.y);
    color = mix(color, uColorSnow, snowMix);

    // ...
}
It looks okay, but too regular.
We are going to add variations using the usual Simplex Noise function according to the vPosition.xz and apply that Simplex Noise to the 0.45 threshold.
Before the main(), include ../includes/simplexNoise2d.glsl:
#include ../includes/simplexNoise2d.glslCreate a float snowThreshold variable, to which you assign 0.45. Then, use it on the step:
void main()
{
    // ...

    // Snow
    float snowThreshold = 0.45;
    float snowMix = step(snowThreshold, vPosition.y);
    color = mix(color, uColorSnow, snowMix);

    // ...
}
No difference, but we can now apply the Simplex Noise to the snowThreshold.
Call simplexNoise2d() according to vPosition.xz and add the result to snowThreshold:
void main()
{
    // ...

    // Snow
    float snowThreshold = 0.45;
    snowThreshold += simplexNoise2d(vPosition.xz);

    // ...
}
Increase the frequency by multiplying vPosition.xz by 15.0:
void main()
{
    // ...

    // Snow
    float snowThreshold = 0.45;
    snowThreshold += simplexNoise2d(vPosition.xz * 15.0);
    // ...
}
Lower the intensity by multiplying the whole simplexNoise2d() by 0.1:
void main()
{
    // ...

    // Snow
    float snowThreshold = 0.45;
    snowThreshold += simplexNoise2d(vPosition.xz * 15.0) * 0.1;
    // ...
}
It’s kind of what we wanted, but the pattern doesn’t follow the animation.
It’s caused by what we did in the vertex.glsl and the getElevation function, we applied uTime to the warpedPosition.
To fix that, add the same uTime to the vPosition.xz:
void main()
{
    // ...

    // Varyings
    vPosition = csm_Position;
    vPosition.xz += uTime * 0.2;
}
Rock
For the rock, we want it to be visible when the surface is almost vertical, but only above the grass level.
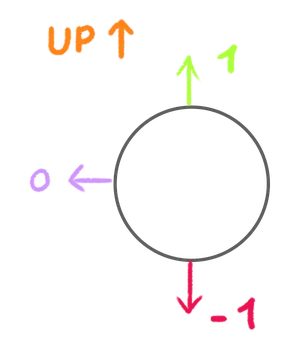
We are going to use the dot product of the normal.
Instead of sending the whole normal to the fragment, we are going to calculate the dot product in the vertex shader and only send the result to the fragment shader.
In vertex.glsl, create a float vUpDot varying:
varying float vUpDot;In main(), use the dot function on csm_Normal against a vector going straight up:
void main()
{
    // ...
    vUpDot = dot(csm_Normal, vec3(0.0, 1.0, 0.0));
}
In fragment.glsl, retrieve the float vUpDot varying:
varying float vUpDot;We don’t want the rocks to cover the snow, which is why we are going to put it right before the snow.
Create a float rockMix variable, to which you assign vUpDot:
void main()
{
    // ...

    // Rock
    float rockMix = vUpDot;

    // Snow
    // ...
}
Currently, vUpDot returns 1.0 when the face is oriented perfectly up and 0.0 when the face is oriented perfectly sideways:
We can use a step on vUpDot with a threshold of 0.8:
void main()
{
    // ...

    // Rock
    float rockMix = vUpDot;
    rockMix = step(0.8, rockMix);

    // ...
}
Then use the mix function to mix between color and uColorRock according to rockMix and assign the result to color:
void main()
{
    // ...

    // Rock
    float rockMix = vUpDot;
    rockMix = step(0.8, rockMix);
    color = mix(color, uColorRock, rockMix);

    // ...
}
Unfortunately, it’s the opposite of what we wanted.
We can fix that easily by subtracting the step from 1.0:
void main()
{
    // ...

    // Rock
    float rockMix = vUpDot;
    rockMix = 1.0 - step(0.8, rockMix);
    color = mix(color, uColorRock, rockMix);

    // ...
}
Or by inverting the two parameters of the step, but let’s stick to something that is easier to understand.
The rock is currently visible in the water. To fix that, we can multiply rockMix by the same step we used for the grass:
void main()
{
    // ...

    // Rock
    float rockMix = vUpDot;
    rockMix = 1.0 - step(0.8, rockMix);
    rockMix *= step(- 0.06, vPosition.y);
    color = mix(color, uColorRock, rockMix);

    // ...
}
Great! Now we are done with the colors.
Water surface 01:20:46
One last addition to make our procedural world shine is to add a water surface. We want that surface to refract what’s below, to blur it and to reflect the environment map and the light.
We are going to use the MeshPhysicalMaterial and its transmission feature.
In script.js, after the Terrain section, add a water Mesh using a PlaneGeometry and a MeshPhysicalMaterial:
/**
 * Water
 */
const water = new THREE.Mesh(
    new THREE.PlaneGeometry(10, 10, 1, 1),
    new THREE.MeshPhysicalMaterial()
)
scene.add(water)
Rotate the Mesh and move it down to -0.1 so that it matches where the water stops in the fragment shader:
const water = new THREE.Mesh(
    new THREE.PlaneGeometry(10, 10, 1, 1),
    new THREE.MeshPhysicalMaterial()
)
water.rotation.x = - Math.PI * 0.5
water.position.y = - 0.1
scene.add(water)
Set the transmission property of the MeshPhysicalMaterial to 1 and the roughness to 0.3:
const water = new THREE.Mesh(
    new THREE.PlaneGeometry(10, 10, 1, 1),
    new THREE.MeshPhysicalMaterial({
        transmission: 1,
        roughness: 0.3
    })
)
water.rotation.x = - Math.PI * 0.5
water.position.y = - 0.1
scene.add(water)
Going further 01:22:53
We are done, but there is room for improvement.
Here are some suggestions:
- Try funny colors
- Improve how colors are being mixed
- Add textures
- Add biomes
- Control the translation on drag and drop
- Add clouds
- Add details and textures to the board